[picture heavy post!]
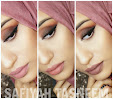
So this is my first picture tutorial.. it took a while and is a lot more longer to do than my normal posts but I had the time so I thought why not! I tweeted for colour combination suggestions for my next makeup look and Sarah of Glittery Allsort suggested a turquoise silver look. I decided to make use of my new Kiko purchase and do a white-turquoise look using the 169 white glittery eyeshadow and the LE Sleek Caribbean palette again (it's becoming a favourite!)
I hope you like this colour combo, I'm starting to like doing contrasting cut creases of late, so hope you don't mind a break from the neutrals!
Products used:
> UDPP & NYX JEP in Milk
> Kiko single e/s in 169
> La Femme pressed eyeshadow (refill in Z palette) White
> Sleek Caribbean palette - Apres Midori, Blue Lagoon, Purple Haze, Singapore Sling & Espresso Martini
> UD 24/7 eye pencil in Zero
> UD Ink for Eyes in Zero
> UD Heavy Metal glitter liner - Catfight
> UD Cannonball and Curling Mascara
> Khuraira ACC in light & MAC studio concealer in NC35
> UD Brow box in Brown Sugar
> Kiko Warm Tangerine Glow blush palette
> Kiko Super Gloss in 129
Start by applying UDPP to the eyelid:


So the final look:


<3


Very beautiful ;) I love it!
ReplyDeletegood job : <3
ReplyDeleteThis is such a beautiful look...I'm gna try attempting it...x keep up the gud wrk though..x
ReplyDeleteHow pretty! I like these white base looks alot.. And it is really nice that u made a picture tutorial widdit, thanks babe! I'll be looking out for more, inshAllah!
ReplyDeleteLove u, muahh!
Yayy a Pik-torial!
ReplyDeleteI Love this look, Very pretty Masha'Allaah!
Hope to see more piktorialz soon =p
Maymoonah xx
very artistic love it
ReplyDeleteI love this look. Thank you so much for the tutorial it's really useful. x
ReplyDeleteNicely done!! You have awesome lashes!
ReplyDeleteWOW !! AMAZING !! :)
ReplyDeleteMasha allah you have such pretty eyelashes you don't need mascara.
ReplyDeletegreat post! love the look =) xxx
ReplyDeletehttp://samram1214.blogspot.com/
that is amazing. so perfect! xo
ReplyDeleteeeevc.blogspot.com
thank you my lovelies! hope you enjoyed the look as much as I did creating it, please do let me know if any of you attempt it, would love to see!
ReplyDeleteHope to do more tutorials too (if I get the time!)
<3
I love this look! I've been feeling so uninspired to create any looks lately, but you make me really want to step up my sneaker inspired makeup series!!
ReplyDeleteWOOOW THAT`S SOOOO GREAT:D YOU ARE SO AWESOME AND BEAUTIFUL!!!
ReplyDeleteWow! So lovely, really great!
ReplyDeleteThe colours look great on you ! And the step by step pictures were great. So pretty :)
ReplyDeleteNew Follower <3 Love This Look. Just Beautiful :) You Are Very Talented & Happy i Found Your Blog. Would Love If You Could Swing By Mine & Follow Back :)
ReplyDeleteOMG, your makeup application is flawless!And you are so pretty, mashAllah. Count me in as your follower ;)
ReplyDeleteReally awesome blog too.
Check mine out: allthingsgirlish.blogspot.com
would love any suggestions from you.
cheerio!
Amazing love the final look!!
ReplyDeleteAbsolutely gorgeous, x
ReplyDeleteBeautiful, love how the look has come together at the end xx
ReplyDelete