Showing posts with label glitter. Show all posts

FF: Ariana Grande No Tears Left To Cry makeup look

Friday, 27 April 2018

I'm back with another makeup look taken from my instagram, but worthy of writing up on the blog due to it being hugely popular on my IG!

This look is a recreation of Ariana Grande's makeup in her latest video after she's been in hiding for months.
There's a few looks in her No Tears Left To Cry video including a smoked out extended wing eyeliner look, but I chose to recreate the glitter underliner look with matte lips and the full on glitzy eyes and lips look.
It was created by none other than Mario Dedivanovic (Makeup By Mario) and when I saw the full on sparkly look I was obsessed and knew I had to try and recreate it.

Read on to see the products used in these too looks!

FF: Soft Glitter Cut Crease Make Up Look + Tutorial

Friday, 4 November 2016

In case you haven't noticed, I've been pretty consistent with my blogging this year; I feel like I have my blogging mojo back and feel inspired with my consistent posts so if you're a fan of these or find them helpful, please do comment below and let me know what you'd like to see more of!

This week's makeup look is a fairly simpler/less harsh version of a glitter cut crease that I created back in 2013 (blog post here, check out my marker pen brows though!)

Anyways, here's the final look and I decided to create a corresponding YouTube tutorial with it below (yay!), so let me know if you recreate it and if you found it easy enough to follow!

FFF: Motives Spring Fever x Urban Decay Gwen Cheeks & Lips Makeup Look

Friday, 11 March 2016

Gosh this post's title is a mouthful! These days I try and specify the products used in a look seeing as I've kind of already used the colours to describe a look plenty of times before lol.

Anyway, as the title suggests, this look uses a combination of the new Spring Fever collection from Motives Cosmetics and the new additions to the Urban Decay x Gwen Stefani collection - the Blush Palette and 24/7 lip liners and lipstick.


Products used
Eyes: 
• UDPP - Eden
• Anastasia Beverly Hills Dipbrow Pomade - Chocolate
• Motives Cosmetics Pressed Eyeshadows: Temperature Rising (crease, blended up and outer corner of eyelid), Tension (inner corner & browbone), Sizzle and Hot! Hot! Hot! (inner eyelid), Summer Glow and Summer Fling (middle and end of eyelid),  Steamy Night (lighthanded on outer corner/crease)

• Motives Gem Sparkles Eye Glitter - Citrine
• Rimmel ScandalEyes pencils - Nude

• Inglot AMC Gel Eyeliner - 77
• NYC Liquid Eyeliner 
• Ardell Demi Wispie lashes (120)
 
Face:
• NARS foundation - Stromboli
• Motives Cosmetics 
Liquid Correction Concealer - Light
• Urban Decay Gwen Stefani Blush Palette - Lo-Fi as contour, Easy as blush
• Motives Sculpt and Shape - contour shade only
• theBalm - Mary Lou Manizer  
  

Lips: 
• Urban Decay Gwen Stefani 24/7 Glide On Lip Pencils - Ex-Girlfriend, 714 and Rock Steady


Illamasqua Glamore Collection launch

Thursday, 27 February 2014

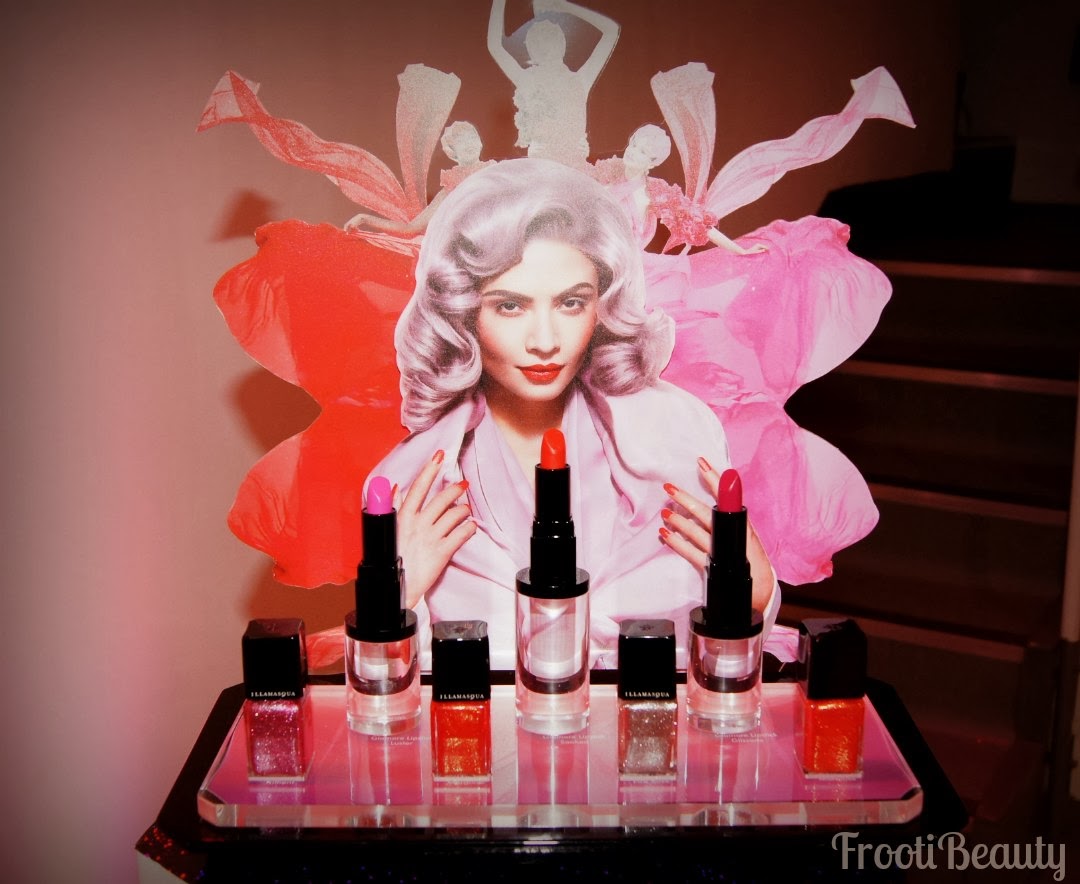
Last week I attended the Illamasqua event for their new Glamore Collection, where I met and chatted with the amazingly talented and inspiring founder Alex Box (who is always so grounded, absolutely love her!)
Glamore collection with an extra "Marquise" nail varnish
We talked about the new collection and how it was all very girly and glam but also perfect for Spring with the floral type visuals. Alex wanted to show how these glamorous colours can suit any skin tone (see the visual below) and I have to say I was sceptical at first when I saw the cool toned pink for my own skin tone but once trying it out at the event I was pleasantly surprised!
a couple of us bloggers (Sheenie, Leanne, Priya & Sharmin) wearing the new lipsticks at the event photobooth
The collection features:
3 satin finish lipsticks (£16.50 each):
  • Luster
  • Glissade
  • Soaked
3 glitzy "Shattered Star" nail colours (£15 each):
  • Trilliant
  • Fire Rose
  • Marquise
It also includes a repromote of the Eye Brow Cake (£15.50) and Angled Brush (£19) to frame the face with these gorgeous lipsticks.

I decided to get a manicure done similar to one Alex was sporting with an ombre glitter effect and chose the colours Trilliant (a light pink shimmery shade with chunkier silver glitter) and Fire Rose (bright pink shimmer with silver glitter too):
holding shade "Trilliant" with ombre mani in Trilliant and Fire Rose
I was more drawn to the pinks in this collection, however on trying the Marquise nail polish, I absolutely loved that it had a pinky-gold hint with one coat and turned into a beautiful golden burnt orange-red when using two coats:
As for the lipsticks, I absolutely adore them, not only for the colours and longevity, but also because of the new satin texture which is massively different to their usual much drier textures as you can see in the swatches below:
I have to say I was quite surprised not to find an outlandish product in this collection as Illamasqua are known for their dare-to-be-different shades; personally this collection is my favourite to date as I am a huge girly girl and love anything sparkly or pink/purple and this collection hits all of these points on the head perfectly. 

I really can't fault this collection on any points as I feel there's something for everyone here and it will certainly draw more mainstream makeup lovers back to Illamasqua once again.
 
The collection is available globally from today (27th February) at Illamasqua.com and in stores.

What do you think of this collection? Have any particular products caught your eye?


Tuesday Takeover: Truly Madly Beauty

Tuesday, 11 February 2014

This weeks guest poster is the lovely Aysh from Truly Madly Beauty, who I've followed for a while now; I think we've both been blogging for around the same time in 2010 and I love her nail posts.. totally wish I could have the patience to do nails!

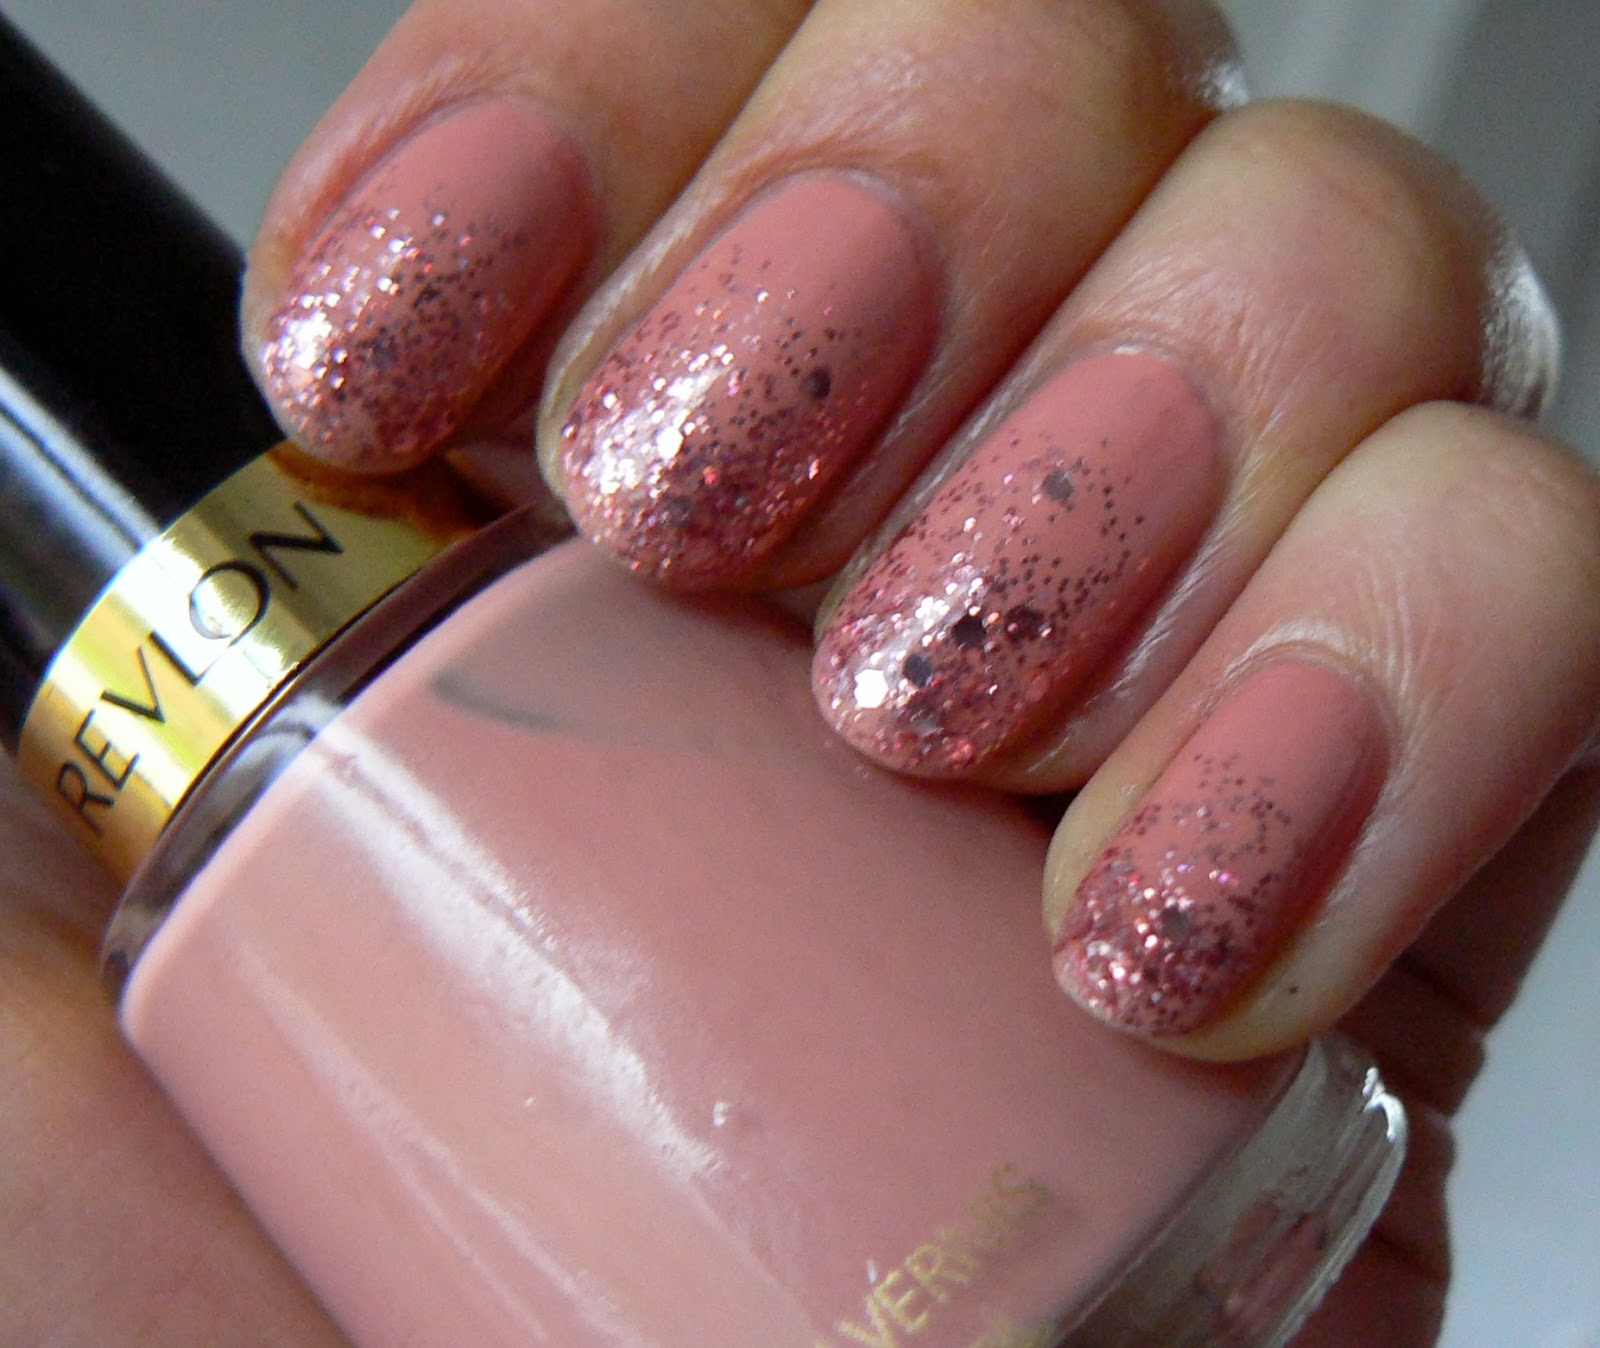
Revlon Sparkling Glitter Gradient

Well helloooo there lovely FrootiBeauty readers! How are you all doing? My name's Aysh & I blog over on Truly Madly Beauty :)
First things first, thank you so much to the lovely Safiyah for letting me loose on her blog today! It's such an honour as I absolutely adore this lovely lady's blog of which I've been following for yonks & am in complete awe of her make up skills. Its my wish to one day have my make up done by this talented lady! :D
Now whilst I love all things make up & beauty, if you're familiar with my blog you'll know that its nails that I am mostly passionate about & enjoy doing so I thought I'd share a quick little mani with you lovelies today! 
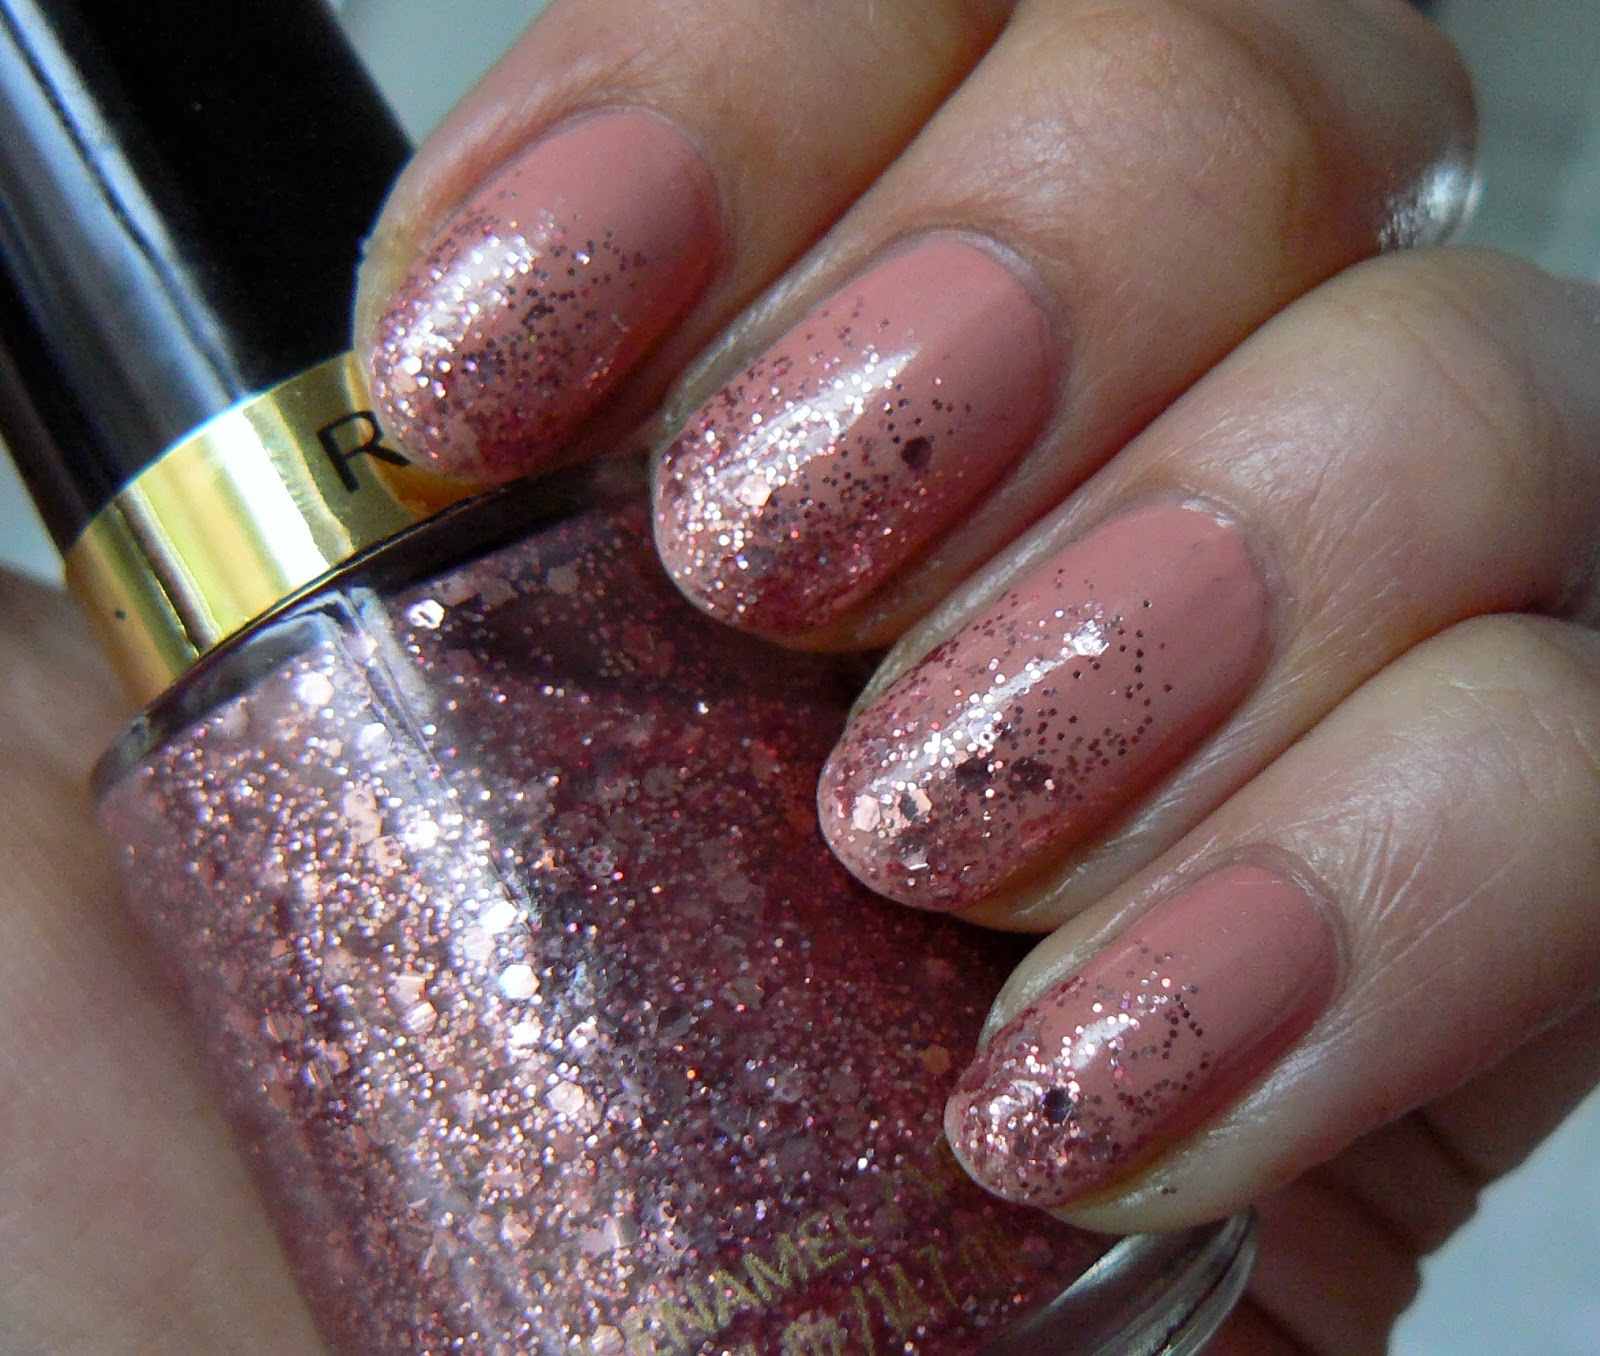
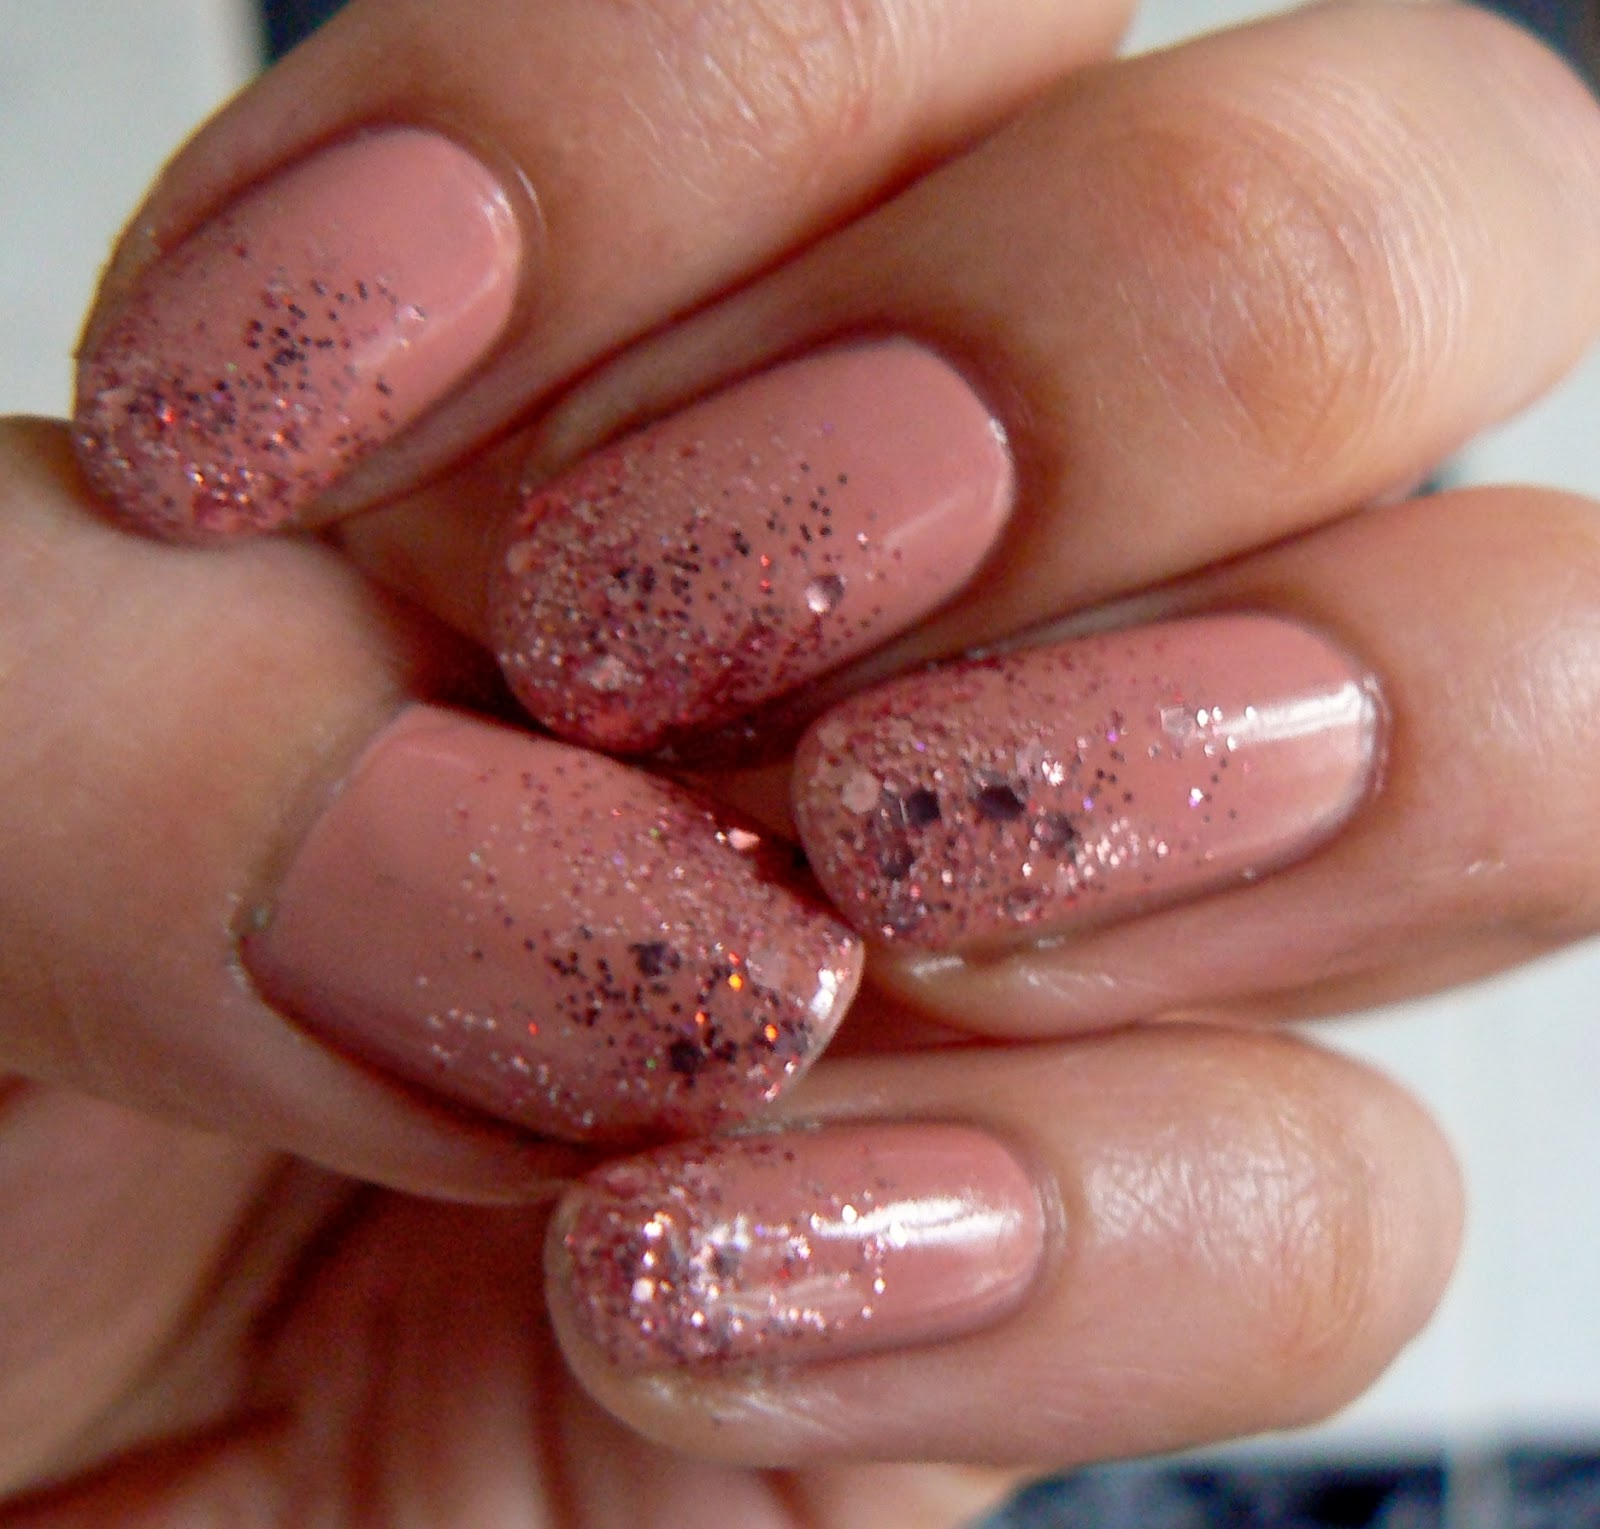
Whenever I'm stumped or lost for ideas/inspiration when it comes to nail art, I always like to go for a nice glitter gradient. Not only are they so easy to do, but its super quick, looks pretty & doing a gradient is a fab way of jazzing up an otherwise ordinary mani. Here I've used Revlon's Touch Of Mauve & Revlon's Sparkling for the gradient.
I started off with my base which was two coats of Revlon's Touch Of Mauve, a lovely pink based nude crème. I actually found this lovely in Poundland, which is one of my FAVOURITE little hunting grounds for polishes! I've found some right pretties in the past including Sally Hansen, OPI & Loreal so I definitely recommend you pop in to your local Poundland to see what treasures you can find!
Then for the gradient I used Revlon's Sparkling which is a lovely pale pink glitter made up of both small & large hexagonal glitters in a clear base. To begin the gradient its best to start off with just a little glitter on the brush, wiping off any excess on the bottle rim, then starting about three quarters of the way on your nail brushing upwards towards the tip.
Once you've done all ten nails, go back to the first with a bit more glitter & apply in the same way but this time starting from the middle. Depending on the denseness of the glitter used you can also go in for a third time, this time applying mostly on the tips, which I've done here.
Finish off with a nice thick coat of topcoat to shine & smoothen all that glitter & thats it! Glitter Gradient nails ready to go. Because of all the glitter layers, drying time may be a wee bit longer than normal but having a quick drying topcoat helps!

Hope you liked the mani lovelies! Thank you again Safiyah for having me on your blog today!
Lotsa love to ya!

Aysh xoxo 

Twitter: Aysh_tmb
Instagram: Aysh_xox

FFF: Purple-Pink Glittery Makeup Look

Saturday, 21 December 2013

Hello my lovelies!

This week's FFF is a Purple-Pink look inspired by my one of my newest acquisitions from my wishlist: the MAC Nocturnals Silver & Violet pigment set.

I haven't done a look with pink in a while it seems (aside from the Rose-Gold look from the Naked 3 palette of course!), so I hope you enjoy this one!

Products used:
Eyes: 
> UDPP - Eden

> NYX JEP - Black Bean
> MAC Nocturnals Pigments & Glitter Set - SIlver & Violet - Vanilla, Kitschmas, Push The Edge, Pink Glitter

> Motives Glitter Adhesive
> UD Naked Basics - Foxy, Naked2  
> UD 24/7 Shadow Pencil - Delinquent
> UD Perversion 24/7 eye pencil 
> Rimmel ScandalEyes Kohl liner in Nude 5 
> NYC black liquid liner 
> Daniel Sandler Jumbo Jet Mascara
> Estee Lauder Double Wear High Cover concealer - 2W
> Anastasia Beverly Hills Brow Wiz and Brow Powder Duo - Ebony
> Ardell Professional 120 Demi lashes 
Face: 
> Estee Lauder Invisible Fluid foundation 2WN1 
> Motives Sculpt & Shape Duo 
> MAC Bronzing Powder - Refined Golden
> UD Shattered Palette - Temper Blush
Lips:
> UD SSLC in Lovechild

I started by priming the eye with Eden PP and Vanilla pigment on the brow bone and inner corner with Push The Edge all over the eyelid, blending upwards. Naked2 from the Naked Basics palette above the crease and Foxy to blend the harsh edges.

I patted Kitschmas over the middle of the eyelid on top of Push The Edge and pushed it further out on either side of the eye. I then applied the Pink Glitter to the centre of the eyelids with Motives Glitter Adhesive and my finger.
Delinquent 24/7 Shadow Pencil was used for the bottom lashline with Rimmel Scandal Eyes Nude liner for the bottom inner eye, whilst UD Perversion eye pencil was used for the inner top eye.
NYC liquid liner was then used to line the top eyelid with a slight flick and after concealing under the eye with Estee Lauder concealer, I finished with Daniel Sandler Jumbo Jet mascara and Ardell 120 lashes, filling in the brows with Anastasia Beverly Hills Brow Wiz and Brow Powder Duo in Ebony, using it lightly:
For the rest of the face, I used Estee Lauder Invisible Fluid foundation and for the cheeks I used both the Motives Shape & Sculpt Duo and MAC Bronzing Powder in Refined Golden with a bit of Temper blush from UD.
On the lips I decided to keep it a light pink and went for the UD SSLC in Lovechild:

Trying to capture the sparkle!
I hope you enjoyed this makeup look, it can be used with other colours too which is great, so I would love to see if you recreate something like this!

Would you wear this look? What colours do you think would look nice with this particular look?  

Tuesday Takeover: SamRam

Tuesday, 8 October 2013

It's been a while since a Tuesday Takeover and as I've been away on holiday and busy with clients I figured I'd feature a fellow beauty blogger again to help me with my blogging load!
This weeks post features the new nail varnishes from Illamasqua's Creators collection by Sam of Sam's Beauty blog.

Illamasqua Creators Nail Varnishes

Hey guys!


Today I am guest posting on Frootibeauty's blog (thanks in advance Frooty!). She was sent two Illamasqua nail polishes from the new Creators line and asked me if I wanted to do the guest post – of course I said yes!

Illamasqua has released a new limited edition collection with four guest creators. This new collection is a unique social collaboration to celebrate 5 years of Illamasqua. Illamasqua joined forces with StyleSuzi, Vex in the  City, Pearls & Poodles and Munroe Bergdorf to create two lipglosses and nail polishes which take inspiration from the 4 corners of the online galaxy. The guest creators had an integral part to play in the production development. StyleSuzi and Vex in the City were the guest creators for the two nail polishes.


Perseid

First, StyleSuzi guest created the nail polish called Perseid. Suzi said she was inspired by the explosion of colours in the galaxy and she wanted to evoke the mysterious nature of the sky at night. She decided to use different sized glitters to create a texture as unique as a star.


Perseid is definitely a combination of a few glittery colours. I can see more purple but then a two-toned teal creeps in too, so it absolutely is a unique colour that reminds me of the night sky. I love the chunks of glitter and then the tiny glitters combined. The texture is amazing and literally one coat is enough. This does take a bit longer to dry, bearing in mind it’s a thicker consistency so it’s understandable. I love the different types and colours of the glitter. This definitely is a WOW nail polish.


Fusion

Vex in the City created the nail polish called Fusion. Yinka said she wanted to create a shade which reflected her vision of the galaxy. She wanted something dark, intense and mysterious with the magic of the stars shining through.


Fusion is a bronze and khaki colour combined. It’s very metallic and I really wish I had an eyeshadow in this colour. It has small glitter pieces compared to Perseid. Again, you literally only need to apply one coat. I think out of habit we tend to apply two but it makes no difference, one coat is good enough. This nail polish dried really fast too and it looks so gorgeous! 


Out of the two, I think I’m in love with Perseid! And super wow to Illamasqua nail polish quality. Never tried their polishes before but will look into buying some soon!
The polishes are limited edition and priced at the same price as the usual Illamasqua nail varnishes (£14.50) and can be bought here on the Illamasqua website.


Which is you fave out of the two?


Sam Ram 
x 


Gold Glitter Makeup Look

Tuesday, 1 January 2013

Hello my lovely followers!

I've been meaning to upload a glittery look for a while now seeing as I love it so much; I thought I'd make it similar to the Naked Arab post that is still very popular on my blog, but with added sparkle.
Although New Years Eve has passed, this can be used with any variation of colours/glitters for any special occasion, so I hope you like!

Products used:
Eyes:
> UDPP
> NYX JEP in Milk & Yogurt
> UD Naked palette: Naked, Buck, Half Baked, Darkhorse and Creep
> La Femme pressed eyeshadow (refill in Z palette) White
> NYC black liquid liner 
> Avon Supershock black eye pencil
> UD Heavy Metal glitter liner in Midnight Cowboy
> Make Up Store glitter in Super
> Daniel Sandler Jumbo Jet mascara
> Khuraira ACC in Light 
Face:
> Graftobian HD foundation in Desert Sand
> UD Razorsharp powder
> UD Toasted Bronzer
> Sleek Face Form in Medium (highlighter)
> Elf cream liner in black (eyebrows)  
Lips:
> UD SSLC in Lovechild & Punch Drunk

As always, I primed the eyes with UDPP and then applied NYX JEP in Yogurt on the eyelids and Milk from the crease to the browbone.
I then applied La Femme White eyeshadow to the brow bone, followed by Naked just above the crease, but under the brow bone. I then added Buck to the crease and Darkhorse to intensify the crease, blending upwards slightly and into the inner corner of the eye. Midnight Cowboy Heavy Metal Glitter eyeliner was used as the adhesive for the Make Up Store Super glitter, and both were applied to the full eyelid but stopping at the crease. Using a small liner-type brush, Half Baked was applied to the bottom lashline, and using a smaller crease brush Creep was used ever so lightly in the V/triangle shape formed at the outer crease of the eye, above the glitter.
I used NYC black liquid eye liner to line the top lid fairly dramatically, winging the flick out and Avon Supershock black eye pencil to line the inner eye both up and down.
I applied my concealer under the eye and finished the eyes by filling in the brows with Elf Cream liner (lightly) and Daniel Sandler Jumbo Jet mascara on the lashes (black):
For the rest of the face I used the Graftobian HD foundation in Desert Sand and UD Razorsharp powder on the areas needed. UD Toasted Bronzer was used to define the cheekbones and the highlighter from the Medium Sleek Face Form. UD SSLC in Lovechild and Punch Drunk were used on the lips:
Hope you like this look, I have another requested makeup look that I will post next, do let me know if you have any requests!

Do you wear glitter? Would you wear this look?


FFF: Purple-Green makeup look

Friday, 13 July 2012

This weeks FFF includes one of my favourite colours - purple! I used a green at the bottom for a mix that is sometimes seen in Asian clothing, so I hope you enjoy this look!

Products used:
Eyes:
> UDPP
> NYX JEP in Milk
> Sedona Lace 120 palette (2nd edition) - all eyeshadows
> MAC fluidline in Blacktrack
> UD 24/7 eye pencil in Covet
> UD Heavy Metal glitter liner in Stagedive
> Daniel Sandler Jumbo Jet mascara
> Khuraira ACC in Light
> MAC Studio Finish concealer - NC35
Face:
> YSL Le Teint Touche Éclat Foundation - BD50
> UD Razorsharp powder
> UD Baked Bronzer in Toasted
Lips:
> MAC lipstick in Quick Sizzle
> UD lipliner in Naked
> UD Stardust lipgloss in Andromeda

After I primed the eye with UDPP  & NYX JEP in Milk, I applied a matte lilac-purple (from the Sedona Lace palette) to the whole eyelid, followed by a more reddish purple (with slight shimmer) in the crease. A matte light pink shade was added to the brow bone and blended down into the reddish-purple in the crease.
I added a bit of a green shadow with a liner brush to the bottom lashline followed by UD Covet eye liner and Stagedive glitter liner on top.
For the topliner I used MAC fluidline in Blacktrack and also on the lower waterline.
Both Khuraira and MAC concealers were applied under the eyes and Daniel Sandler Jumbo Jet mascara to the lashes.

Trying to capture the glitter from this angle!
For the rest of the face I used a sample of the new YSL Le Teint Touche Eclat in BD50 and set it with UD Razorsharp powder.
I then used UD Baked Bronzer in Toasted on the cheeks and MAC Quick Sizzle (matte fuschia) first on the lips:
I then used a more nude colour on the lips (UD Naked lipliner) for those afraid of bright colours!: 
And finally added a bit of gloss (UD Stardust lipgloss in Andromeda) for a nude shine:
And there you have it! If you have any requests for makeup looks please feel free to comment below, email, tweet or write on my facebook page!

Which combination do you like best? Would you wear this look?


FFF: Cream-Brown makeup look

Friday, 1 June 2012

Apologies for the lack of posts lately, I've been sooo busy shooting and doing party makeups/sorting bridals plus I'm flying out tomorrow on holiday so I had a lot to do before then!
I have got a couple reviews and requested makeup looks coming up after I get back though so stay tuned ;)
This weeks FFF is inspired by another dress request using Sedona Lace's 120 palette (review coming soon!) and my usual favourites. So here's the dress:
 
 
Products used:
Eyes:
> UDPP
> NYX JEP in Milk
> UD Sedona Lace 120 palette palette (2nd Edition)
> UD Ink for Eyes in Demolition
> UD Heavy Metal glitter liner in Midnight Cowboy
> Daniel Sandler Jumbo Jet mascara
> Khuraira ACC in Light
> MAC Studio Finish concealer - NC35
Face:
> UD Surreal Skin Cream to Powder foundation - Supernova
> UD Toasted Bronzer
Lips:
> NYX SMLC in San Paulo
After priming the eye with UDPP & NYX JEP in Milk I applied a creamy gold colour to the full eyelid and a matte brown to the crease, blending upwards. Using the same creamy gold colour but lightly, I patted some onto the brow bone and blended it down into the brown.
UD Demolition liner was used to line the whole eye and also as a top liner and on the lower lash line, creating a double winged liner. Midnight Cowboy glitter was used in between the double wing and a little on the inner corner of the eye. I used the same matte brown eye shadow on the eyes to set the liner.
Daniel Sandler mascara was wiggled into the lashes followed by another matte brown from the palette and a bit of matte black; Khuraira & MAC concealers were used under the eye:
Trying to capture the glitter without flash!
For the rest of the face I used UD cream to powder foundation in Supernova and UD Baked bronzer in Toasted on the cheekbones; for the lips I used NYX SMLC in San Paulo:
And there it is, I hope you like this look!
It's a fairly simple look but the glitter and slightly shimmery brow bone dress this look up a bit for going to a wedding.

I'll be on holiday for a week so next weeks FFF will not be running unfortunately, but I'll be sure to get down to reviewing a couple products and doing makeup looks when I get back!


template design by Studio Mommy (© copyright 2015)