Showing posts with label red lips. Show all posts
Showing posts with label red lips. Show all posts
Emolyne Cosmetics - Metamorphosis Lips and Nails
Friday, 19 June 2020
Sunday, 24 December 2017
Of course when the Stunna Lip Paint was released I was dyinggg to get my hands on it to review but wanted to check it in person at Harvey Nichols first as not every red lipstick suits me despite it being described as a "universal red" and I wasn't willing to wait in a queue in this cold. So when it turned up in the post from their PR I was over the moon and knew I wanted to get it on my lips ASAP.
Now I don't generally wear red lipstick these days but seeing as it's a more wearable colour in this festive season, I thought I'd wear red a bit more to test it out; read on to see what I think of "Uncensored"...

Tuesday, 14 November 2017
It's been an age since I've had Tanzina (Makeup A to Z) guest posting on my blog, 4 years to be exact!
You can check her last guest post here, where she recreated one of my client party makeup looks.
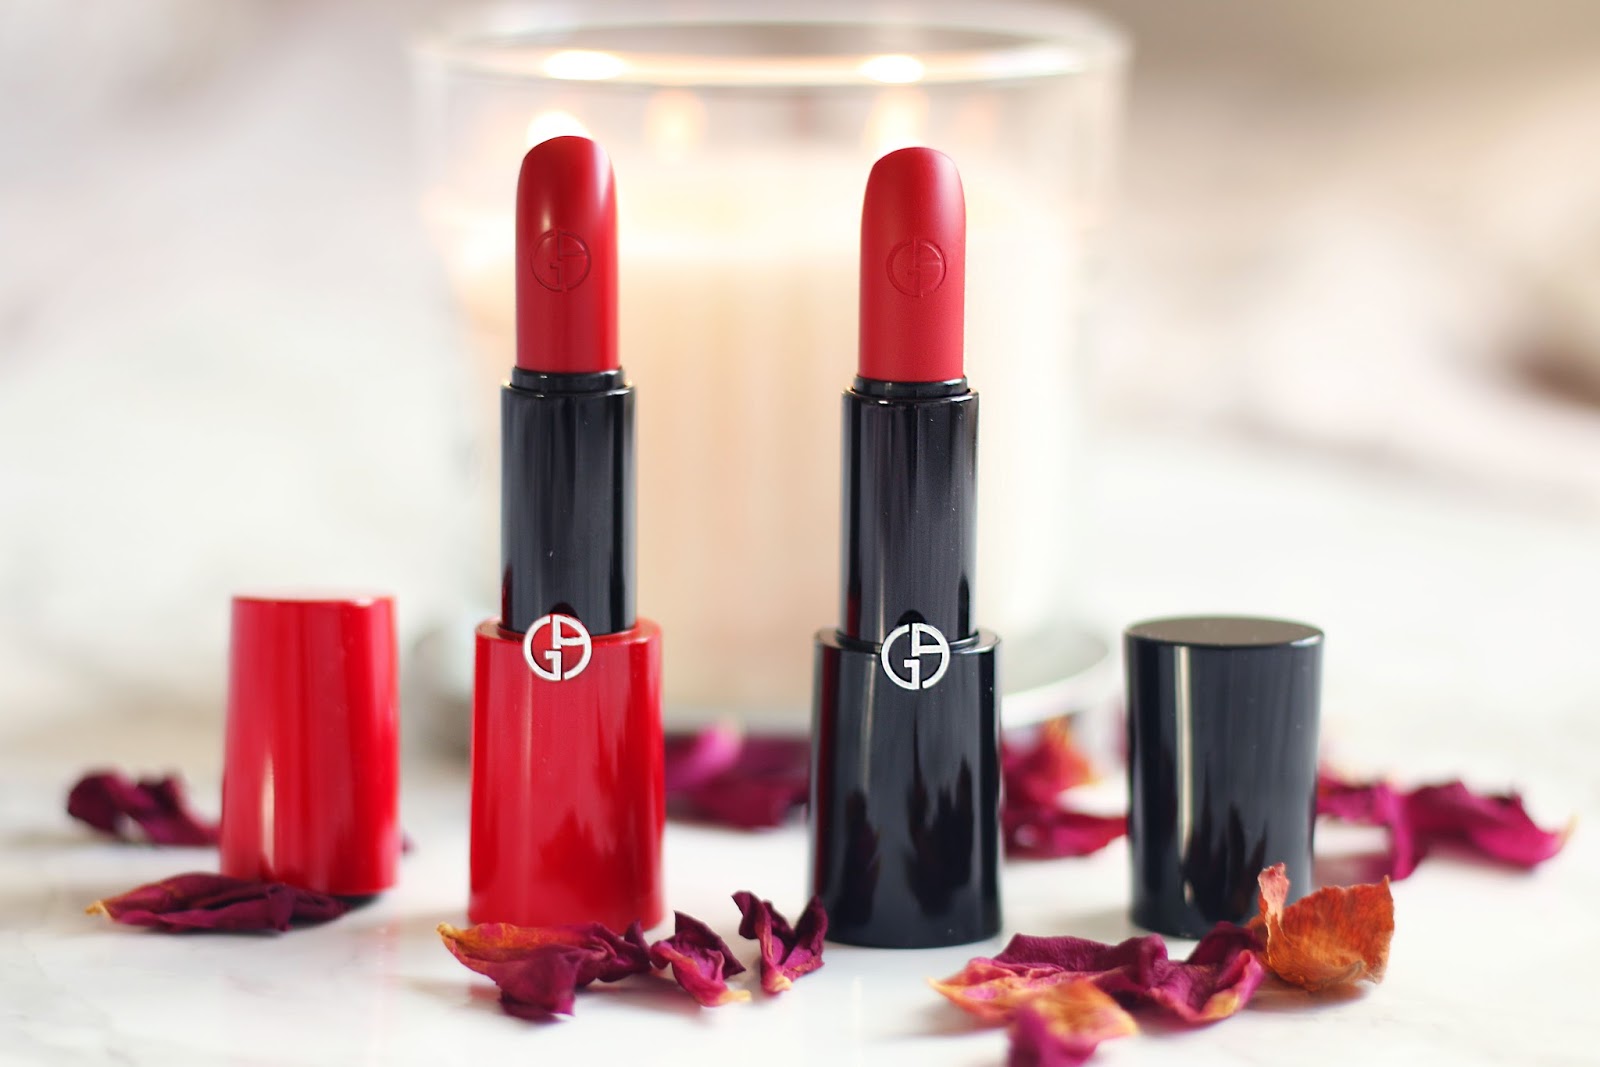
This time around she'll be reviewing a few red lipsticks that I was sent as red lipsticks are her thanggg and I knew she'd be the best person to review them, especially in this festive month when red is more likely to be worn. Read on to see how stunning she looks in them!
12
comments
⋅
Labels:
Armani Beauty,
Giorgio Armani,
guest post,
red lips,
red lipstick,
Tuesday Takeover


Sunday, 12 March 2017

Sunday, 7 June 2015
[picture heavy post!]
After attending the MUFE UK event 2 weeks ago, I knew people were dying to get their hands on some products so here's my review of the ever popular MUFE foundation and swatches of some of their Aqua range.

I also love the HD Powder to use on clients so I was happy to get a full size in my goody bag at the event.
6
comments
⋅
Labels:
foundation,
foundation files,
lip liner,
makeup forever,
MUFE,
red lips,
reviews,
sunday swatches,
swatches,
waterproof
Friday, 13 March 2015
Hi my lovelies!
Last week was a busy week for me as my baby boy turned 1, so I didn't get time to blog but not to worry, I'm back this week with a makeup look that I hope you like =D
I thought I'd go for another gold glittery look, the last one I did was back in January 2013 and this look is fairly similar, but using different brands. I also tweaked a couple things; instead of the black eyeliner on the lower waterline I opted for a nude in this look as well as wearing colour contacts of course, and I also tried two different shades of bold red lips this time around - the bright red Illamasqua "Maneater" lipstick and the dark berry Motives lipstick in "Naughty".
Products used:
Eyes:
• UDPP & NYX JEP in Milk
• Anastasia Beverly Hills Dipbrow Pomade - Ebony
• Motives eyeshadows: Whipped Cream (inner corner highlight), Gold Rush & Goddess (eyelid), Cappuccino & Hot Chocolate (crease), Vanilla (brow bone), Heavy Metal (lower lashline)
• MAC Reflects Gold Pigment with Anastasia BH Beauty Genius
• Urban Decay Midnight Cowboy and Baked Heavy Metal Glitter eyeliners
• Illamasqua Colouring Pencil Vow (lower waterline)
• NYC Liquid Eyeliner
• Estee Lauder Little Black Primer Mascara
• Ardell Lashes: Demi 117
• Lenses: Desio Lens in Forest Green
Face:
• Motives Quad in Medium
• House Of GlamDolls GlamBase Wheel for contouring and concealing under foundation, and "Illuminate" for highlighting on top
• Anastasia Beverly Hills Contour Kit - Fawn, Java, Havana for contour, Banana and Sand for highlight
• Motives Blush in Runway
Lips:
• Illamasqua lipstick in Maneater
• Motives lipstick in Naughty


Last week was a busy week for me as my baby boy turned 1, so I didn't get time to blog but not to worry, I'm back this week with a makeup look that I hope you like =D
I thought I'd go for another gold glittery look, the last one I did was back in January 2013 and this look is fairly similar, but using different brands. I also tweaked a couple things; instead of the black eyeliner on the lower waterline I opted for a nude in this look as well as wearing colour contacts of course, and I also tried two different shades of bold red lips this time around - the bright red Illamasqua "Maneater" lipstick and the dark berry Motives lipstick in "Naughty".
Products used:
Eyes:
• UDPP & NYX JEP in Milk
• Anastasia Beverly Hills Dipbrow Pomade - Ebony
• Motives eyeshadows: Whipped Cream (inner corner highlight), Gold Rush & Goddess (eyelid), Cappuccino & Hot Chocolate (crease), Vanilla (brow bone), Heavy Metal (lower lashline)
• MAC Reflects Gold Pigment with Anastasia BH Beauty Genius
• Urban Decay Midnight Cowboy and Baked Heavy Metal Glitter eyeliners
• Illamasqua Colouring Pencil Vow (lower waterline)
• NYC Liquid Eyeliner
• Estee Lauder Little Black Primer Mascara
• Ardell Lashes: Demi 117
• Lenses: Desio Lens in Forest Green
Face:
• Motives Quad in Medium
• House Of GlamDolls GlamBase Wheel for contouring and concealing under foundation, and "Illuminate" for highlighting on top
• Anastasia Beverly Hills Contour Kit - Fawn, Java, Havana for contour, Banana and Sand for highlight
• Motives Blush in Runway
Lips:
• Illamasqua lipstick in Maneater
• Motives lipstick in Naughty
Let me know which lip you prefer to go with this look and how it compares to my last gold glittery look!
4
comments
⋅
Labels:
EOTD,
FFF,
FOTD,
glittery looks,
gold eyeshadow,
makeup looks,
Motives Makeup,
red lips
Sunday, 16 February 2014
Following my previous FFF makeup look post on Friday (here) with red lips, I thought I'd do a corresponding Sunday Swatches blog post featuring the new Illamasqua I'm The One Valentines collection which was used for the red lips in the post.
The collection features four products in the colour of love and can be bought in a gift set from the Illamasqua site which saves you £9.50!
I'll be swatching the lip pencil and lipstick in this post as worn in the previous makeup look post so you can see the colours individially.

"Feisty" Lip Colouring Pencil
A new shade of red to their Colouring Pencils, this pencil is a beautiful Scarlet. I've only tried one other lip Colouring Pencil (Severity, a red grape colour) and was impressed with that shade too.
 Colour & Pigmentation: I don't usually find bright reds suit me but I was happy with this shade; I'd say it leans more on the orange-red side than blue red and has amazing colour payoff too.
Texture/Finish: For a lip pencil, I was pleasantly surprised at how soft it glided on, along with the pigmentation. It didn't feel drying on the lips despite it having a matte finish.
Longevity: As with all lip pencils, I found it to last at least 3 hours without budging, but I'd expect it to last a lot longer!
Price: At £14 it's the average price of a lip pencil for a high end brand.
FrootiFactor: As I quite like the longevity and feel of the pencils on my lips so far, I'd say these pencils are worth the price; Feisty is a flattering bright Scarlet red for most skintones so if you're looking for a lovely red, I'd recommend trying it. I give this pencil a 4.5 out of 5:
 Lipstick in "Maneater"
Another great lippie from Illamasqua, despite it not being a new shade, I've never tried this particular cherry red. The other reds I've tried from Illamasqua are Sangers (blood red) and Liable (orange red) but this particular red is a lovely blue based red that I prefer on myself for two reasons; first being my pigmented lips and second the illusion of whiter teeth when wearing blue-based reds.
 Colour & Pigmentation: The colour is a gorgeous blue-red as aforementioned, and the pigmentation as with all Illamasqua products is top notch.
Texture/Finish: Another matte finish lip product, it didn't feel drying on the lips compared to my Liable lipstick which was great!
Longevity: Matte lipsticks generally last the longest on the lips and again I found this lipstick to last at least 2 hours on its own (with a bit of a pleasant stain).
Price: At £16.50 it's slightly pricier than a MAC lipstick but of course being a huge fan of Illamasqua and luckily getting pro discount, I certainly think they're worth it.
FrootiFactor: I do like the colour, texture and pigmentation of this particular lippie so I have to give it s 5:

I'm not much of a gloss wearer but I have to say the new gloss shade in "Touch" from this collection was very pigmented (as with all Intense lipglosses from Illamasqua) and has a lovely depth to the colour with the different tones of sparkle (see first swatch picture in this post).
The nail varnish "Throb" is also to the usual high quality pigmentation of an Illamasqua varnish, one coat would give enough coverage, but two coats look very opaque and lush.
All Illamasqua products are available to buy instore or online at Illamasqua or Debenhams.
What are your favourites from this Valentine's I'm The One collection? Will you be buying any particular products?

The collection features four products in the colour of love and can be bought in a gift set from the Illamasqua site which saves you £9.50!
I'll be swatching the lip pencil and lipstick in this post as worn in the previous makeup look post so you can see the colours individially.

 |
| swatches of the I'm The One collection |
A new shade of red to their Colouring Pencils, this pencil is a beautiful Scarlet. I've only tried one other lip Colouring Pencil (Severity, a red grape colour) and was impressed with that shade too.
Texture/Finish: For a lip pencil, I was pleasantly surprised at how soft it glided on, along with the pigmentation. It didn't feel drying on the lips despite it having a matte finish.
Longevity: As with all lip pencils, I found it to last at least 3 hours without budging, but I'd expect it to last a lot longer!
Price: At £14 it's the average price of a lip pencil for a high end brand.
FrootiFactor: As I quite like the longevity and feel of the pencils on my lips so far, I'd say these pencils are worth the price; Feisty is a flattering bright Scarlet red for most skintones so if you're looking for a lovely red, I'd recommend trying it. I give this pencil a 4.5 out of 5:
Another great lippie from Illamasqua, despite it not being a new shade, I've never tried this particular cherry red. The other reds I've tried from Illamasqua are Sangers (blood red) and Liable (orange red) but this particular red is a lovely blue based red that I prefer on myself for two reasons; first being my pigmented lips and second the illusion of whiter teeth when wearing blue-based reds.
Texture/Finish: Another matte finish lip product, it didn't feel drying on the lips compared to my Liable lipstick which was great!
Longevity: Matte lipsticks generally last the longest on the lips and again I found this lipstick to last at least 2 hours on its own (with a bit of a pleasant stain).
Price: At £16.50 it's slightly pricier than a MAC lipstick but of course being a huge fan of Illamasqua and luckily getting pro discount, I certainly think they're worth it.
FrootiFactor: I do like the colour, texture and pigmentation of this particular lippie so I have to give it s 5:
I'm not much of a gloss wearer but I have to say the new gloss shade in "Touch" from this collection was very pigmented (as with all Intense lipglosses from Illamasqua) and has a lovely depth to the colour with the different tones of sparkle (see first swatch picture in this post).
The nail varnish "Throb" is also to the usual high quality pigmentation of an Illamasqua varnish, one coat would give enough coverage, but two coats look very opaque and lush.
All Illamasqua products are available to buy instore or online at Illamasqua or Debenhams.
What are your favourites from this Valentine's I'm The One collection? Will you be buying any particular products?
2
comments
⋅
Labels:
Illamasqua,
red lips,
red lipstick,
red makeup,
reviews,
sunday swatches,
swatches
Friday, 14 February 2014
Hello my lovelies!
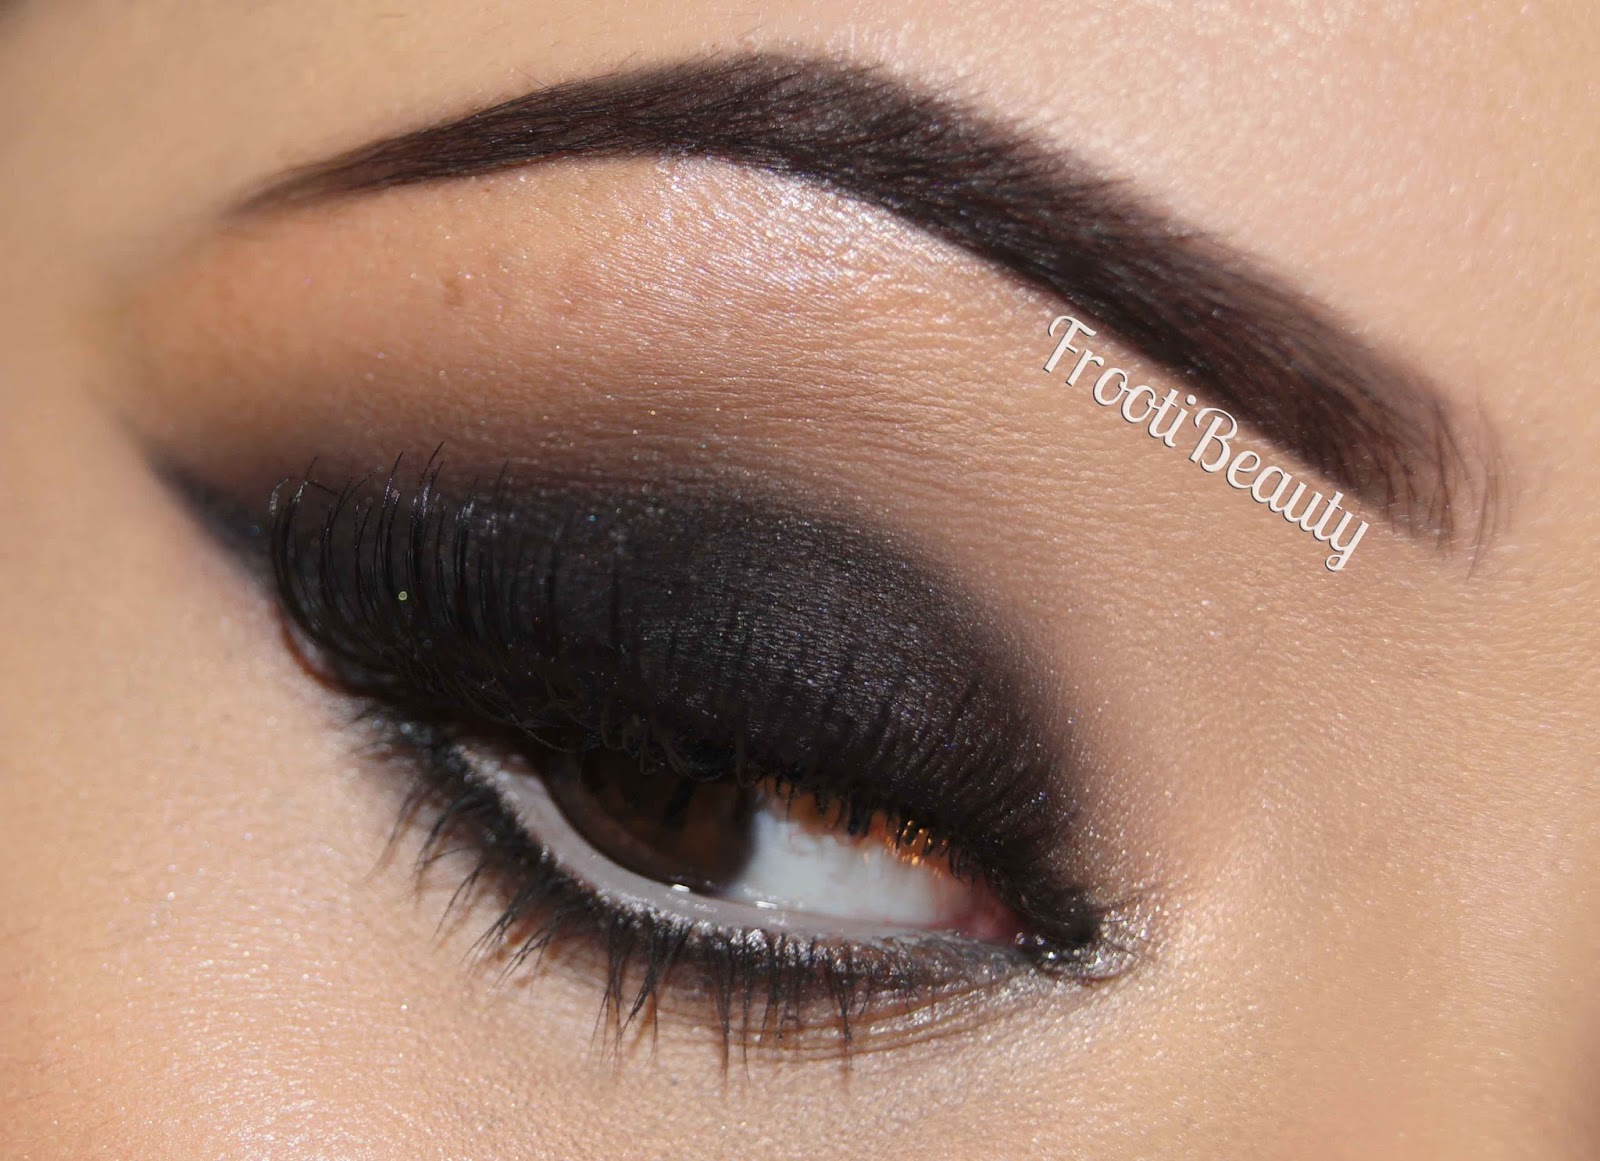
Today's makeup look is a quick, simple but sultry look, perfect for Valentines day if you wanted to go for a bit more drama.
I paired it with the red themed Illamasqua I'm The One Valentines collection (just the lip pencil and lipstick) for extra va-va-voom.. hope you like!
Products used:
Eyes:
> UDPP & NYX JEP in Black Bean
> Smashbox Full Exposure palette - mattes in black, brown and skintone colours
> Illamasqua Pure Pigment in Furore
> Illamasqua Sculpting Powder Duo (Lumos)
> Illamasqua Eye Colouring Pencil - Vow
> Inglot AMC eyeliner gel - 77 (black)
Lips:
After applying UDPP, I lightly applied the NYX JEP in Black Bean only on the eyelid, as in the last makeup look pictorial (here). I blended the JEP and added the matte black eyeshadow from the Smashbox Full Exposure palette, winging out the shadow and slightly buffing upwards. I then added 2 of the matte brown shades from the bottom left of the palette to the crease, gently buffing upwards. With an angled liner brush, I added the same matte black eyeshadow to the bottom lower lashline, blending slightly downwards.
The matte skintone colours were used to blend out any harsh lines and finally Illamasqua Pigment in Furore was patted onto the inner corner of the eye and Lumos from the Sculpting Powder Duo to the brow bone.
I lined the eyes with Inglot AMC Gel liner in 77 and lined the bottom inner eye with Illamasqua Eye Colouring Pencil in Vow.
The brows were then filled with Anastasia Dip Brow Pomade in Ebony and the lashes were coated with mascara and then Eylure Kimberley lashes added on top to finish off the look:
 For the rest of the face, I used Illamasqua's Skin Base in SB10 all over, setting it with UD Naked Powder in Medium Dark; I then sculpted the cheek with the Blush Up brush and
the contour shade from Motives Sculpt and Shape Duo, followed by Illamasqua's Sculpting Powder Duo in Heliopolis and Lumos to highlight.
For the rest of the face, I used Illamasqua's Skin Base in SB10 all over, setting it with UD Naked Powder in Medium Dark; I then sculpted the cheek with the Blush Up brush and
the contour shade from Motives Sculpt and Shape Duo, followed by Illamasqua's Sculpting Powder Duo in Heliopolis and Lumos to highlight.
For the lips I first used Feisty lip pencil by with Maneater lipstick on top:
 As you can see, although the technique is fairly simple, its definitely a stand-out/dramatic look; if you wanted to tone it down a bit, you could go for a nude lippie or gloss instead.
I hope you enjoyed this look, do let me know if you try it!
Today's makeup look is a quick, simple but sultry look, perfect for Valentines day if you wanted to go for a bit more drama.
I paired it with the red themed Illamasqua I'm The One Valentines collection (just the lip pencil and lipstick) for extra va-va-voom.. hope you like!
Products used:
Eyes:
> UDPP & NYX JEP in Black Bean
> Smashbox Full Exposure palette - mattes in black, brown and skintone colours
> Illamasqua Pure Pigment in Furore
> Illamasqua Sculpting Powder Duo (Lumos)
> Illamasqua Eye Colouring Pencil - Vow
> Inglot AMC eyeliner gel - 77 (black)
> Lancome Hypnose Star mascara
> Collection 2000 Lasting Perfection Concealer - Medium
> Eylure Girls Aloud lashes - Kimberley
> Anastasia Beverley Hills Dip Brow Pomade in Ebony
Face:
> Illamasqua Skinbase in SB10
> UD Naked Skin Ultra Definition Finishing powder - Medium Dark
> Motives Sculpt & Shape Duo
> Illamasqua Sculpting Powder Duo
> Illamasqua Lip Colouring Pencil - Feisty
> lllamasqua lipstick - Maneater
After applying UDPP, I lightly applied the NYX JEP in Black Bean only on the eyelid, as in the last makeup look pictorial (here). I blended the JEP and added the matte black eyeshadow from the Smashbox Full Exposure palette, winging out the shadow and slightly buffing upwards. I then added 2 of the matte brown shades from the bottom left of the palette to the crease, gently buffing upwards. With an angled liner brush, I added the same matte black eyeshadow to the bottom lower lashline, blending slightly downwards.
The matte skintone colours were used to blend out any harsh lines and finally Illamasqua Pigment in Furore was patted onto the inner corner of the eye and Lumos from the Sculpting Powder Duo to the brow bone.
I lined the eyes with Inglot AMC Gel liner in 77 and lined the bottom inner eye with Illamasqua Eye Colouring Pencil in Vow.
The brows were then filled with Anastasia Dip Brow Pomade in Ebony and the lashes were coated with mascara and then Eylure Kimberley lashes added on top to finish off the look:
For the lips I first used Feisty lip pencil by with Maneater lipstick on top:
I hope you enjoyed this look, do let me know if you try it!
10
comments
⋅
Labels:
EOTD,
FFF,
FOTD,
makeup looks,
red lips,
red lipstick,
romantic makeup,
smokey eyes,
smokey looks,
Valentines
Sunday, 15 April 2012
Apologies for the delay of FFF, it now is a FFS haha!
This weeks FFF was for a makeup company interview and inspired by the scarf I was wearing for it.. this was the mock up of what I'd wear so took a couple variations of the look! I ended up going with a pink-red lip coz I liked both, but let me know what you think..
Products used:
Eyes:
> UDPP
> NYX JEP in Milk
> MAC glitter & ice Warm palette - Winterscape
> MAC VV She Who Dares eyeshadow - Green side
> Too Faced Insurance Policy Palette - Lucky Charms
> Wet N Wild Comfort Zone palette - left side Eyelid & Crease shadows
> Sleek Au Naturel palette - Honeycomb, Bark & Noir
> UD 24/7 eye pencil in Zero & Covet
> MAC fluidline in Blacktrack
> Ardell 110 demi black lashes
> Khuraira ACC in Light
> MAC Studio Finish concealer - NC35
Face:
> Bourjois Healthy Mix foundation in 55
> MAC WonderWoman blush - Mighty Aphrodite
Lips:
> MAC Such Flare! lipstick
> MAC Quick Sizzle lipstick
After priming the eye with UDPP & NYX JEP in Milk I applied MAC Winterscape to the inner corners of the eyes and Too Faced Lucky Charms to the middle of the eyelid. The green side from MAC She Who Dares eyeshadow was used in the crease and outer corner of the eyes, buffing it upwards slightly, followed by Bamboo (Sleek Au Naturel palette) on the brow bone, blending down into She Who Dares. I also applied a bit of Noir to the outer corner to intensify the smokiness.
UD 24/7 eye pencil was added to the lower lash line followed by Lucky Charms using a liner brush; the inner eye was then lined by UD Zero pencil and topliner done with MAC fluidline in Blacktrack.
I used Ardell 110 demi black lashes and filled the top liner with more MAC fluidline; then filled in the brows with Sleek's Bark & Noir from the Au Naturel palette and concealed under the eyes to finish:

For the rest of the face I used Bourjois Healthy Mix foundation in 55 and MAC Wonderwoman in Mighty Aphrodite on the cheeks; for the lips I first used MAC Such Flare! lipstick:

I also tried the look with MAC Quick Sizzle lipstick:

I tried a different look on the other eye with the green "eyelid" colour in the Wet N Wild palette, but I didn't like it as much, so didn't feel it was worth taking pics of or doing!
I did do a neutral smokey look after, with the champagne & golden colours "eyelid" & "crease" in the Wet N Wild palette, leaving the green bottom liner:


I did end up going for a pink-red mix on the lips and green smokey look but I'd love to see which look you prefer!

14
comments
⋅
Labels:
EOTD,
FFF,
FOTD,
green eyeshadow,
MAC,
makeup looks,
pink lips,
red lips,
smokey eyes,
smokey looks
Wednesday, 23 November 2011
I got down to doing a quick makeup look the other night using my newest haul - from the MAC winter collection. If you'd like to see the palette and swatches you can see them here.
I did try to use as many colours as possible from the palette so hope you like it!
Products used:
> UDPP
> MAC Warm palette - Winterscape, Patina, Buckwheat, Gaelic Gold, Midnight Flurry
> MAC fluidline - blacktrack
> UD 24/7 eye pencil - zero
> Dior Show mascara - black
> Khuraira ACC - light
> MAC studio concealer in NC35
> UD Brow Box in brown sugar
> UD baked bronzer in Toasted
> MAC Such Flare lipstick
After priming the eyes with UDPP, I used Winterscape (the lightest silvery white shadow) on the inner corners and a bit on the brow bone with the MAC 239 SE brush. I used Patina and Gaelic gold further along the eyelid, starting with Patina and following along with Gaelic Gold. On the outer corner I used Midnight Flurry and blended Buckwheat upwards into the crease with the MAC 217 SE brush.
I used MAC fluidline in blacktrack to line the top eyelid, whilst using UD pencil in Zero to line the inside waterline. Using the liner brush (212 SE) I used the same shadows from the eyelid to create a symmetry on the lower lashline.
Using Dior Show on the lashes I wiggled the brush to bring the most out of the lashes, and concealed under the eyes with the Khuraira ACC and MAC studio concealer:
 For the rest of the face I used UD Baked bronzer predominantly on the cheeks and lightly brushed on the forehead, nose and chin. On the lips I used the MAC Such Flare lipstick, just one coat.
 Have you bought any products from this years MAC winter collection? If so which would you recommend?
<3
I did try to use as many colours as possible from the palette so hope you like it!
Products used:
> UDPP
> MAC Warm palette - Winterscape, Patina, Buckwheat, Gaelic Gold, Midnight Flurry
> MAC fluidline - blacktrack
> UD 24/7 eye pencil - zero
> Dior Show mascara - black
> Khuraira ACC - light
> MAC studio concealer in NC35
> UD Brow Box in brown sugar
> UD baked bronzer in Toasted
> MAC Such Flare lipstick
After priming the eyes with UDPP, I used Winterscape (the lightest silvery white shadow) on the inner corners and a bit on the brow bone with the MAC 239 SE brush. I used Patina and Gaelic gold further along the eyelid, starting with Patina and following along with Gaelic Gold. On the outer corner I used Midnight Flurry and blended Buckwheat upwards into the crease with the MAC 217 SE brush.
I used MAC fluidline in blacktrack to line the top eyelid, whilst using UD pencil in Zero to line the inside waterline. Using the liner brush (212 SE) I used the same shadows from the eyelid to create a symmetry on the lower lashline.
Using Dior Show on the lashes I wiggled the brush to bring the most out of the lashes, and concealed under the eyes with the Khuraira ACC and MAC studio concealer:


<3
Monday, 2 May 2011
Since spotting the "Margarita" NYX round lipstick at my makeup course, I have been wanting it desperately. I managed to find out through rhamnousia on Twitter about a lovely eBay seller Joy, who sells NYX products for great prices from America.
The Round Lipsticks are velvety textured and long lasting, making them NYX's best selling lippys. They're available for £4.95 each via the NYX website.
I decided to go for the 3 lipsticks offer Joy's cosmetic offers, seeing as I need a collection of red lipsticks for my bridal makeup collection. So I chose Margarita, Chaos and Eros; a coral colour and two reds.


 I received the lipsticks within 2 weeks which was great, however I think I may have used an old Margarita lipstick in my makeup course as this one I received seemed a bit more frosty.. does anyone know for certain if the old Margarita lipstick was a tad less frostier? I'm sure it was in the makeup course and more coral-ly than frosty peach.

Anyway, that was the only disappointment as frosty colours tend not to suit my lips as they are darker/pigmented, so on to the other two colours I chose: Chaos & Eros.
Chaos:
 A dark, red lippy, bordering on the purple side in my pics! I do prefer this red to Eros though. Review: it's definitely pigmented, smoothes on nicely on the lips (provided you have Vaseline or a lip primer on!) and is reasonably priced considering!
Here's how it looked on my lips:

Eros:
 A orange-red lipstick, bright and slightly shimmery compared to Chaos, which has little to no shimmer at all!
Here's how Eros looked on my lips:

Overall, the consistency of the lipsticks are great, not too drying and definitely better on the lips than the Diamond Sparkle lipstick I got before (check here for the post). The Diamond Sparkle lipstick is smooth and moisturising, but grainy in texture because of the glitteriness.
The packaging seems a tad cheap but it's expected to be honest and I do like the little window at the bottom of the lipstick that tells you what shade of lipstick it is. My only qualm with the packaging is that the colour is named on the lid.. so if you have three (or more!) lipsticks like me and have a terrible short term memory, it's easy to get it mixed up!
All in all though, aside from the Margarita non-suitability, I love these lipsticks and will defo buy some more soon!
Do you have any NYX lipsticks? Which colours would you recommend?
<3
The Round Lipsticks are velvety textured and long lasting, making them NYX's best selling lippys. They're available for £4.95 each via the NYX website.
I decided to go for the 3 lipsticks offer Joy's cosmetic offers, seeing as I need a collection of red lipsticks for my bridal makeup collection. So I chose Margarita, Chaos and Eros; a coral colour and two reds.


swatches:


Margarita lipstick
Anyway, that was the only disappointment as frosty colours tend not to suit my lips as they are darker/pigmented, so on to the other two colours I chose: Chaos & Eros.
Chaos:

Here's how it looked on my lips:

Eros:

Here's how Eros looked on my lips:

Overall, the consistency of the lipsticks are great, not too drying and definitely better on the lips than the Diamond Sparkle lipstick I got before (check here for the post). The Diamond Sparkle lipstick is smooth and moisturising, but grainy in texture because of the glitteriness.
The packaging seems a tad cheap but it's expected to be honest and I do like the little window at the bottom of the lipstick that tells you what shade of lipstick it is. My only qualm with the packaging is that the colour is named on the lid.. so if you have three (or more!) lipsticks like me and have a terrible short term memory, it's easy to get it mixed up!
All in all though, aside from the Margarita non-suitability, I love these lipsticks and will defo buy some more soon!
Do you have any NYX lipsticks? Which colours would you recommend?
<3
Friday, 25 February 2011
So this is the other look I did with the Arabic palette last week, it's a (south) Asian bridal look, using burgundy/red to achieve a full on dramatic look.
I remember using a lottt of products (like 3 concealers & 3 eyeliners!), but here's what I defo can remember:
> Bare Minerals makeup - Warm Beige foundation & Summer Bisque concealer
> UDPP
> Arabic Palette - silver white, bronze gold, gold & burgundy colours
> Manly palette - matte white for blending down brow bone, gold for highlighting cheeks
> Sleek Ink Pot gel liner
> UD 24/7 eyeliner in Zero & Yeyo for bottom liner
> MAC rapidblack penultimate eyeliner (to get an even more intense black topliner)
> Eylure Girls Aloud false lashes in Nadine
> Khuraira AC concealer in Light
> MAC Studio Finish concealer in NC35
> Sleek blush in Scandalous
> Pixi Lip Blush in Love
> Sleek Pout Polish in Scandal
> OCC Lip Tar in Harlot
And here's what it looked like!
First two pics are with Pixi Lip Blush in Love:


 And here's with Sleek Scandal Pout Polish:


 And here's the OCC Lip Tar in Harlot and how it looks:

 Quite red! Finally, here's how it looked after I'd taken the lip colour off (OCC stained my lips a bit):


 Hope you liked the look, I tried my best even though I'm still not used to eyelashes! I think my eyes are too small for these eyelashes in particular, so I'll keep trying eyelashes till I find the right ones for me!
Btw, if you've gotten paid today or just fancy splurging on Barry M, take their survey to win a goodie bag and for 20% off for this weekend, enter the discount code "SURVEY" when buying from their website!
<3
I remember using a lottt of products (like 3 concealers & 3 eyeliners!), but here's what I defo can remember:
> Bare Minerals makeup - Warm Beige foundation & Summer Bisque concealer
> UDPP
> Arabic Palette - silver white, bronze gold, gold & burgundy colours
> Manly palette - matte white for blending down brow bone, gold for highlighting cheeks
> Sleek Ink Pot gel liner
> UD 24/7 eyeliner in Zero & Yeyo for bottom liner
> MAC rapidblack penultimate eyeliner (to get an even more intense black topliner)
> Eylure Girls Aloud false lashes in Nadine
> Khuraira AC concealer in Light
> MAC Studio Finish concealer in NC35
> Sleek blush in Scandalous
> Pixi Lip Blush in Love
> Sleek Pout Polish in Scandal
> OCC Lip Tar in Harlot
And here's what it looked like!
First two pics are with Pixi Lip Blush in Love:


Btw, if you've gotten paid today or just fancy splurging on Barry M, take their survey to win a goodie bag and for 20% off for this weekend, enter the discount code "SURVEY" when buying from their website!
<3
Subscribe to:
Posts (Atom)