Showing posts with label neutral colours. Show all posts

Sunday Swatches: Urban Decay Naked Ultimate Basics

Sunday, 4 December 2016

Hi my lovelies!

So this week's Sunday Swatches post (as the title suggests) features the Urban Decay Naked Ultimate Basics palette which you may have already seen me use in my Soft Glitter Cut Crease Tutorial or of course featured in the Rose Gold Gift Guide, but here's the palette in it's full glory, complete with my review, so read on for more!

Sunday Swatches: Anastasia Beverly Hills Modern Renaissance | Full Review

Sunday, 26 June 2016

Hi guys!

This week's Sunday Swatch post is featuring the new Anastasia Beverly Hills Modern Renaissance palette, which I already gave a short review/swatch over on my SnapChat (it's sooo much more faster on there than typing up, but alas only lasts 24 hours; le sigh).

If you missed my mini review, I mentioned that I really didn't feel like I needed another palette when I saw this one being released; I wasn't overly fussed about the red and pink tones, however when I looked at the shades more closely I realised that most of them were matte and also were perfect for Asian skintone/Asian Bridal makeup.
Read on to see more swatches and the full review.

FF: Naked Palette Brown-Gold Make Up Look

Friday, 22 April 2016

Hi my loves!

This post features an old but much used palette: the original Urban Decay Naked Palette.
I have to say out of all three palettes this one is still my favourite (you can read my recommendations/thoughts on the three palettes here).

Sunday Swatches: Makeup Revolution Essential Mattes

Sunday, 23 November 2014

Hello my dears, hope you've all been well.

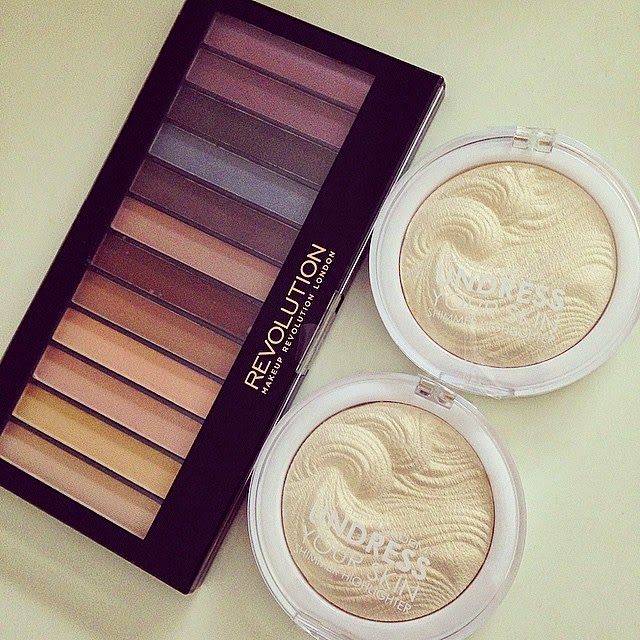
This instalment of Sunday Swatches features an affordable "drugstore" brand which is fairly new - Makeup Revolution.
I posted a pic of my mini haul on Instagram (below), taking advantage of the Superdrug 3 for 2 promotion of course! (I bought two of the new Undress Your Skin highlighters).
 
I have to say Superdrug are churning out affordable brands that actually have great quality products and I'm impressed even though I'm a bit of a makeup snob at times.

I checked out a Makeup Revolution stand by swatching away in true beauty blogger style and was pretty impressed at the softness of the texture, but more importantly the colour payoff. 
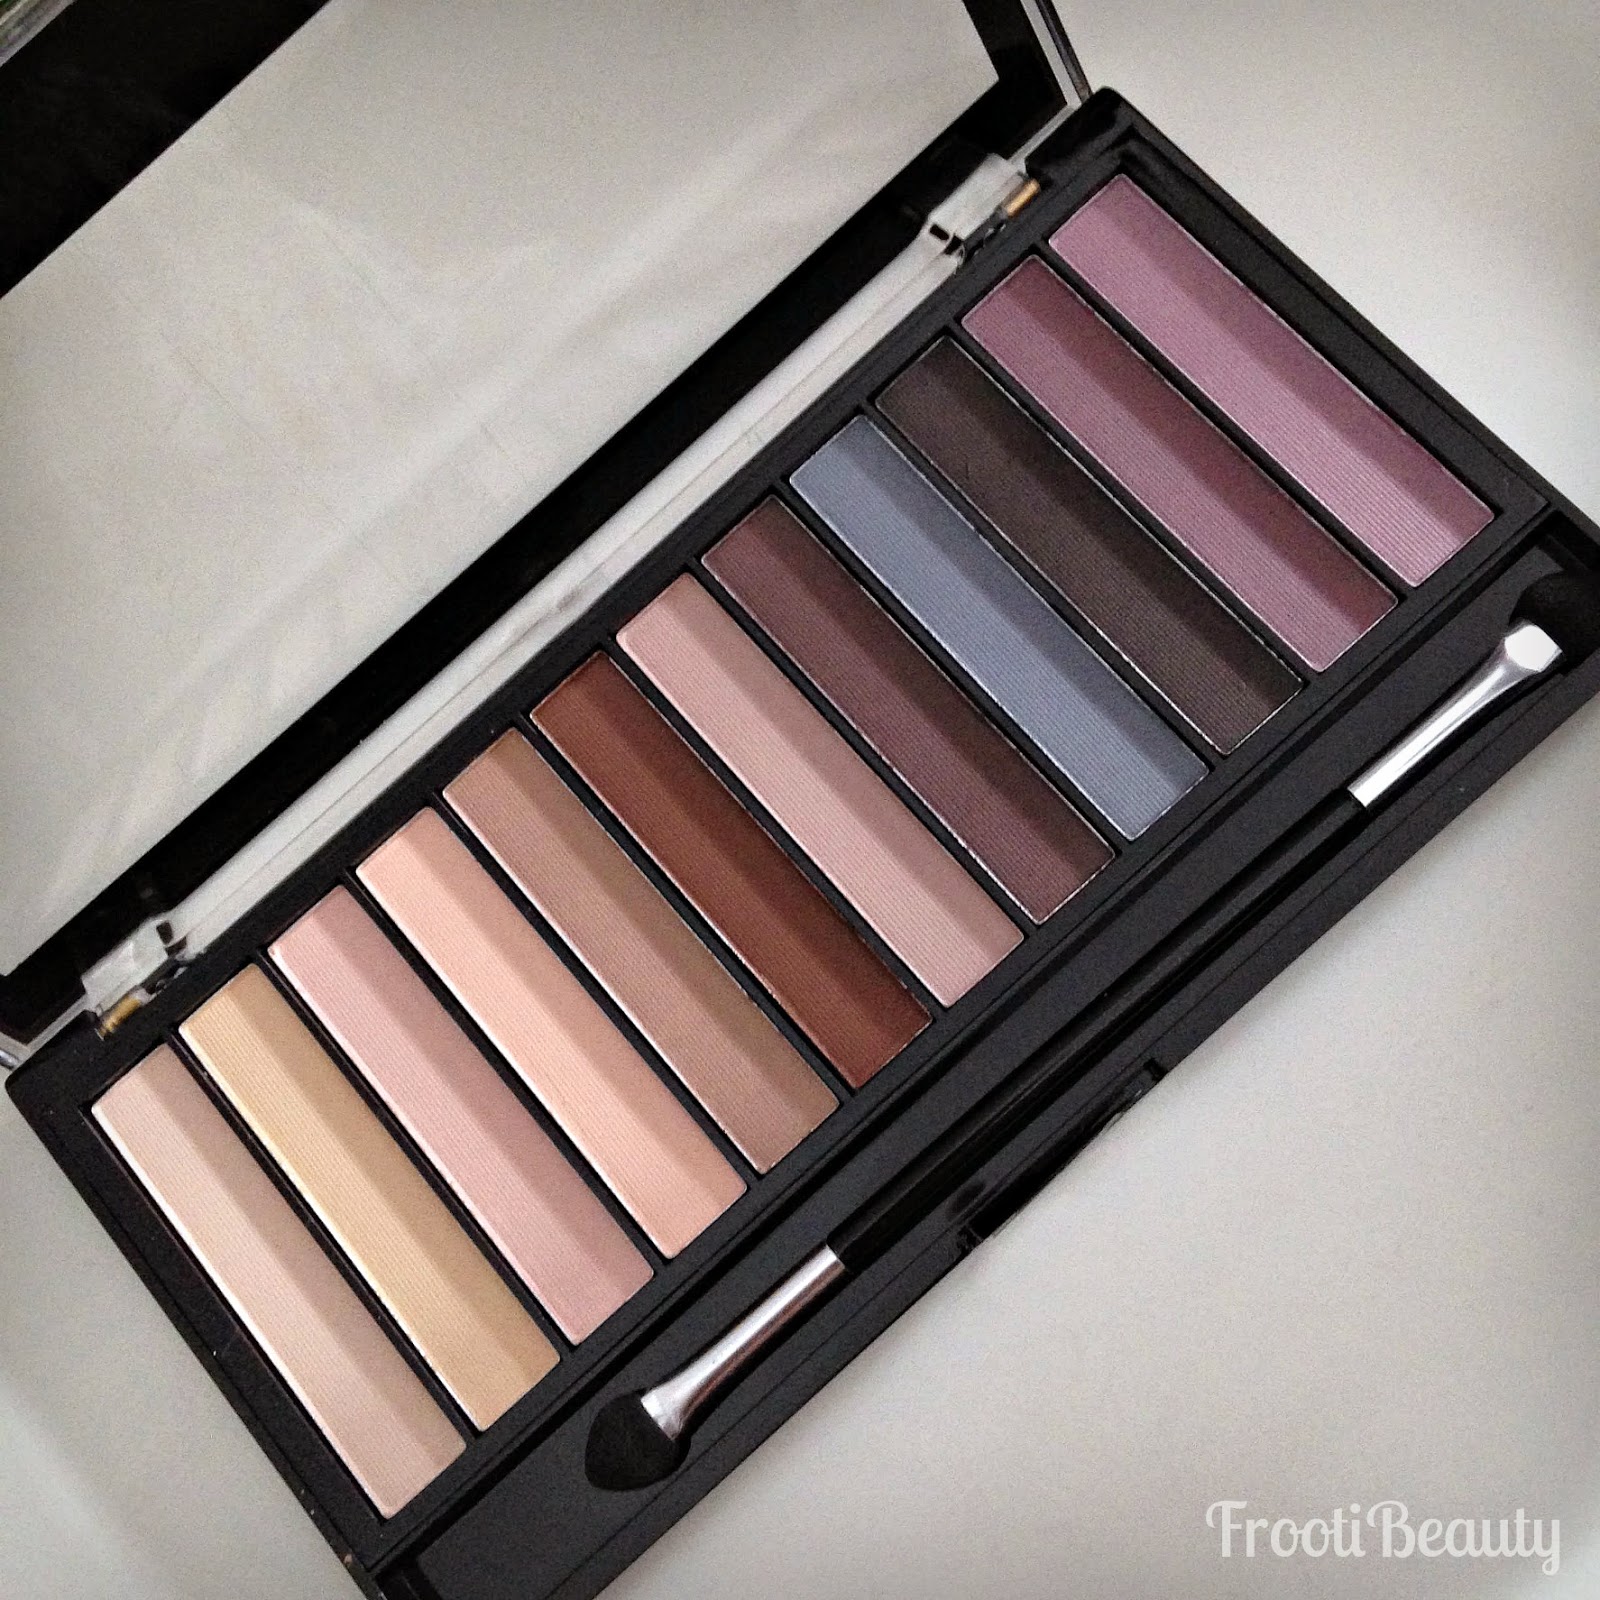
I was drawn to the "Essential Mattes" palette for 2 reasons 
1) The palette boasts a range of neutral colours
2) They were all matte! 

For those of you who know me, follow my makeup posts or have attended my masterclass, you will know how much I'm a fan of neutral matte colours as they play a huge part in blending eyeshadow.

So when I saw that not only were they pigmented and soft, but there were 12 shadows and for ONLY £4, it was a no brainer.

Colour & Pigmentation: The neutral shades should pretty much suit every skintone. Pigmentation was more prominent in the darker matte shades but the lighter ones were satisfactory too in colour pay off.
Texture: Silky and soft
Packaging: No fuss, standard packaging, possibly breakable if it fell from a height. I like that it has a window at the front so you can see the palette shades at a glance (handy in case I buy more palettes)!
Longevity: I found the shadows to be of average lasting power, however I always wear UDPP under eyeshadows so can't comment without!
Price: At £4 for 12 shades it works out to about 33p per eyeshadow.. insane!

FrootiFactor: This is my first encounter with the brand and I'm impressed!
I'd give this product a 4.5 out of 5, because I'm sure the packaging wont last in a kit or under pressure, but for £4 I really wouldn't be breaking the bank to buy another!


The Essential Mattes palette can be bought from the Makeup Revolution website or from Superdrug, who are still holding the 3 for 2 promotion! 


Have you tried anything from Makeup Revolution? What would you recommend? 
post signature

FFF: Golden Electric Blue EOTD

Friday, 8 August 2014

So I managed to get some free time to do a quick EOTD!

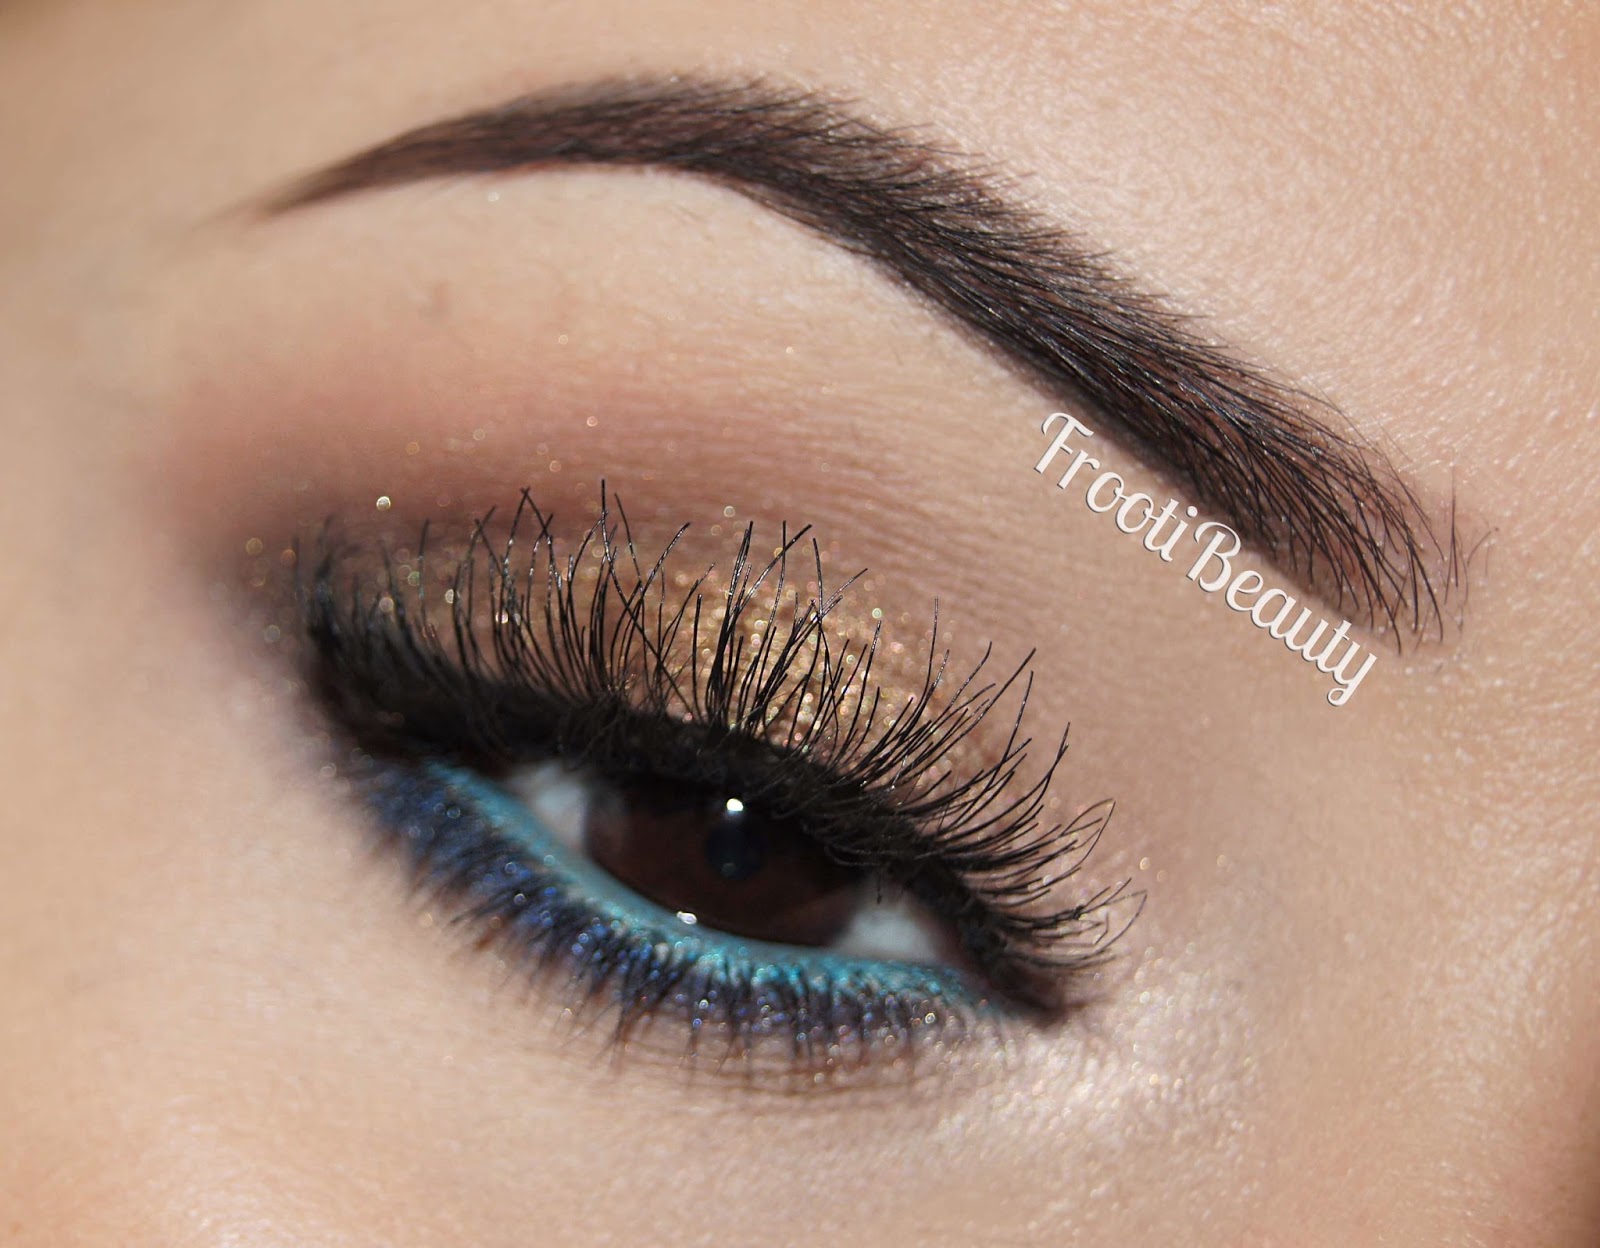
I felt inspired by the blue in the previous guest post from Annie (check the post here) but teamed it with a neutral golden eyeshadow instead, with just a pop of blue on the lower lash line with electric blue on the waterline.. Hope you enjoy and feel inspired <3

Products used:
> UDPP - Eden
> Too Faced Chocolate Bar palette - Milk Chocolate, White Chocolate, Salted Caramel, Champagne Truffle

> Illamasqua Neutral Quad palette - all colours used
> Motives Mineral Gel eyeliner - Little Black Dress
> Urban Decay 24/7 eye pencils - Perversion, Electric, Ransom & Deviant 

> Daniel Sandler Jumbo Jet mascara
> LA Girl Pro Conceal concealer - Creamy Beige
> Eldora False Eyelashes - H151


After priming the eyes, I buffed Salted Caramel and Milk Chocolate from the Too Faced Chocolate Bar palette into my crease, blending upwards. I intensified the crease using Wolf and Obsidian from the Illamasqua Neutral palette, followed by patting on Vintage to the middle of the eyelid and Creme Brulee from the Chocolate Bar palette further inwards. I highlighted the inner corner of the eye with Champagne Truffle and the brow bone with White Chocolate and Stealth from the Neutral palette.

I decided to not go with my usual eyeliner extended flick style, and kept the wing short using Motives Gel Eyeliner in LBD.
I then lined the inner top waterline with Perversion eye pencil and the bottom with Electric. I then used a mixture of Ransom & Deviant on the lower lashline, blending slightly down.

To finish the look I concealed around the eye area with LA Girl Pro Conceal in Creamy Beige and applied Eldora False Eyelashes in H151, using the Daniel Sandler Jumbo Jet Mascara to blend the lashes and slightly coat the bottom lashes.

I hope you enjoyed this look, hopefully next time I get to do a full FOTD! 
post signature

FFF: Lorac Pro Golden Bronze Makeup Look

Friday, 21 February 2014

This week's FFF is using the fairly newly acquired Lorac Pro Palette that a friend very sweetly got for me from the US as it's not available here in the UK (booooo!)
I wasn't sure what I'd do with the palette at first as it's so pretty and the texture is so soft but I decided on a fool proof golden bronze look, so I hope you like it!

Products used:
Eyes:
> UDPP - Eden

> Lorac Pro Palette - Cream, Taupe, Sable, Espresso, Black, Nude, Lt Bronze, Gold, Garnet

> Inglot AMC Gel liner in 77 (black)
> Rimmel ScandalEyes Kohl liner in Nude 5 
> Daniel Sandler Jumbo Jet Mascara
> Collection 2000 Lasting Perfection Concealer - Medium
> Urban Decay Heavy Metal glitter eyeliner in Midnight Cowboy
> Anastasia Beverley Hills Dip Brow Pomade - Ebony
> Eylure Girls Aloud lashes - Kimberley
Face: 
> UD Naked Skin foundation in 6.0
> UD Naked Skin Loose Finishing Powder in Medium Dark
> Motives Sculpt & Shape Duo 
> UD Toasted Bronzer - Toasted
Lips:
> UD Naked Ultra Nourishing lipgloss in Rule34

After priming the eyes with UDPP in Eden, I filled in the brows with the Anastasia Beverley Hills Dip Brow Pomade in Ebony and concealed around the brows to make them more clean. I then started applying Taupe with a fluffy brush to the crease of the eyes, and using a flat brush, applied Nude to the brow bone to highlight, blending in between with Cream and Taupe.
Using a pointed brush I applied Espresso to the outer V of the eye and crease and blended more. I then applied Gold to the middle-inner part of the lid and Lt Bronze to the inner corner of the eye, with Garnet and a bit of Black to the outer corner. You can add more Black to the crease with a pointed brush for more depth, making sure to blend upwards and at the lower outer lash line.
I then went with a flat liner brush and added more black to the outer corner, then further with Inglot AMC gel liner. With another liner brush I added Nude to the bottom inner lash line and UD Heavy Metal glitter eyeliner on top.
I lined the top eyelid with Inglot AMC Gel liner, extending the wing out and lining the top inner eye. For the bottom inner eye I used Rimmel ScandalEyes Kohl liner in Nude.
After coating the lashes with mascara, I added Eylure Girls Aloud Kimberley lashes and concealed under the eyes with Collection 2000 Lasting Perfection concealer to finish off the look:
For the rest of the face I used Urban Decay Naked Skin foundation in 6.0 (yellow toned), and the Naked Medium Dark Loose Powder.
For the cheeks I used the Motives Sculpt & Shape Duo with UD Toasted Bronzer in between the highlight and contour.
I decided to then keep the lips neutral as my last look was fairly dramatic and only used the UD Naked Ultra Nourishing lipgloss in Rule34 (no lip liner), which is quite sheer but a nude brown:
And voila, the look is done!
I usually prefer brighter colours on my lips and probably would have paired it with a less sheer nude or a plummy brown colour lipstick, but wanted to try out the new UD Naked Lipgloss for this look so I went with that.

What lip colour would you wear with this look?
 

Safiyah's Guide to Naked Palettes

Wednesday, 18 December 2013


In all the excitement of the new Naked 3 Palette release, I know there has been some confusion in which to buy for a lot of people, so I thought I'd break it down in my opinion and experience with the 3 palettes.  

Despite the three palettes being neutral shades, each palette offers a range of neutrals to suit every skin tone. 
They each have colours that would suit fair and deep tones alike, for example the golds Half Baked/Trick; or bronzes Smog/Snakebite; or plums Hustle/Busted).
However, I think some palettes look darker on fairer tones and the new Naked 3's matte shades will look too chalky on deeper tones (still yet to be 100% confirmed!)

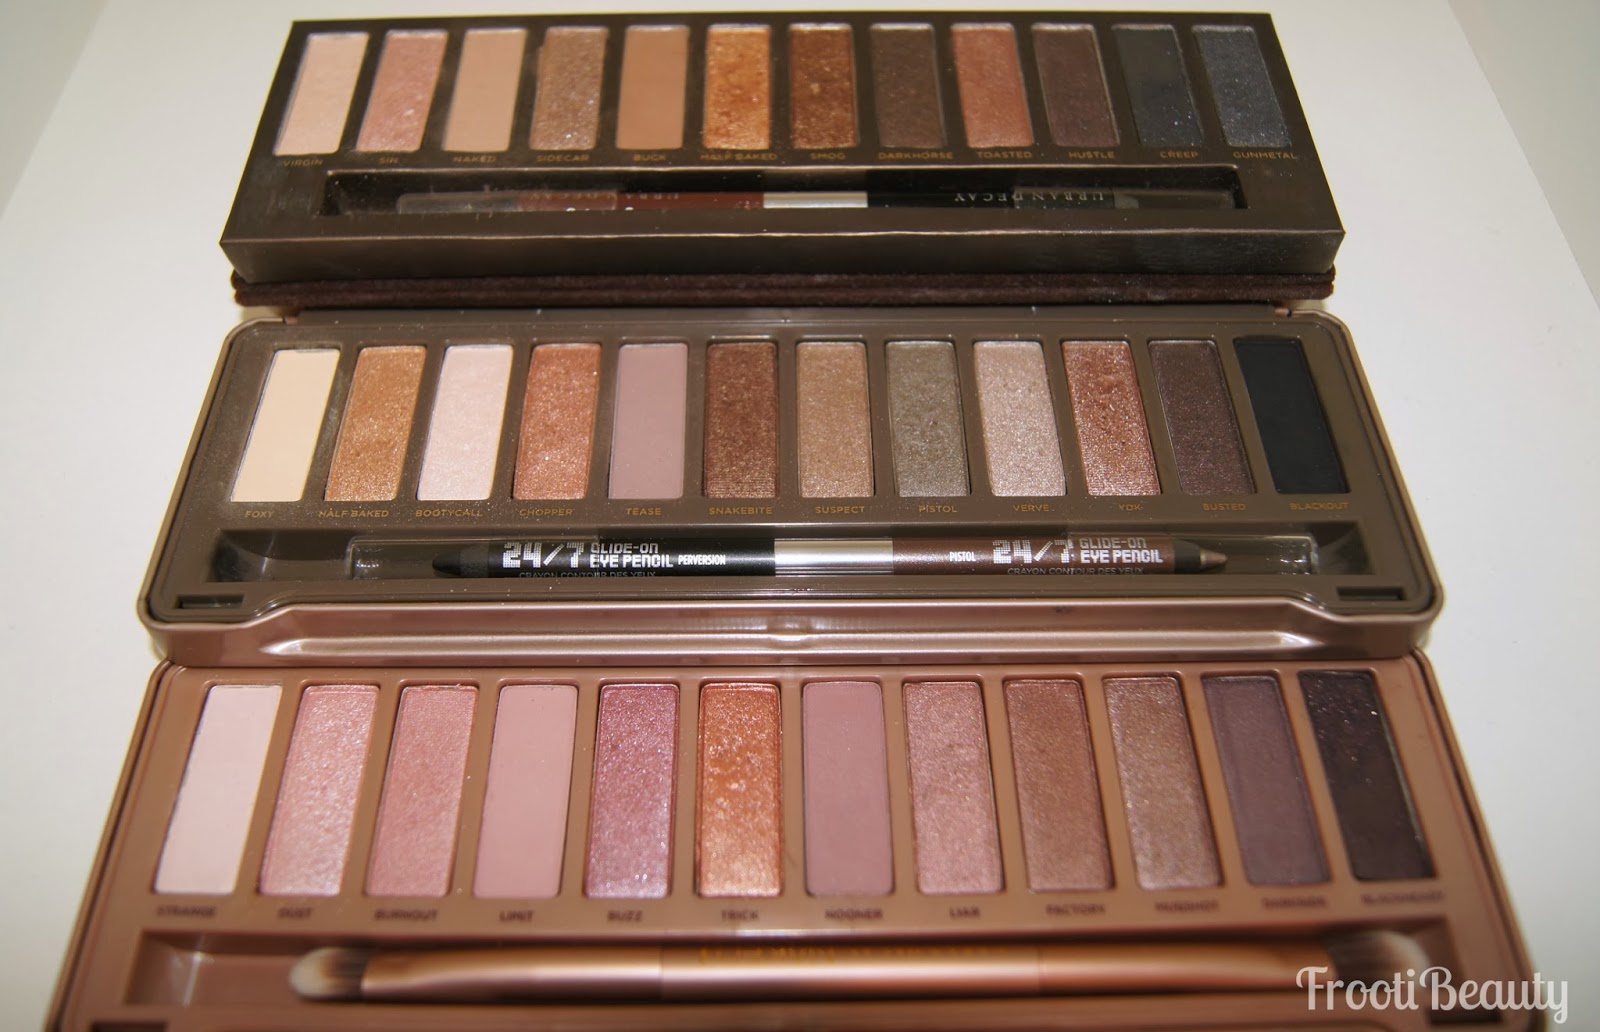
Laid out together you can see the difference in palettes:

As a guide, I'd say the following palettes are best suited to these MAC skintones based on the matte blending/transition shades in each palette:
  • Naked 1 (Bronze neutrals): Medium to Deep skintones (both yellow toned and pink/red tones)  [MAC shades NC25s+ and NW18+] {blog post here}
  • Naked 2 (Taupe neutrals): Fair to Medium skintones (both yellow tones and pink/red tones)  [MAC shades NC15-40 or NW10+] {blog post here}
  • Naked 3 (Rose neutrals): Fair to Medium skintones (mostly pink tones, some yellow tones)  [MAC shades NW10+ and NC15-35] {blog post here}
  • Naked Heat (Red neutrals): Warm to Dark skintones (mostly warm red tones) [MAC shades NW/NC25+] {blog post here}
  • Naked Smoky (Dark neutrals): Light to Medium skintones (mostly dark greys/browns) [NW/NC10-25] {blog post here}
  • Naked Ultimate Basics (Matte Neutrals): All/most skintones as there's a matte transition type shade to suit most skintones! {blog post here}
Like I said above, this guide isn't strictly to be followed as the shimmery shades in all 3 palettes can be worn on pretty much every skintone, so my guide is just based on using the matte shades really!

I hope this helps in deciding which palette is best for you (if you're not a collector/UD junkie like me). 
  
All three Naked Palettes are now available to buy at the following retailers (if they're not already sold out for Christmas!):
House of Fraser, and John Lewis.

Do you have a Naked Palette? Which is your favourite?


Urban Decay Naked 3 Palette - Rose Neutrals (Swatches and Review)

Thursday, 28 November 2013

Following on from my previous post, I thought I'd share my experience from the exclusive Naked 3 event I attended on Tuesday and of course get down to actually showing the beauty of the palette with swatches!

Warning: this is a very long post and is picture heavy!
 

Naked 3 - Rose Neutrals

As I entered the event on Tuesday, I was greeted with a poster of the new Naked 3 visual "12 all new Rose Neutrals":
I'd seen images of the palette from Temptalia and of course fell in love with the rose-gold theme as it's very on trend and has a certain richness to the colour.

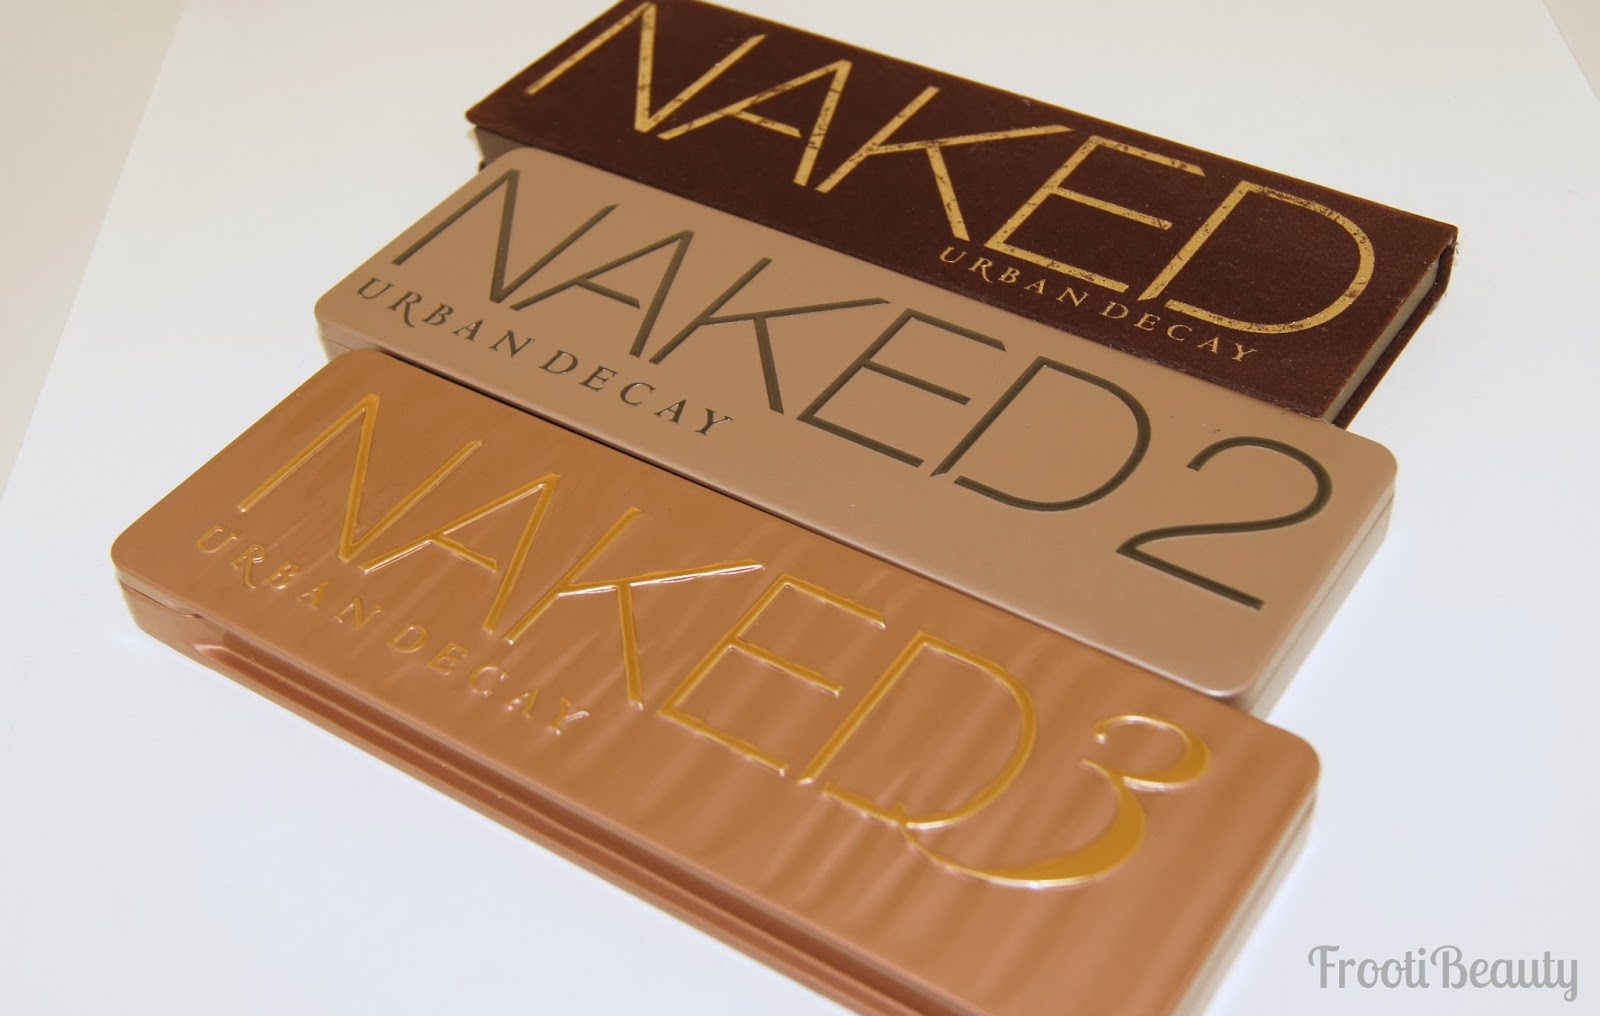
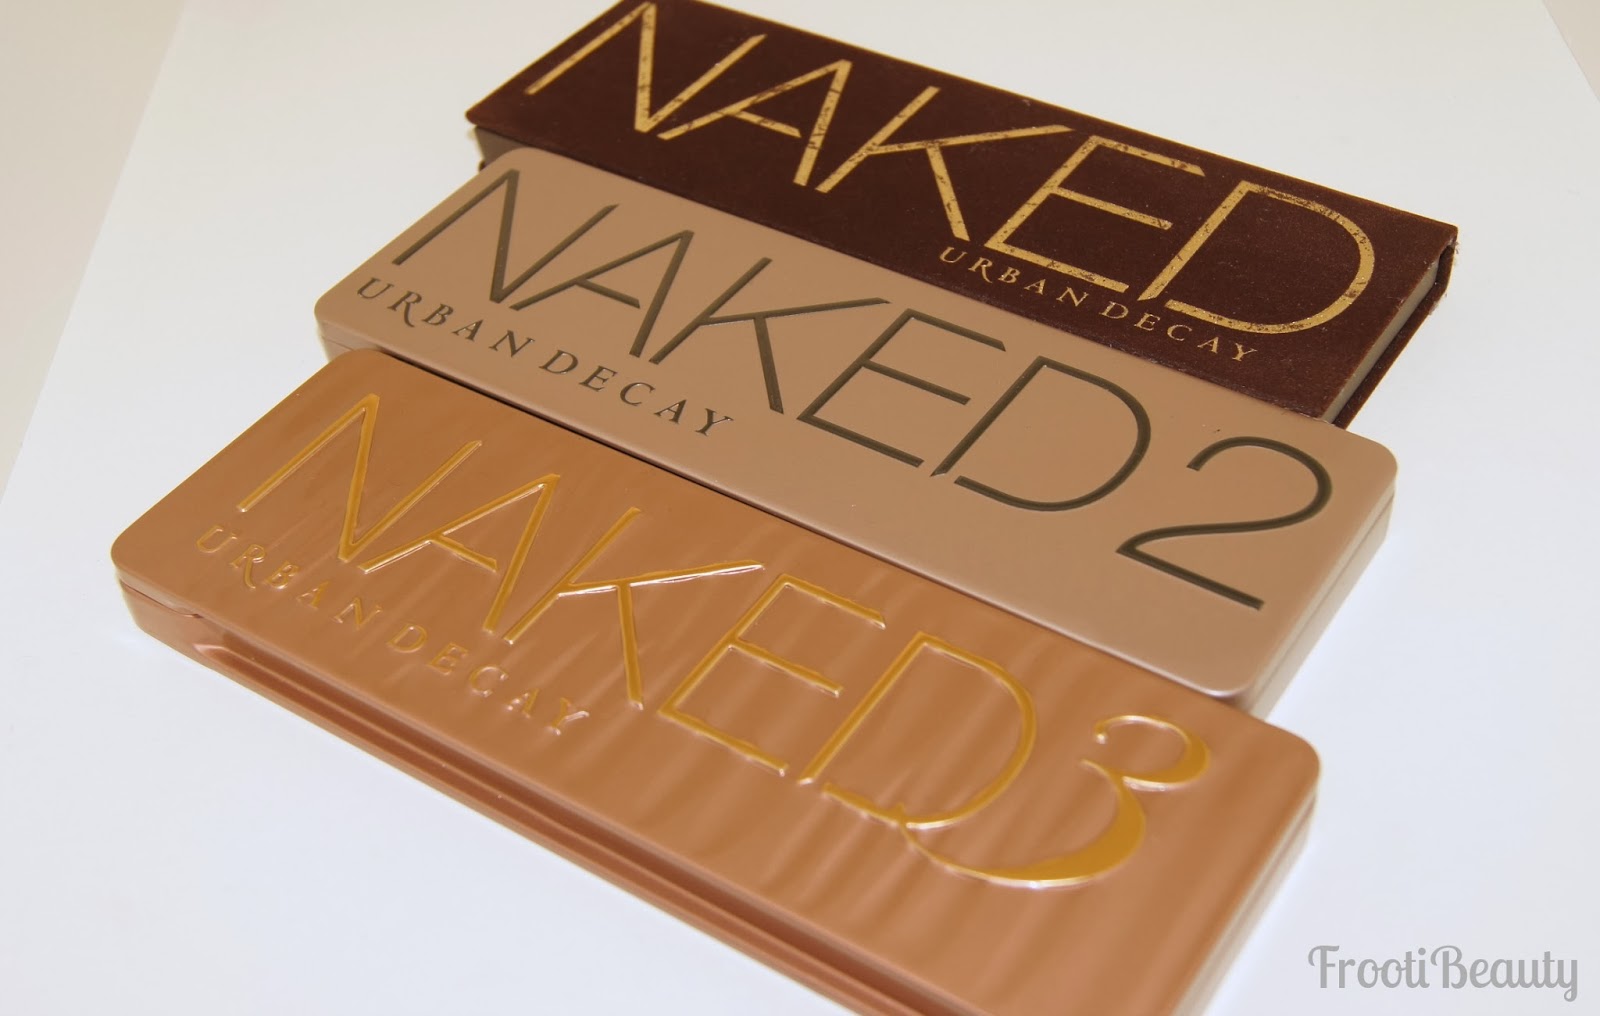
A stand ahead of me held "The Perfect Threesome" of Naked palettes; of course I had to lay them out next to eachother for comparison and Instagrammed a picture of them straight away, but in this blog post I've added the clearer picture taken with my camera:
I went straight ahead and dunked my fingers into the sumptuous Naked 3 which felt like butter underneath my fingertips.
I was particularly intrigued to try out the matte shadows in the palette as usually matte shadows don't tend to be as pigmented as shimmers but I was pleasantly surprised as I swatched the first shadow "Strange" on my hand; unlike Foxy from Naked 2, Strange is much more pigmented and softer to the touch which meant to me that it would be a much better highlighting shadow than Foxy which didn't quite show up as much as I'd have liked it to.

As I spoke to the head makeup artist for Urban Decay, I found out that Urban Decay had also added double ended "Naked" 24/7 pencils for each of the Naked Palettes, bringing back the Zero/Whiskey from the original Naked palette that I bought as well as a few others (Temptalia again has posted pictures of these).

I then had to head off to another event which I'll be posting about shortly, but when I got home, all I could think about was my gorgeous new Naked 3 palette sitting there and decided to snap some pictures:
Also included with the Naked 3 palette is a 4-pack sampler blister pack, containing a 1 week supply of 4 different eyeshadow primers in Original (clear/invisible), Eden (nude matte), Sin (champagne shimmer) and the new Anti Aging primer (invisible).
4-pack eyeshadow sampler included with Naked 3

Naked 3 Swatches

Although Temptalia is my main source of info for the clearest swatches, I decided to swatch the Naked 3 palette on my own skin as I know a lot of my followers on Instagram, Twitter etc are of a warmer skintone and were asking me how it would look on our tones.
I'm particularly yellow in skintone so I myself was intrigued as to how it would look on my skin.
I split the swatches into 4s for swatching purposes and have them all in a single picture at the end: 
All shadows swatched on arm

Review

Packaging: The packaging for Naked 3 is pretty much identical to Naked 2, except that it is in a gorgeous rose gold shade and has a ripple effect on the outside. I like that it is sturdier and clips shut unlike Naked 1. The brush included is double ended like with Naked 2, however instead of a fluffy crease brush you get a blending brush.

Colour & Pigmentation: The shadows in this palette are rose-hued to match the whole rosy theme. As you can see above, the shadows are very very pigmented as always with Urban Decay. 
All shadows in this palette are completely new.
I found Trick to be less pigmented out of all of them, however when applied wet/with the finger it becomes amazingly pigmented and sparkly, so it's actually my favourite!
Blackheart is my next favourite as it's an interesting colour; it's described as a smoky black matte with rosy red micro sparkle, but I see a deep purply/aubergine colour in it, and when you can't see the sparkle it looks black.. amazing!

Texture: The palette includes 3 mattes (Strange, Limit and Nooner), 4 glittery/sparkly shades (Dust, Buzz, Trick, Blackheart) and satin/shimmers. All are smooth to the touch of course.

Longevity: Without being biased, I've always found UD eyeshadows to last a crazy long time, particularly when paired with the Primer Potion.

Price: At £37, the Naked 3 is priced the same as the other Naked palettes which works out £3.08 per eyeshadow. Full size eyeshadows by UD are priced at £14 each so this works out pretty cheap even if they're not full size! Not to mention a standard shadow brush is usually £14.50 alone and you get a double ended one in this palette. Score!

FrootiFactor: I love the packaging and pigmentation of this palette; not to mention the new range of neutrals that a makeup artist can never have enough of! I'd give this palette a 4.5 out of 5, only because I don't think it will be very suitable for the deepest of skintones:
The Naked 3 Palette will be available to buy on the 16th December 2013 from Debenhams and House Of Fraser stores as well as online and at these online retailers: LookFantastic, HQhair and BeautyBay.

From the responses I've seen about this palette through my own social media sites as well as from looking at how it sold out in the US hours after going on sale, I highly anticipate this palette to send everyone into a buying frenzy just as with the release of Naked 2.

If you want to pre-order the palette without having to worry about it selling out, you can do so via LookFantastic HERE who offer free delivery, or Next Day Delivery with the code "NDD1". You're welcome.

I will be doing a "FrootiBeauty's Guide to Naked Palettes" post very soon if you're confused about which palette to get for you, so do keep an eye out for that!

What are your thoughts on this palette? Are you an UD Junkie like me and adding this palette to your collection?


FFF: Smokey Brown look

Saturday, 10 August 2013

As you can see I've been trying more neutral coloured makeup recently, I guess I just wanted to test my new makeup out but I hope you like it anyway; I know this post is a day late but better late than never eh?!

Everything except the eyeliner is by Motives cosmetics which are all listed below:

Eyes: 
> Luxe Creme Shadows in Gold Dust and Brown Sugar

> Pressed eyeshadows in: Onyx, Vino, Chocolight, Hazelnut, Cappuccino, Vanilla, Whipped Cream.

> Gem Dust in Sterling
> Inglot AMC Gel Liner - 77
> Khol eyeliner Angel, Earth and Black
> Lash Primer

> Lustrafy Waterproof mascara (black)  
> Creme Concealer - Amber
> False Eye Lashes - 112
Face: 
> Perfecting Face Primer
> Cream Foundation for Loren - Medium Dark
> Photo Finish Powder - Neutral Medium
> Pressed Blush - Flushed
> Shape & Sculpt Duo
Lips:
> Lip Crayon in Naked
> Motives for La La Mineral Lipstick in Nice & Manhattan
> Motives for Loren Lipstick in Motivated

Instead of the usual primer, I used the Luxe Creme Shadows in Gold Dust on the brow Bone and inner corner of the eye and Brown Sugar on the eyelid.
I started by applying Whipped Cream to the brow bone and inner corner of the eye, then Vanilla underneath the brow bone, sweeping into the inner eye slightly.
I applied Vino to the middle to the end of the eyelid and Chocolight and Cappuccino to the inner eyelid but not on top of the highlight Whipped Cream.
I added Onyx to the outer corner of the eye, blending upwards slightly and Hazelnut just above the crease.
After cleaning up on the outer corner, I added the Inglot gel eyeliner for the top liner and lined the top of the inner eye with Khol eyeliner in Black. The bottom inner eye was lined with Angel Khol liner and smudged so that it wasn't as white as it draws on! I then went underneath the inner eye at the lash line with Earth Khol pencil.
I primed the lashes with the Motives Lash Primer and finished with the Lustrafy Waterproof mascara.
After concealing under the eye with Amber Creme concealer, I applied the 112 False Eyelashes:
For the rest of the face, I primed with the Perfecting Face Primer and used the Cream Foundation Quad by Loren Ridinger in Medium-Dark. I then set the makeup with the Photo Finish Powder in Neutral Medium and used Flushed Blush on the cheeks and the Shape & Sculpt to highlight and contour where needed.
On the lips, I first used Naked Lip Crayon and filled with lipstick in Nice:
I then used a pinky neutral lipstick by Loren Ridinger in Motivated, and then red lipstick by LaLa in Manhattan, here they are side by side:

And there you have it! Which lip do you prefer with this versatile neutral look?


Makeup Masterclass; Arabic Naked Palette Look

Tuesday, 27 March 2012

This Sunday just gone, I held my first makeup masterclass based on the makeup look in this blog post, which coincidentally happens to be one of my most popular looks! 
I chose this look not only for its popularity, but also because the products listed are pretty much staples in all beauty bloggers'/makeup fans' collections; namely the UD Naked palette and other neutral products like bronzers, eyeliner and lipstick.
Despite the neutral colours however, the look is fairly full on/glamorous particularly because it has a double eyeliner flick.

The class was held in a small but cosy salon in East London (Pink Crust) and I kept the group small enough to be able to give attention to everyone.. which worked out well in the end!
Appropriate quotes dotted around the salon
I decided to start on the eye makeup rather than foundation, so that the hardest part would be out of the way.. and seeing as that's what a lot of my followers like the most, I thought it would be best to focus on that!

Numera (of Hommesdefemmes) volunteered to be my lovely model who I used to show the steps on, followed by everyone going ahead and doing the same on themselves. 
Priming the eye with NYX JEP in Milk
The girls picked up the look and techniques really well and watching all their looks come together definitely was a proud moment for me!
The girls getting to grips with the look
Another lovely quote
I love this symmetrical shot of doing eyeliner!
It was great to answer any questions as we went along in steps; I encouraged the girls to give their own takes on the look and dotted in and out if help was needed, but to be honest you'd think these girls were pros!
Here are some of their eyes finalised (without lashes):
Aalia (of Hijabi with Style)
Shirin's eye
Taz
Numera (I didn't get a closeup of the other eye!)
The talented Sheenie of Just Nice Things who by the way was a super pro!
It was amazing to see practically carbon copies of my makeup look and I was really impressed with the girls' efforts! 
After the main focus of eye makeup was done I decided to quickly go through foundation, blusher/bronzer/contouring, eyebrows and lips on Numera as these were the next main concerns.
The final look:

Sheenie's completed look which she put up in her blog post blew me away:
Do have a read through her post here, she has even more pictures of the day and her lovely makeup. <3 


You can also read Numera & Aalia's posts on the masterclass too =)

Overall I thoroughly enjoyed teaching this look, the girls were a great bunch and very talented so I look forward to holding another class in the near future!

If you're interested in attending a masterclass in the near future, do contact me via email: contact@frootibeauty.co.uk

I look forward to hearing your thoughts!
 
template design by Studio Mommy (© copyright 2015)