I received a cute Model's Own x Sophy Robson package a while back and because I felt I wouldn't do the collection much justice (I can just about paint my nails one colour these days without smudging!) I looked for someone to guest post for me and chose Aysha who's guest posted for me before (click here).
Read on to see what she's created with these fab Models Own polishes!
Hello there lovely readers!
I'm so delighted to be collaborating with the beautiful Safiyah again, I've alotta love for this lady, not only have I been a follower of hers for donkeys years (oh gods that makes us sound ancient doesn't it?) but she also taught this dunce how to contour correctly, me & my defined cheekbones are forever grateful for your tutelage my dear!
She's now played the role of fairy blogmother & very kindly offered to send over to moi some of the new Models Own polishes to play with. On par with cake & cats my passion is nails so I was more than happy to step in & swatch these beautiful polishes for her as well as rustle up some quickie nail art looks for you with them.
Models Own have impressed me mightily with their polish game this year, they have in the past held true as one of my favourite brands however I did feel of late, a lot of the collections released were a tad samey samey. Well I needn't have feared as Models Own have come back into the game guns blazing, rolling out some truly ace collections including the mythical Celestial range, the bright & bold Aquaproof polishes & the stellar SoFly collection which I'll be sharing with you today & twas MO'S fab collaboration with the one & only nail slash street artist Sophy Robson & the polish offerings did not disappoint.
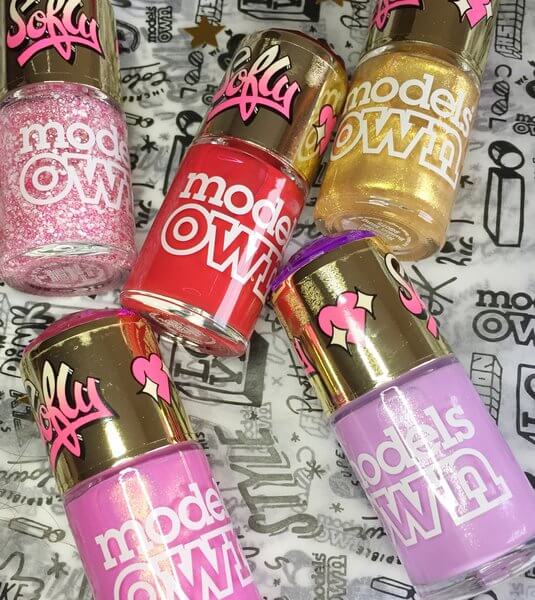
Can we just take a moment to admire the gorgeous packaging of these polishes? The gem
stone golden lids embossed with the SoFly logo are stunning & probably reason enough for me to go gaga for this range. But of course, its whats inside that counts & the Sofly collection offers an eclectic mix of four beautifully pigmented shades plus a glitter. I've paired each of the polishes with the glitter topper on an accent nail to show you you how it looks on each shade & I've also thrown together some super easy nail art looks for you to recreate too using just a dotting tool so lets mosey on!
When it came to which polish would be getting first dibs it was definitely going to be Flylac. I'm an absolute sucker for lilac shades & Flylac delivers on this & then some. A gorgeous pink toned lilac creme, Flylac has the prettiest soft silver microshimmer running through giving it a subtle iridescent edge. This was two coats applied smoothly for an opaque finish. I've applied one coat of Spray My Name on my ring finger which is the glitter in this collection & a fun mix of white & pink hexagonal glitters that I kinda dig as I have nothing like it in my stash.
For my first easy nail art look I've used the gold shade from the collection, Bullion Bling & with my dotting tool simply applied 5 dots along the tips for a dotted french look. Start with placing a large dot in the centre before adding two more either side, gradually making the dots smaller.
Simples!
Next up we have Girl Gang which is Flylac's sister shade in this collection if you will, another gorgeous creme, this one is a beaut candy pink shade & is paired with a divine golden microshimmer running through it this time. This is two coats applied with one coat of Spray My Name again on the ring finger.
For my second nail art look, grabbing the gold & my trusty dotting tool again, I've simply applied three dots in descending size by the cuticles, before finishing with topcoat & you're done! I wasn't kidding when I said these were quick & easy huh? ;)
Now its the vampy one in the collections turn, Vandal is a cherry red colour, very retro chic. Here I've applied two coats but even so I could still see a visible nail line so 3 should give you full coverage. I stuck with two because I'm a stickler for a habit...& perhaps just a lazy sod. I also LOVE how Spray My Name looks on top of Vandal, its got full on festive vibes going on there so I anticipate digging it out quite a bit come December.
For the third nail art look yup we're using the gold again, this time using the dotting tool to create some cute flowers. Simply place your dot where you want your flower(s) to be & then add 5 more dots around it. Fit on as many or as few as you like, here I've stuck with two on each nail.
And last but by no means here is the gold we've been using for our nail art, Bullion Bling in all its golden glory. The formula of this shade is actually on the sheer side, so I did have to overcome my lazy bum-ness & go in with three thin coats here, but boy was it worth it, look at that bling!
Spray My Name also looks lush on top of the gold. I didn't want to distract from the metallic goodness of Bullion Bling so sidestepped doing any nail art on this one.
Such LUSH shades don't you think?! All the polishes applied beautifully down to the quality of the formulations & the brush itself, I honestly cannot fault them. I wanted to create a final nail art look that was fierce enough to do this gorgeous collection justice & what better than some roaring leopard print nails?
This is my favourite go to look when I want a quick nail art fix as it looks ace & is so darn easy to do! To show you how here's a quick step by step pictorial on how to create Leopard Print Nails.
I decided to use Flylac as my base as its hands down my favourite out of the whole collection, so start with applying two coats of Flylac or whichever base colour you like (1).
Next grabbing Bullion Bling, add a splodge of gold where you want your spots to be using the brush from the polish, it doesn't need to be neat! Be sure to swipe the brush on the edge of the bottle to remove excess polish so you only have a bit on the brush to avoid flooding your nail with polish (2).
Now grabbing a black polish & a dotting tool, (FYI you can get these super cheap off Ebay but if you don't have one then use whatever is at your disposal! This can be a bobbypin, a toothpick, heck I've even used a pencil on occasion) we now create our leopard spots. Drop a blob ofblack polish onto some paper/foil, dip in your tool & draw on two to three curved squiggly lines around your gold spot like so (3).
Add a few extra smaller empty black spots randomly in different sizes for extra detail by drawing C like curves on top of each other, rather like a macaroon, before finishing with topcoat to seal & shine (4).
And you have you some fierce Leopard print nails ready to rock. Like I said this is one of my favourite designs to do, super quick & endless possibilities with the colour spectrum. Hope you like it too!
Thank you so much Safiyah for having me on your blog again, its truly an honour. All the best!


0 comments:
Post a Comment
I'd love for you to leave me some comments.. they make me happy!