Sunday Swatches: Urban Decay Super Saturated Cream Eyeliner Review

Monday, 2 June 2014

As soon as I saw Urban Decay release the information about a new range of "Perversion" eyeliners, I knew I had to try at least one from the collection and I had my eyes set on the new Perversion Super Saturated Ultra Intense Cream Eyeliner; seeing as these names are getting more and more lengthier, I shall abbreviate this product to: SSUICE.
Currently, my most used black eyeliner for makeup looks is the Inglot AMC gel eyeliner, which I haven't found a darker/blacker eyeliner than, to date. Naturally, having tried the Urban Decay 24/7 eye pencil in Perversion, I was interested to compare this SSUICE to the Inglot one.

Also, being a true Urban Junkie, I also wondered if the new Cream Eyeliner compared to the old Ink For Eyes Cream Eyeliner, which came in a long thin package with a small angled liner brush (pic here courtesy of Cosmetic Candy). I have to say I still use this brush for my brows and eyeliner as I haven't found a thinner brush yet, so I also wanted to see how the new Perversion Angled Brush compared.

Unfortunately the SSUICE doesn't come with a brush, however Urban Decay have released a new liner brush (the Perversion Angled Brush, £12) especially for use with the SSUICE and thankfully it's angled which I find is the easiest brush to use.

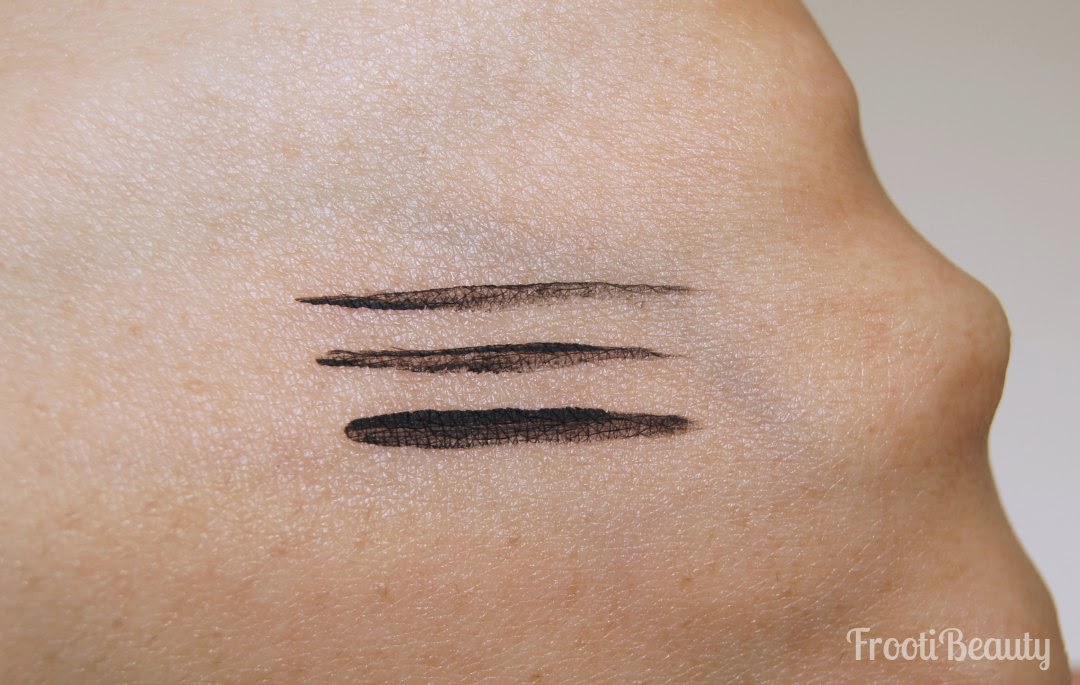
SSUICE swatched with the Perversion Angled Brush (bottom two) and old Ink For Eyes brush (top)
As you can see, the top swatch is the thinnest which was done with the old Ink For Eyes brush (comparison below). The bottom swatch is done with the brush as is; straight out of the packaging, whilst the middle swatch is done with the brush pressed together with a makeup wipe, which allows a thinner line to be achieved.
I took a picture of the new Perversion Angled Brush thickness (pressed together) versus the old Ink For Eyes brush for comparison, and the Perversion brush is thicker on the shorter angled end as well as being shorter in overall width:
left: Perversion Angled Brush; right: Ink For Eyes Brush

Swatched in comparison to the Inglot AMC Gel liner:
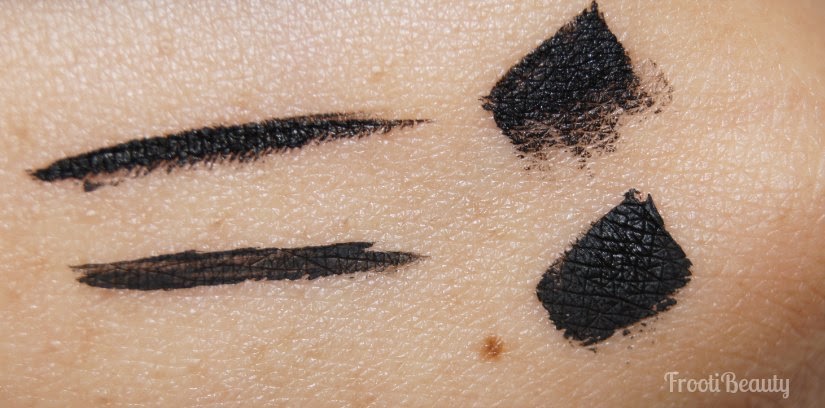
top: Inglot AMC Gel liner; bottom: Urban Decay Cream liner
Colour & Pigmentation: The SSUICE is indeed a very dark black, however compared to the Inglot AMC Gel liner, it seems more browner in colour. Pigmentation wise, the Inglot Gel liner is definitely more pigmented, whilst the Urban Decay SSUICE is more thinner/creamier in consistency, which is probably why it seems browner in colour when swatched.
Texture: The texture of this product is supremely silky and glides on beautifully with a slight sheen finish.
Packaging: The packaging is definitely a massive improvement to the old plastic Urban Decay Ink For Eyes; the glass pot and gunmetal lid certainly have a more luxurious and classy feel. The Perversion Brush also has a different appearance to the rest of the brushes by Urban Decay as it is black in colour and also has a soft touch handle which is more comfortable to use.
Longevity: The SSUICE lasts pretty long as expected from a waterproof product from Urban Decay; the swatch itself had to be scrubbed off with a makeup wipe, but thankfully it comes off with ease using an oily makeup remover.
Price: At £16, the SSUICE is £1 more than the MAC Fluidline Gel liner, or £6 more than the Inglot AMC Gel liner. The Perversion Angled Brush is reasonably priced at £12 for a one off investment that can be used with other gel/cream liners.

FrootiFactor: Overall, I'd give both the Super Saturated Ultra Intense Cream Eyeliner and the Perversion Angled Brush a 3.5 out of 5:
The Cream Eyeliner and Perversion Angled Brush are available to buy from the following retailers: Debenhams and House Of Fraser and online at Feel Unique and BeautyBay.

What do you think of these additions to Urban Decay? Do you prefer pencils or pots to apply eyeliner?
http://i.imgur.com/XWvgk0G.png?1

Caesarian Staples

Thursday, 22 May 2014

So as you may or may not know, I recently gave birth to my little baby boy and have decided to add a parent/mummy/baby blogging section, where I hope to write helpful posts and reviews of products.

I cannot believe how fast time has already flown and getting to know him is an amazing and exciting experience for me, despite the initial sleepless nights!

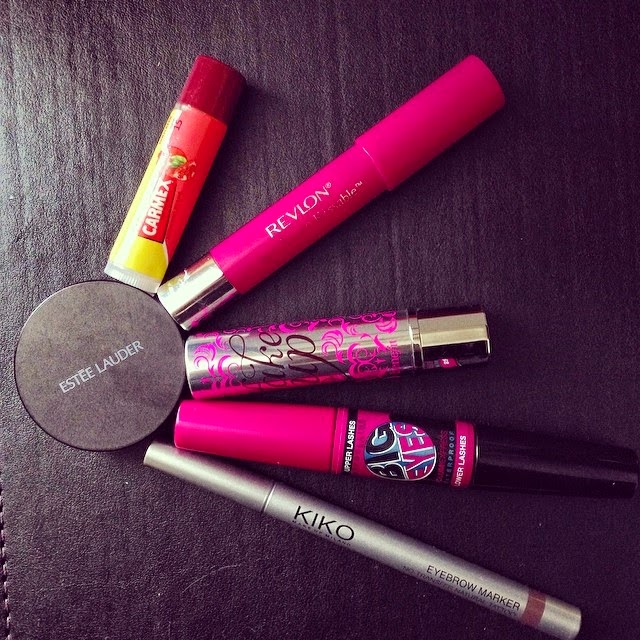
I've been more up to date with posting quick little pictures on my Instagram, and if you follow me you may have seen my quick "instablogpost" on my "hospital bag essentials", which I will now rename as "Caesarean staples".
I thought I would do an official blog post here on the blog for those who may want to refer back to this post for future reference, but essentially I'll be repeating what I wrote on my Instagram picture:
I had a planned (elective) caesarean, so of course I had time to prepare and some of the products I recommend here may not be suitable for a natural birth, so bear this in mind!

In true MUA/bblogger style I had to of course try and look my best for my delivery with bare minimal products as you're not actually allowed makeup as they need to monitor your skin colour whilst operating; so that meant to me that face products like foundation, bronzer/highlight, blush etc were a no-no.


The midwife did say I looked "far too glam to be having a baby" but she clearly didn't know she was speaking to a makeup addict haha.

So these are my basic staples with links of where to buy them (mainly Boots links below):
  • Carmex/lip balm - hospitals are very warm places and dry out your skin especially the lips as you get so thirsty; any lip balm in stick form is ideal so you're not faffing around with fingers once baby is born! If you want a 2 in 1 rather than using a separate colour for the lips, the Moisture Plus Tints will probably serve you best. 
  • Revlon Just Bitten Kissable lip stain - I wanted something that lasts much longer even after drinking etc, so I applied some of this lip stain whenever I wanted to perk up a bit for hospital visitors too.
  • Benefit Fake Up concealer - This hydrates the eye area and conceals in one; again, the hot hospital air can affect your skin hydration and depending on how long you're in the hospital for, you may need something quick to hydrate and conceal in one go, particularly with the sleepless nights! (More suited to C-Sections)
  • Estée Lauder Double Wear concealer - for more coverage and longer lasting power or to top up your under eye/face areas (if needed). I prefer the Double Wear High Cover concealer (available at Debenhams) as it has a drier texture so sticks better to the skin or on top of the Benefit Fake Up. (More suited to Natural Births)
  • Maybelline Big Eyes/Waterproof mascara - a good waterproof mascara will last long through tears (or sweat if natural birth!) and this particular one can coat top and bottom lashes. The best waterproof mascara I've tried to date is the Urban Decay Cannonball mascara, review here.
  • Kiko Eyebrow Marker - a quick and easy application without looking too overdone; also doesn't smudge or stain.
And there you have it; my most essential products I'd recommend. I'd also suggest going for multitasking products like cheek and lip tints or cream blushers so that you can add a bit of colour to your cheeks and lips for photos after birth if you wanted!

Any mums out there who had some beauty essentials they couldn't live without? Would love to make a collective list!


Tuesday Takeover: Sheen's Fabulosity Studio

Tuesday, 13 May 2014

Hello my lovely readers!

I've been feeling uber guilty about the lack of posts and have been trying to compensate by posting mini updates on my Instagram, so do feel free to follow to keep up with what I'm loving at the mo!

This weeks Tuesday Takeover is by Shireen who is reviewing the Illamasqua cream blusher in Dixie:

Illamasqua Dixie Blush [review]
Hello to all you fabulous readers. This is Shireen from Sheen's Fabulosity Studio, a very good friend of mine from Pyari Beauty told me that Safiyah was looking for guest bloggers for her wonderful blog so naturally I jumped at the task.

I love this time of year when the chunky sweaters are chucked away in the suitcase giving way to some pastel colours and light waterfall cardigans. During this time I like my makeup to be a bit bright as well, with a sprinkling of bronzer so that the pastiness of winter does not show up on my face. In the matter of hiding the winter paste I came across Illamasqua last year in December when they were having a sale and boy was this blusher a bargain at £5, unfortunately now its not on sale and it is £21.50 from Illamasqua.com, but it's totally worth it. Just look at the beautiful texture of this blusher, its really creamy but once applied it does not feel like you have a lot on your face and experimenting with it, I found some new tips and tricks to make this blusher THE thing to use everyday this Spring/Summer.
This beautiful pot gives you a very dewy finish and its a warm coral pink, perfect for my complexion. Its a bit difficult to find a good blusher for myself as I have a yellow undertone, so a warm coral that suits me is pretty hard to come by but this fits the bill really well. For me, I apply this with an Eco Tools foundation brush which I have found is pretty useful with anything creamy. Then blend upwards in circular motion with your brush into a "c shape" to achieve a natural flush rather than a caked on fake blush. For this blusher, less is more just build it up but this colour is so warm that you would not need more. 

Apply it on foundation for a dewy finish or under the foundation, yes, you heard me right, use it under your foundation for a wonderful glow and it will look so natural people will think its your own natural blush or flush coming on from under the foundation. Perfect for the no makeup "makeup" look.

You can also apply this cream blusher as a lip stain or as a balm and it works like a dream; it has vitamin E in it so it does not dry your lips. Apply it with your fingers and blend, Voila you have a matching lip colour that will suit you much better than any other lip colour with this blush. This is becoming my go to blusher for this season until I fall in love with another blusher. Famous last words, Dixie you are fabulous. 

Love and Peace All 
Sheen x
 

Urban Decay Electric Pressed Pigment Palette: Swatches and Review

Tuesday, 1 April 2014

Following my last post featuring a makeup look using the Urban Decay Electric palette, I thought I'd do a quick review of the palette with swatches for you all to see just how pigmented the palette actually is.
As the name suggests, the palette consists of pressed pigments which means that the colour payoff is not chalky or invisible as with other bright eye shadows; the Sleek Acid palette has very similar colours, however I've found the neon colours to not show up without NYX Jumbo Eye Pencil as a base, whereas these UD ones don't even need a primer to show up as you can see below:
Colour & Pigmentation: The palette has amazing colour payoff purely because they're pressed pigments; this also means that the soft texture can cause the shadow to have slight fallout, but with its amazing pigmentation, it's worth it (and I always start with the eyes anyway, so fallout can be wiped away).
The palette consists of mattes and shimmers with one metallic silver shade (Revolt).
My personal favourites are Fringe (satin teal), Jilted (two toned fuchsia-blue) and Urban (bright metallic purple).
All shades are new except for Chaos which was available in the Vice Palette and Revolt which was in the Anarchy Face Case.
Texture: The texture is soft and velvety, no need to dig with a finger or brush to get the colour to show (as with all UD shadows!).
Packaging: Not too sure if I like the smoke-screen print on the front of the palette, however it certainly corresponds well with the shades inside so you know what you're reaching for when amongst other palettes. I do however like the sleek feel of the packaging and the generous sized mirror; the brush is also different to the usual metallic looking brushes included in other palettes; this double ended brush has black casing and bright purple synthetic brush fibres.
Longevity: As with all UD shadows, these are long lasting but even more so due to the fact they're pressed pigments. Some shadows like SlowBurn and Savage do stain however, so best to be careful.
Price: At £38, it's slightly pricier than a Naked palette, but still pretty worth it considering single eye shadows (non pressed pigment) are usually £14 each.


FrootiFactor: Overall, I'd give the palette a 4 out of 5; aside from the fallout and smoke-screen design, I'm glad to see UD are back to their bright and colourful selves seeing as it's what I fell in love with about them in the first place.

The Electric Palette is available from today (April 1st 2014) at the following retailers: Debenhams and House Of Fraser and John Lewis.

What do you think of this palette? Do you prefer the Naked collection or would you like to see more brights from Urban Decay?


FFF: Urban Decay Electric Palette Makeup Look

Friday, 28 March 2014

Hi guys!

So I managed to get some spare time this week to do a makeup look which is no easy feat with a newborn by the way!

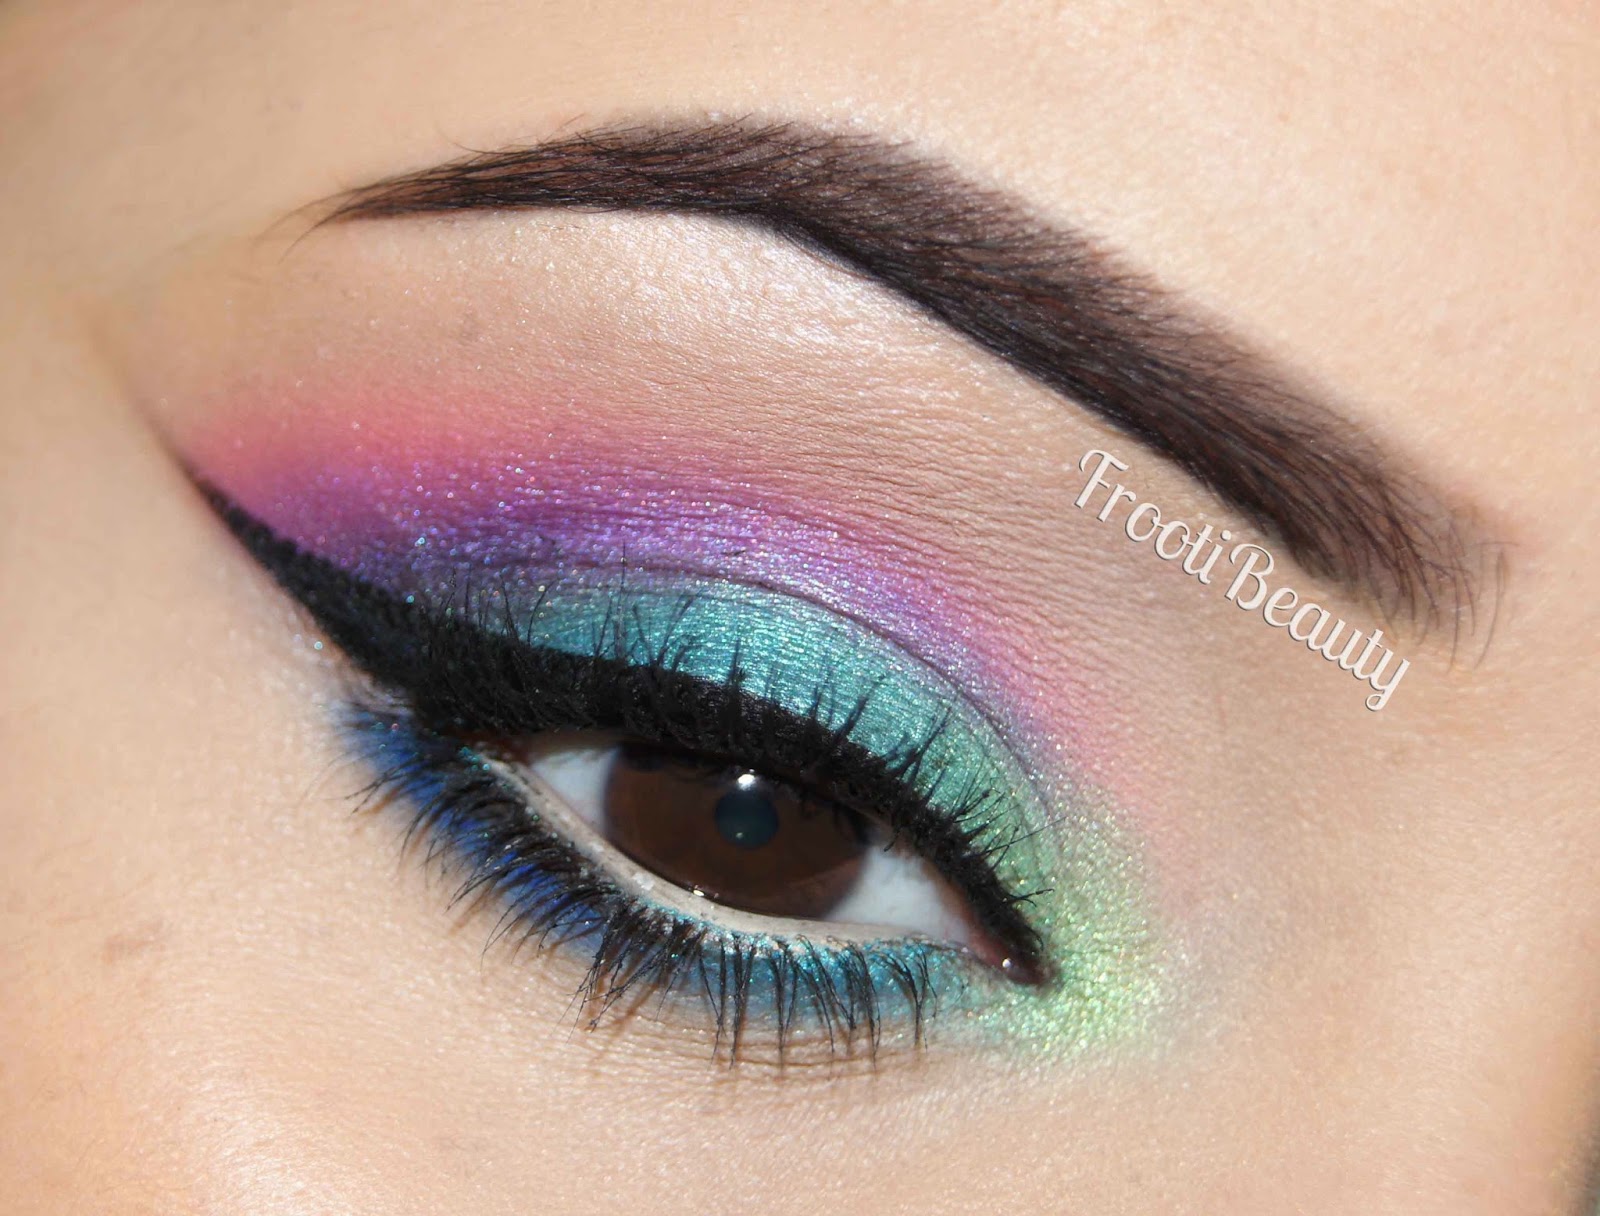
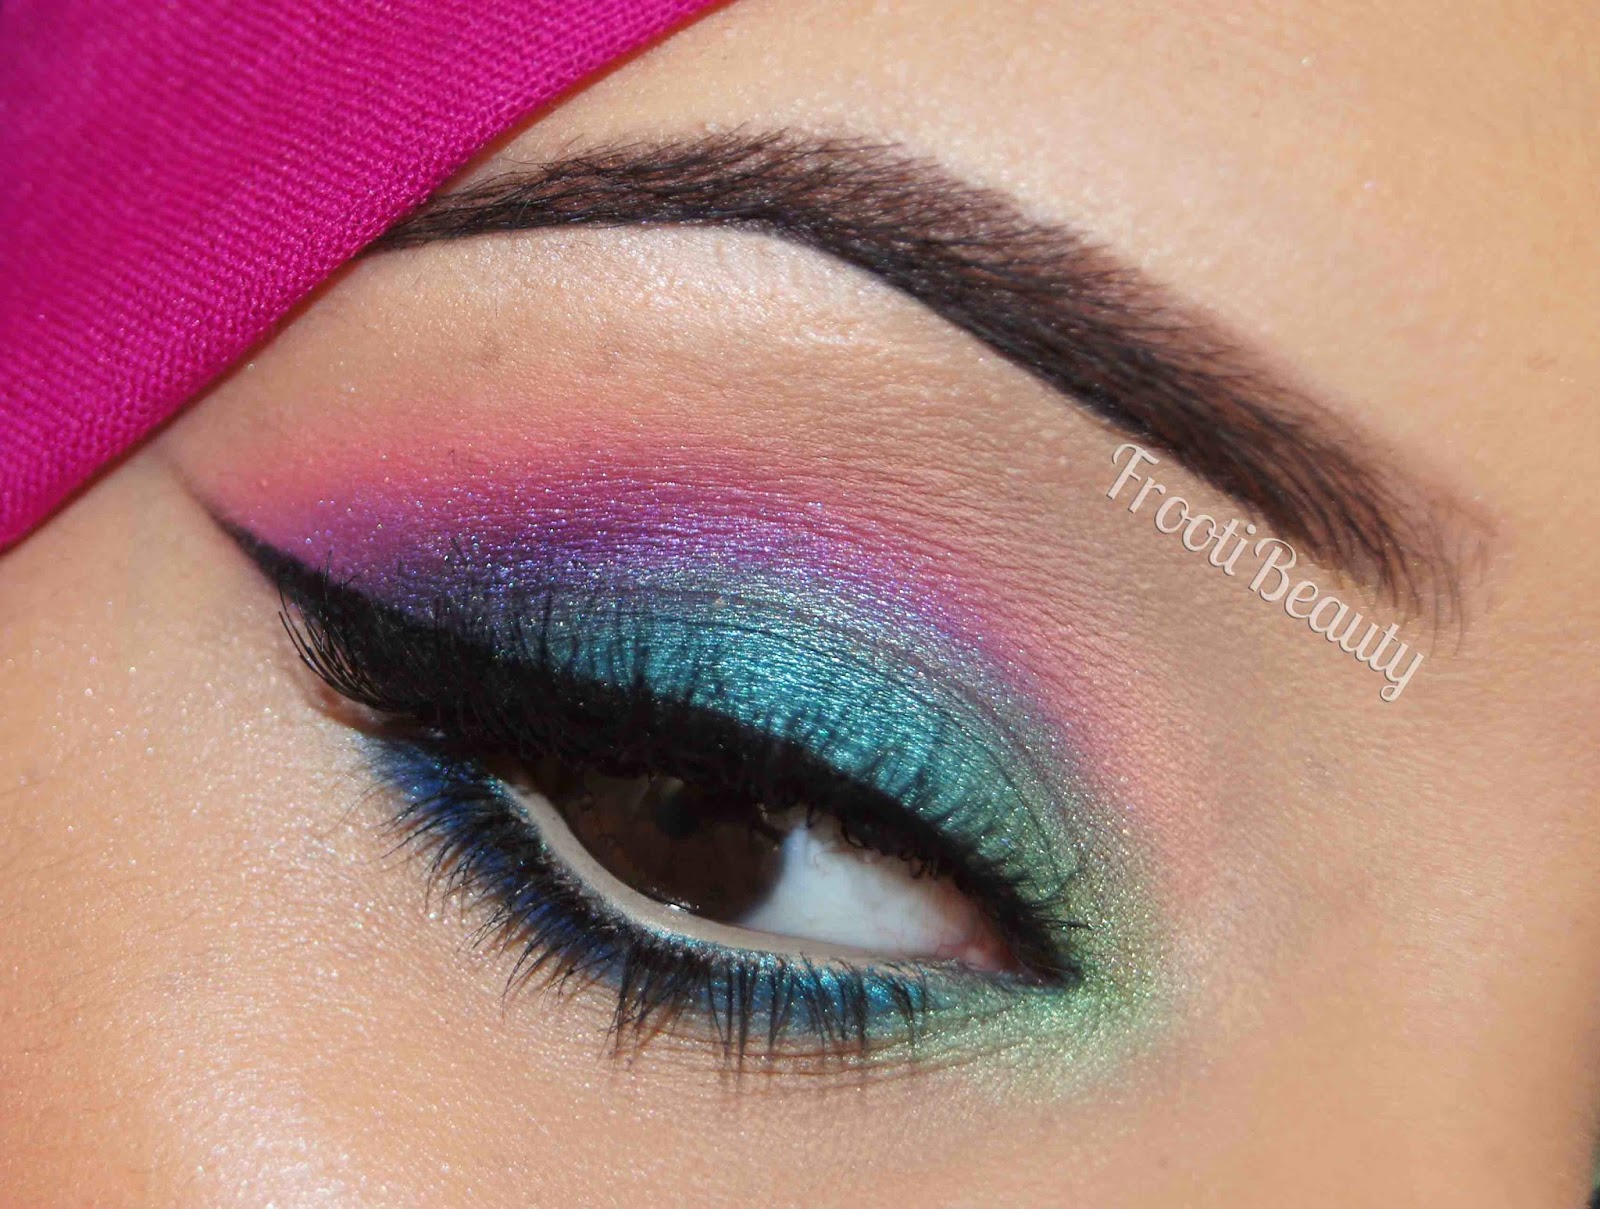
I was uber excited to use the Urban Decay Electric Palette that I was sent (releasing on April 1st 2014), so I got straight to it, trying to use as many of the colours in this one look.. 

Unfortunately I won't be able to describe what I put where for the time being as I'm short for time with posts, however once baby settles I'll be able to describe more (and hopefully get some more YouTube tutorials done!)

Products used:
Eyes:

> UDPP - Eden
> Urban Decay Electric Palette - Gonzo, Slowburn, Fringe, Chaos, Urban, Freak

> Urban Decay Naked Basics Palette - W.O.S, Naked2, Crave
> Inglot AMC Gel liner in 77 (black)
> Illamasqua Eye Colouring Pencil - Vow
> Daniel Sandler Jumbo Jet Mascara
> MAC Pro Longwear concealer - NC30
> Eldora False Eyelashes - H151
Face: 
> UD Naked Skin foundation in 6.0
> Daniel Sandler Sculpt & Slim Effect Contour Powder
> Daniel Sandler Watercolour Blusher in Spicey
Lips:
> UD lip pencil - Naked
> Illamasqua lipstick - Luster


eye makeup without eyelashes
eye makeup with eyelashes
full face makeup
full face makeup
I hope you enjoyed this look, it includes some of my recent makeup acquisitions including the Daniel Sandler Watercolour Blusher and Sculpt & Slim Contour Powder, Eldora False Eyelashes and of course the new Illamasqua lipstick in Luster.

The Urban Decay Electric palette will be available priced at £38 on April 1st from Debenhams, House Of Fraser, Look Fantastic, Feel Unique, HQHair and BeautyBay.

Would you wear this look?


Tuesday Takeover: Pyari Beauty

Tuesday, 18 March 2014

Hello my lovelies!
Apologies for the lack of posts over the last 2 weeks, but if you've been following me on Instagram/Facebook/Twitter, you may have noticed I've been away to give birth to my beautiful son.. So I think that is a valid excuse for now!

Once again I've asked a fellow blogger to guest post and this week it's none other than blogger and friend Aaliyah of Pyari Beauty, who will be reviewing the MAC Pro Longwear concealer that we shopped together for as it's one of my most favourite concealers and kit staples.


Hello everyone! I’m Aaliyah from Pyari Beauty, when Safiyah asked me if I wanted to guest post on her blog of course I jumped at the chance. Today I will be reviewing the MAC Pro Longwear Concealer. I first came across this concealer when Safiyah included it a few months ago in her concealer stash on Instagram. After hearing her positive thoughts on it I knew I had to get it. When in Westfield Stratford one day, I finally got matched and the shade I was matched to was NW20. I purchased it there and then and it's been love ever since. For those who love the ever popular Collection Lasting Perfection Concealer, the Pro Longwear Concealer is the big sister of that except the Pro Longwear Concealer is oh so better. You get 5 ml of concealer in a sleek glass vial which comes with a pump. You only need the tiniest amount so you need to be careful when you dispense the product. The formula of this is creamy but it dries fairly quickly which can make it a little difficult to work with, so you need to make sure to blend it before it dries. I love using this for my under eyes and any blemishes, it's for sure one of those multi purpose concealers which can be used anywhere. To apply it underneath my eyes, I use my ring finger which is my preferred method, however you can use a Real Techniques Buffing Brush as well. When I apply this underneath my eyes, I do find it creases slightly but powdering over the concealer helps with this problem. Longevity wise this concealer is amazing. I don't find that I need to reapply my concealer after a few hours as I have experienced with other concealers. It's something that I can apply and not need to worry about whether it'll still be there at the end of the day. Overall I'm very happy with it and I have definitely found a new favourite. I highly recommend it for anyone looking for a multi-purpose, long lasting full coverage concealer.

What's your favourite multi-purpose concealer?
Find Me On → BloglovinFacebookInstagramPyari Beauty; & Twitter.
 
 
template design by Studio Mommy (© copyright 2015)