Yellow Orange Sunrise look

Tuesday 30 November 2010

Despite the snow we've had today in London, I decided to go for a bright yellow-orange look! 
I thought I'd use my Manly palette for this, seeing as it has the yellows I needed for this look, although I was tempted to use the Sleek Good Girl palette for the orange look I was going for. I wanted to finally use the scarily orange looking blush I got from NYX in "cinnamon":


The terrible cold weather we've been having in London is wreaking havoc on my skin though, dry patches are forming on my cheeks, near my eyes and on parts of my body, it's horrible! For some reason this winter feels way more harsher than any other, or is it just me?!


Anyway, here's the products I used for the look:

> UDPP
> Manly 120 palette
> UD 24/7 "zero" eyeliner
> MAC rapidblack penultimate eyeliner
> MAC select moisturecover concealer in NC35
> Dior Iconic mascara (black)
> NYX powder blush in "cinnamon"
> No 7 Sheer Temptation lipstick in "smoulder"


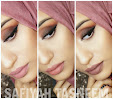
To start, I used two yellow colours for the inner corner of the eyes and the brow bone. I then used peach-orange colours along the middle of the eyelids, blending with the yellow, and finally dark orange for the outer corners of the eyelids and the wing. I then went back over the yellow on the inner corner of the eyes (to make it pop, as it usually gets dulled down by darker colours along the lid), followed by MAC rapidblack eyeliner on the top lid, whilst using the UD Zero liner for the bottom lashline. Finally I added Dior Iconic mascara to the top and bottom lashes (using a zigzag motion), and MAC concealer under the eyes.
I used the NYX Cinnamon powder blush as I would a blusher, but in all honesty it would be better suited as a bronzer, as I ended up looking too tangoed! For the lips I used a lipstick I bought around the time of my wedding, its very sheer but gives a nice hint of colour to the lips and is very moisturising!

Here's how it looked:


As you can see in the third pic, I look quite orange! Even so, using it sparely can give a nice slightly tanned look, so it's not that bad a product. I would like to try the pink/purples in the range too now!

<3

Naked Spotting

Sunday 28 November 2010

No it's not in any way related to flashing or nudity, last Wednesday I popped into Boots in High Street Kensington and spotted Urban Decay Naked Palettes! I was pretty shocked seeing as they're sold out in every shop that stocks Urban Decay, so I thought it was worth blogging about for those of you who live in London and are desperately seeking the naughty palette.

I managed to take some pics with my phone of the stock on Wednesday (hopefully they're still there!):


Good luck finding them otherwise!

Also on Wednesday I spotted something that made me stop and stare in pleasant shock:


My own beauty brand (if it was spelled UI insteady of OO)! I joke, it was M&S's range of budget beauty products, but it caught my eye and I was pretty impressed.. future buying prospects?! 

Finally, I'm putting together another giveaway seeing as the numbers are creeping up slowly.. this time it'll be a bit better, so when I reach 130 followers on Google/Blogger, I'll announce more info! Keep tuned and don't forget to keep sharing, so it comes sooner ;)

<3

Naked palette leopard print Beyonce eyes

Friday 26 November 2010

After looking back at Beyonce's Kitty Kat video (click here), I thought I'd try the once crazed leopard print eye, and what better palette to use than the UD Naked palette!

Here's some stills of how Beyonce's eyemakeup looked:


Very meowww!


Here's the products used for the look:
 
> Bare Minerals foundation "medium beige" & "warmth"
> UDPP
> UD Naked palette - half baked, smog & darkhorse (for eyebrow filling)
> MAC rapidblack penultimate eyeliner
> UD Ink For Eyes in "zero"
> MAC moisturecover concealer in NC35
> Dior Iconic mascara
> Sleek Glo in "bronze baby"
> Elf lipgloss in "honey"


I started with putting Half Baked all over the eye after using UDPP. I then drew leopard "C" shapes all over the eyes with MAC rapidblack penultimate eyeliner, from eyelid to eyebrow a la Beyonce. I filled the C shapes with Smog and used Darkhorse to fill in my eyebrows. To line the eyes I used UD Ink For Eyes in Zero, using the liner brush for the top eyelid, and the smudger for the bottom line, smudging heavily for the smoky line that Beyonce dons in the video. I finished the eyes with Dior Iconic mascara...

Her face is very bronzed and contoured in the vid, so I tried to re-enact the angular bronzed cheeks, but couldn't go the whole hog, reshaping the nose etc. I used the "warmth" from Bare Minerals on the cheeks, as well as a swipe down the brown-bronze bit of Sleek Glo Baby, in a right angled sweep under the cheek bone and straight down.
For the lips I used a golden-nude colour; Elf lipgloss in Honey.

Me vs B..

<3

Glittery Fishnet look

Monday 22 November 2010

Sorry I've been busy of late, Saturday at work was manic! Guess everyone's doing their Christmas shopping, but either way I was almost driven mental! I finally found the time to blog though, so here goes!

Here's a look I did using the Red Herring glitter creams and my favourite eyeshadow - UD Fishnet.

Products used:

> Bare Minerals foundation in "medium beige"
> UDPP
> Clinique "sugar sugar" eyeshadow (not in pic)
> UD "fishnet" eyeshadow
> MAC VV "she who dares" eyeshadow - midnight blue bit
> UD Ink for Eyes in "zero"
> Red Herring glitter palette
> Dior Show in black
> MAC moisturecover concealer in "213"
> Illamasqua blusher in "hussy"
> NYX diamond sparkle lipstick in "sparkling orchid"

After applying Bare Minerals foundation all over the face, I applied Clinique Sugar Sugar eyeshadow to the inner corners of the eyes and under the brows (notice the new shape?? Let me know what you think!) I then used UD Fishnet on the middle of the eyelids followed by the blue part of MAC VV She Who Dares eyeshadow on the outer corners of the eyelids, blending all three together. I then used the purple shade of glitters (as pointed in the above pic) for the lower lashline, taking it out in a flick upwards. I then used Fishnet on top of the glitter cream to give some more colour. As for the liner, I used UD ink for eyes in Zero for the top liner and also used it on the lower waterline and used the smudger to blend the black and not make it so harsh. I then used Dior Show mascara on the top and bottom lashes.

For the cheeks I decided to use the Illamasqua Hussy blush as its pinky and pink & purple are my favourite colours together! For the lips I used NYX Sparkling Orchid and Voila!

 
Hope you like!

<3

All that glitters..

Friday 19 November 2010

As a complete girly girl and total magpie, I've always loved all things shiny/glittery/sparkly. I get super excited by glitter especially, so when I saw the Mavala "diamond" nail polishes, I couldn't help but buy. Of course I used my loyalty points at Debenhams to get it, but the polishes are so gorgeous I would have bought without (and without Mr Frootibeauty knowing!)


As with all glittery cosmetics though, it's not so easy to get off, but it's worth the struggle for how pretty they are! My favourite without a doubt is the "pure diamond" - multicoloured silver glitter! It's the reason I actually bought the set. At the moment Debenhams are selling a pack of 8 polishes for £15 (6 "diamond"/glitter polishes and a top and base coat), but I didn't like the other glittery polishes too tough, so I just stuck with the duo set =)

I also found a glitter cream eyeshadow palette (own brand again!) and just had to try it.. there were so many colours and they were all shining at me!
and out of the packaging (click picture to enlarge):


I tried them out and my favourite one so far has to be the big peach glitter circle in the bottom left corner. Colour-wise, the glitters are quite sheer with only a hint of colour and they're quite tricky to work with, using the included applicators anyway! Compared to the NYX glitter creams (where the glitter sat on top of the stickier part), this did seem a bit easier, but in all honesty the effect was a little better on the eyes with the NYX glitter creams.

As for the NYX Candy glitter eyeliner, I bought it to see if it was a dupe of my most favourite UD Heavy metal eyeliner - Spandex. As you can see in the picture below, the colour is almost identical! 


I am happy with this eyeliner in terms of dupe for UD Spandex, but the applicator brush is way too thick than what I am used to with UD; Here's Urban Decay's fine brush:


And here's NYX applicator:


I'll be posting the makeup look I did with the glitter creams, and once my nails have grown back I'll hopefully get some pictures with the Mavala diamond polishes =)

<3

Brows(e) & Findings..

Thursday 18 November 2010


So sorry, I've been busy the last couple days, work, Eid, girls nights, family nights and now work and babysitting tomorrow! On a good note, my lovely hubby got me a new camera for Eid & this ones better than the last one! It's another Sony camera but it's absolutely amazing, can't wait to do makeup looks on it, hopefully there'll be one up by Friday, so stay tuned!
I also went Southall (aka mini India in London!) on Monday and found a bargainous shop off the high street, selling MAC, Benefit, Chanel and other exclusive brands for discounted prices! Unfortunately, hubby was with me and has put a major spending ban on any kind of makeup *sulks* but I managed to get a MAC Hello Kitty eyeshadow palette that I'll blog about on Friday. I also got my eyebrows reshaped to finally become more even, but I'm still in two minds on whether I like it or not! o_O


Anyway, I'll be back soooon, so much to blog about now!


<3

Gold eyes, Red Lips

Sunday 14 November 2010

Here's a look I did with the better Sony camera that suits most skin types.. but I personally don't think it suits my own skin tone. On darker skin colour and even pale complexions this look is stunning, but I don't personally like it on myself! I thought I'd give it a go though, seeing as it's a glamourous look and I can use my new Barry M buys - Lip Lacquer Crayon in No 1 (red) & Lip Gloss Wand in Cherry (glitter).

I tried to make this a budget look, using the Gilt gold cream eyeshadow from Primark that I got a couple weeks ago, and a couple other budget brands, Sleek, Barry M etc.
Here's a full list of products used (although it doesn't look that much!):

> UDPP
> Primark Gilt Gold cream eyeshadow
> Sleek inkpot
> myface.cosmetics concealer in "213"
> Dior Show mascara (black)
> Sleek Rose Gold blush
> Barry M Lip Lacquer Crayon in "No. 1"
> Barry M Lip Gloss Wand in "cherry"

First I applied UDPP, although it rendered useless against the cream eyeshadow! I've never been a fan of cream eyeshadows for this exact reason, hence why the Gold Gilt all over the eyelid is somewhat lightly applied- to avoid creases. After applying Gold Gilt to the full eyelid, I used Sleek inkpot as a topliner, leaving the lower lashline bare. I then used under eye concealer and finished the eye with Dior Show mascara.
For the rest of the face I used Sleek Rose Gold blush on the cheeks, then Barry M No. 1 Lip Lacquer on the lips (here's how it looks alone):

 
Then I added Barry M Lip Gloss Wand in Cherry on top:


Here's how it looked altogether:


<3

Winning Look

Friday 12 November 2010

Excuse the pun title, couldn't resist lol!


For this look I used:
> Bare Minerals Get Started Kit
> UD PP
> NYX "lagoon sparkle" single eyeshadow &
> NYX "purple pearl" Ultimate Pearl eyeshadow
> NYX "surreal"  Glitter Cream Palette (far left purple-blue)
> UD "zero" Ink For Eyes
> Eyelash curlers
> L'oreal Telescopic mascara in black
> NYX Diamond Sparkle Lipstick in "sparkling orchid"

To start, I used the Bare Minerals kit:


First I applied the "medium beige" foundation (medium looked too light, you get two in the kit), then I used the All Over Face Colour in "warmth", then applied the concealer "summer bisque" under my eyes (although I think it's too white/light for my colour), followed by the "mineral veil" all over the face. All products are instructed to be applied by three steps: Swirl (the brush), Tap, then Buff on the face. I did as instructed, with the included brushes and actually loved the effect on my skin, as I woke up today with unusually blotchy skin =(
I didn't use the included sample of Bare Minerals face primer this time round, thought I'd save it for when I get a better camera!

For the eyes, after using UDPP I added NYX Lagoon Sparkle to the inner corners of the eyes, followed by Purple Pearl to the middle and outer corners. I then added the NYX purple-blue glitter cream to the outer corners of the eyes (although it's sadly not as visible as it was in real life!). This glitter cream has the glitter on top, whilst the cream is underneath, which was different to work with, but managable!

I used my recently purchased Urban Decay Ink for Eyes in Zero, which went on so smooth, it's the best to apply with out of all of the liners I now own. Colour-wise, it's not as dark as I'd like. I then tried out the L'oreal Telescopic mascara, which I have to say I'm sadly disappointed with. It made my eyelashes look all sparse despite curling them beforehand, and brushing out with a mascara wand. I think the product was too wet than what I'm used to, which spoiled it unfortunately.


Finally I used NYX Diamond Sparkle Lipstick in Sparkling Orchid, which I love; the colour is beautiful, the camera does it no justice! It was very very moisturising, the most moisturising lipstick I've tried to date.


I personally think my skin looks airbrushed with this Bare Minerals, and a little bit tanned, but maybe it's the camera quality that's making it tanned.. I'll defo be trying with a better one soon! Even though I don't wear foundation and tend not to be a fan, I'll be saving this for special occasions/when I have more time!

As for NYX products, I'm pleasantly surprised that the products are lovely to use, I still have the Glitter Liner in "Disco Queen" to use as well as the Powder Blush in "Cinnamon" and the rest of the Glitter Creams =D

Hope this was helpful to those of you interested in either NYX products or Bare Minerals =)

<3

I love receiving packages!

I've been waiting for two packages all week and they both arrived today, so I was super excited! Last week was my luckiest week ever, first I won the NYX halloween competition to spend £35 on their website, then I entered the facebook competition of feelunique.com (click here), and I won £50 to spend on their site too! I actually thought it was a scam competition when I won £50 just like that, but then I saw other people won things too on the page, so I ordered and it worked!!
Obviously I got all my mates to enter too, but unfortunately the most they got was 10% off.. So I feel so grateful God has seen how broke I am, yet yearning a lot lol!


Anyway, here's what I ordered from NYX:


And here's what I ordered from feelunique:


When I went Covent Garden the other week with my mates, we popped into the Bare Escentuals shop, where my mate tried on their foundation with the help of the assistant. Personally, I'm not a foundation person; they're either too heavy on my skin, not the right shade, or if they're a powder like this, too dry on my already dry skin! Plus I don't like the idea of taking copious amounts of make up off (I already do with eyeshadow, concealer & blush!). 
Anyway, when I saw it being put on her, I thought it looked nice, gave great coverage and suited her tone nicely, giving her a nice glow. It's only when we were going home via the tube that I looked back at her and was wowed by how flawless her skin looked! Then I read reviews about it and how it "magically transforms your skin" after at least 15mins, and I couldn't help but believe it as I saw it with my own eyes. So obviously this was in the basket asap when I saw it, and although I hadn't tried any on myself, I decided to go with the shade that the assistant tried on her, as she's similar to me; Medium beige.
I also am still on the lookout for the perfect solution for my terrible zombie-ish dark circles and read pretty good reviews on the Garnier Caffeine Anti-dark Circles so I thought I'd give that a go.

I couldn't wait to dig in and swatch, so I tried a makeup look as soon as it came today using as much as I could and I've been wearing the NYX Diamond Sparkle lipstick since 2pm and it still feels moist.. naice!
Stand by for the makeup look (with my Lumix camera!)

<3

Fireworks FOTD look

Wednesday 10 November 2010

I know bonfire night is over, but I decided to upload a quick "fireworks" look (as Mr frootibeauty called it). I wore it on Sunday to the local fireworks display. It's nothing special, just a bit of eyeliner & glitter with red lipstick and blush.

I wore UD 24/7 eyeliner in Zero, with UD Heavy Metal glitter eyeliner in Distortion, all over the eyelid, finished with Dior Show mascara in black.


I uploaded the pic above as it accentuated the glitter.. the pics I took were in a rush so I didn't get to take proper pics and the glitter didn't show much on the ones I took =(

For the rest of the face, I used MAC concealer & MAC Truth & Light liquid powder, finishing with Illamasqua Hussy blush & a red lipstick I have from Boots' Natural Collection - Crimson.

Here's what it looked like..


I've noticed my skin looks paler when using the MAC Truth & Light, which is a shame, cos it actually has light golden glittery flecks that are really pretty!

Here's a (not so great) pic of the fireworks.. really doesn't do them any justice, they were loooooovely =)


<3
 
template design by Studio Mommy (© copyright 2015)