Motherhood Mondays: Breastfeeding Tips

Monday 8 December 2014

Hello my lovelies!

I have to say I haven't been able to blog about Baby/Parent/Mummy things as much as I'd like to and the last couple posts have been a welcome break for me to enjoy makeup and reviewing again, seeing as I'm just getting on with the actual motherhood bit haha!

But I've had a couple requests for more baby related posts and I thought I'd feature a Motherhood Mondays post as much as possible, even if it means simply posting a picture.

Since my last post was about Caesarean Staples, I thought I'd follow in chronological order of what I'd blog about next (even though my bubba is now 9 months old!)

Probably the first and most important thing for me after giving birth was breastfeeding; I am so pro breastfeeding, not only after the antenatal classes but especially after studying Human Nutrition and the human body; the benefits are endless and I knew I wanted to breastfeed no matter what.

For those who think its a simple process and comes "naturally", I'd say the reality can be far from it and it takes a lot of work!  
Here are 10 tips/things I learned (some, the hard way):

1) Latching on  
Initial latching on can be painful; no matter how many midwives you confirm with, it's better to see an actual breastfeeding specialist in a class (if available to you) as they are a lot more supportive and helpful. Trying different positions helps and I found using cushions very helpful!

2) Creams & Pads  
Lansinoh was my favourite brand for nipple cream as well as breast pads; I tried a few other branded breast pads but these were by far the best! Can be bought from Boots, John Lewis, Mothercare.
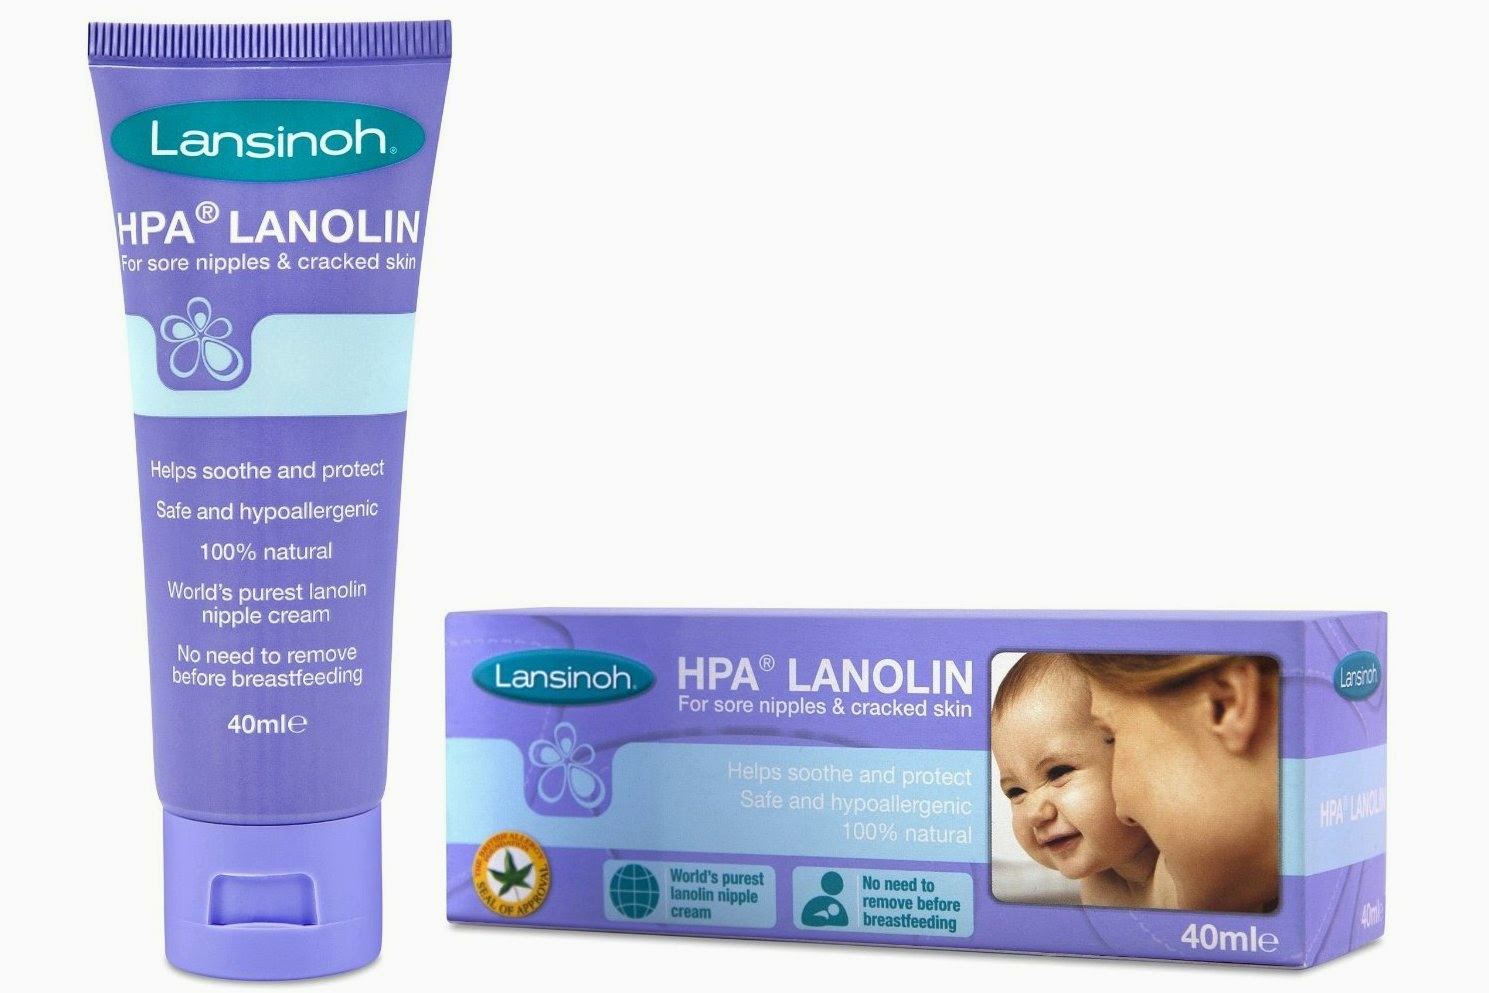
[The best prices I found for the cream is £6.66 and for the breast pads £3.66 for reference].


3) Determination / Mentor
Breastfeeding requires determination, so I would say if you want to breastfeed, buddy up with someone who can push you when you feel like stopping (and believe me, there's so many times you feel like giving up).
I was lucky enough to have a family member to lean on at all sorts of hours who had recent experience herself and I would recommend the same for anyone else as it's still fresh in their heads (mums/aunts/grandmothers may have forgotten the struggle).


4) Eating/Drinking Well  
You have to keep your own nutrition up, but also bear in mind you have to be careful what you're eating as it affects the little one's stomach; you don't want to eat something too acidic or gassy or spicy for instance, but at the same time, you're pretty much using energy to turn food into milk, so you need to eat as many calories as you can and of course a lot of milk ideally. I found chocolate milkshakes did the trick for me and also somehow kept me awake for the many night time feeds!

5) Immunity  
Seeing as your chest is out a lot whilst feeding and your immunity is low, you can expect to get ill fairly frequently; so continue taking Pregnacare/pregnancy vitamins to try and keep on top of your vitamins and minerals.

6) Midwives
Some can be awesome, so ask as many questions as you can, but some can make you feel like giving up and formula feeding. Whilst I have nothing against formula feeding, I do think that it's worth pushing breastfeeding exclusively as much as you physically can, for as long as possible, purely because the health benefits for your baby supersede formula feeding massively.. I could write a post or even a book on breastfeeding benefits alone!

7) Expressing 
I started hand expressing but would wholeheartedly recommend an electric pump as it saved time and felt a lot more comfortable/no pain.
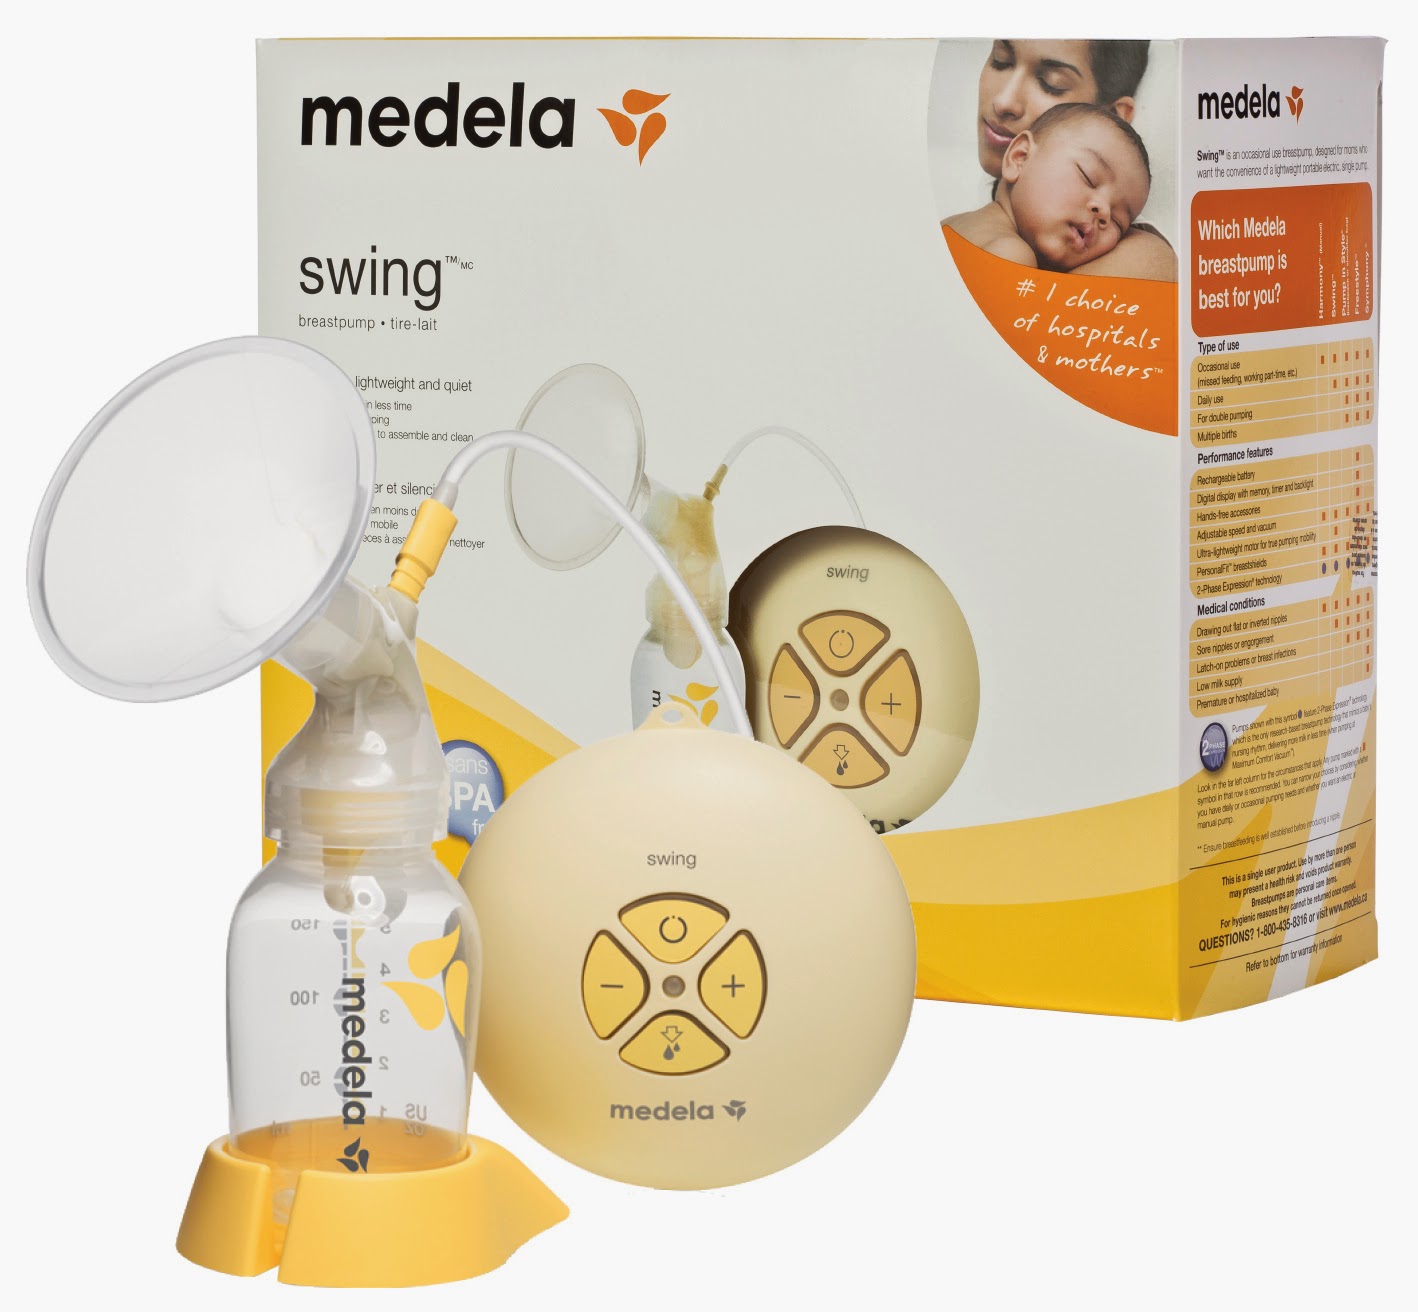
I used the Medela Swing, bought from John Lewis (also available at Boots and Mothercare) and it was probably the best breastfeeding product for me.
It can be disheartening expressing sometimes, because unfortunately it's not an accurate estimate of what your baby is drinking, but expressing is a great way to top up for night feeds rather than formula, or to give yourself a break at night time (and breastmilk lasts longer than formula).


8) Bottles 
The only ones I can recommend in conjunction with breastfeeding are the ones that require baby to suck as they do with breastfeeding. I came across the Haberman Suckle Feeder bottles at a baby show and was so impressed, I never bothered to try any other bottle (aside from Mam for feeding water).
Every bottle claims they're "anti colic" but I swear this one actually works as the filter works to get rid of air bubbles, as well as the fact that it allows the baby to control it's own drinking flow without any overflow or spluttering. It was tricky to get my bubs to understand the bottle at first but I'm glad I persevered because he's able to switch from bottle to breast and vice versa.

9) Breastfeeding Cover
When you're out an about, the last thing you want is a hungry screaming baby, so I would definitely recommend the Bebe Au Lait breastfeeding covers (also available at John Lewis, Boots and Mothercare. You can of course use a large muslin cloth or scarf (or express) but the reason why I think the Bebe Au Lait is worth it is because the neckline has a curved semi rigid band in it so you can see directly down at baby (and them up at you) as well as letting air in, but without anyone seeing from any angle. It also has a bit of towelling on the corners and a pocket which are cute and handy features. 

10) Relax
Finally, the best tip that I could give (and try to still give myself) is - relax! Stressing in any form is not helpful at all for milk production (not to mention the stress hormones affect baby), so it's best to just switch off as much as possible and enjoy baby-mummy time, especially as exclusively breastfeeding is only around 6 months! <3

I know I probably haven't covered half as many things as I could have regarding breastfeeding, but feel free to email me if you have any questions or comment below if you have any tips of your own!
 
post signature

FFF: Illamasqua Facets Makeup Look

Friday 28 November 2014

I'm treating my followers to yet another week of blogging (making up for lost time clearly!)
I got to play around with the Facets Semblance Palette again this week (review here), and managed to get a quick makeup look done. I also used a few shades from my new Makeup Revolution Essential Mattes palette as it's great for blending <3

Products used:
Eyes:
• UDPP - Eden

Anastasia Beverly Hills Dipbrow Pomade - Ebony
• Illamasqua Semblance palette
• Makeup Revolution Essential Mattes palette

• NYX Two Timer eyeliner

• Illamasqua Vow Colouring Eye pencil
• Eldora lashes: H151
• Lancome Hypnose Drama mascara
Face:
• Illamasqua Skinbase foundation in SB10
• Skinbase Lift in Medium 1
• Illamasqua sculpting duo: Nefertiti

Makeup Revolution Face Contour Kit
Lips: 
• Urban Decay Naked lip liner

Illamasqua lipsticks- Bare

Eyes:
1) Prime the eyelids with UDPP Eden and fill in brows with Anastasia Beverly Hills Dipbrow Pomade in Ebony.
2) With a blending brush I added a matte brown eyeshadow from the MUR Essential Mattes palette to just above the crease blending upwards and downwards. I also added a beigey flesh toned colour above this and a lighter matte colour on the brow bone with a bit of Slink (Semblance).
3) I then patted on Obsidian (matte black - Semblance palette) to the whole eyelid except for a small part on the middle of the eyelid.
4) I added Slink and a tiny bit of Tango to the middle of the eyelid, blending back and forth.

5) I lined the bottom waterline with Vow Colouring Eye Pencil and shaded the outer bottom lashline with Obsidian and a bit of Slink.
6) For the eyeliner I used the NYX Two Timer eyeliner- the felt side for the top liner detail and the kohl side to tightline the inner top eye.
7) I coated the lashes with Lancome Hypnose Drama mascara, followed by Eldora False Lashes in H151 (need to restock soon!).

Face & Lips

1) I concealed under the eyes using the Illamasqua Skinbase Lift in Medium 1 and used Illamasqua Skinbase foundation in SB10 all over the face.
2) I then lightly contoured the face using the Illamasqua Sculpting Duo, but only using Nefertiti in the hollows of the cheeks. I then used MUR Face Contour Kit (part of a Christmas Gift Set); using the matte contour shade to blend in with Nefertiti and then the blush and highlight above the cheeks.
3) I lined the lips using Urban Decay Naked lip liner, followed by Illamasqua Bare lipstick.

And voila! 
Here's a collage of the eyes and half my face: 

This look is very similar in technique to the Motives Brown-Copper makeup look that I taught in my last masterclass, and also the Purple-Pink glittery look here.

Do you like this look? Let me know what you'd like to see next!

post signature

Sunday Swatches: Makeup Revolution Essential Mattes

Sunday 23 November 2014

Hello my dears, hope you've all been well.

This instalment of Sunday Swatches features an affordable "drugstore" brand which is fairly new - Makeup Revolution.
I posted a pic of my mini haul on Instagram (below), taking advantage of the Superdrug 3 for 2 promotion of course! (I bought two of the new Undress Your Skin highlighters).
 
I have to say Superdrug are churning out affordable brands that actually have great quality products and I'm impressed even though I'm a bit of a makeup snob at times.

I checked out a Makeup Revolution stand by swatching away in true beauty blogger style and was pretty impressed at the softness of the texture, but more importantly the colour payoff. 
I was drawn to the "Essential Mattes" palette for 2 reasons 
1) The palette boasts a range of neutral colours
2) They were all matte! 

For those of you who know me, follow my makeup posts or have attended my masterclass, you will know how much I'm a fan of neutral matte colours as they play a huge part in blending eyeshadow.

So when I saw that not only were they pigmented and soft, but there were 12 shadows and for ONLY £4, it was a no brainer.

Colour & Pigmentation: The neutral shades should pretty much suit every skintone. Pigmentation was more prominent in the darker matte shades but the lighter ones were satisfactory too in colour pay off.
Texture: Silky and soft
Packaging: No fuss, standard packaging, possibly breakable if it fell from a height. I like that it has a window at the front so you can see the palette shades at a glance (handy in case I buy more palettes)!
Longevity: I found the shadows to be of average lasting power, however I always wear UDPP under eyeshadows so can't comment without!
Price: At £4 for 12 shades it works out to about 33p per eyeshadow.. insane!

FrootiFactor: This is my first encounter with the brand and I'm impressed!
I'd give this product a 4.5 out of 5, because I'm sure the packaging wont last in a kit or under pressure, but for £4 I really wouldn't be breaking the bank to buy another!


The Essential Mattes palette can be bought from the Makeup Revolution website or from Superdrug, who are still holding the 3 for 2 promotion


Have you tried anything from Makeup Revolution? What would you recommend? 
post signature

Sunday Swatches: Illamasqua 2014 Releases - Summary Post

Sunday 9 November 2014

[picture and text heavy post!]
Following my last post, I thought I'd run through some of the recent Illamasqua releases that I've had the chance to play around with and use in the time I haven't blogged.

As you may well know, Illamasqua is a brand close to my heart; I love that they push boundaries and cater for all skintones.
Lately, Illamasqua have been releasing more neutral and toned down products compared to their previous collections with more daring colours (as in the Paranormal and Human Fundamentalism collections).
I like that they are producing more everyday-friendly products however the artistic streak in me hopes they pull a wild card soon and make something eye catching again.

This post will feature a round up of my favourites from the recent releases, hope you enjoy!

Nude Glamore Lipsticks 
Since the release of the Glamore Satin Finish Lipsticks in February this year (blog post here), I have to say I was really impressed with the formula and longevity and was looking forward to the release of any new shades.
July 2014 brought the release of 7 Nude Glamore Lipsticks in the same formulation as the original Glamore with a range of shades for all skintones, including rose, earthy rose and nude corals
I picked the nude coral in "Cherub" (above) as I tend to wear MAC Crosswires almost every other day, which is definitely my go-to lip colour. Below I swatched Cherub and Crosswires together to see the difference and you can see Cherub is a slightly less-pink coral.


International Season Collection
 
August saw the release of the International Season Collection, exclusively in Selfridges.
It consisted of the above items; a new Sculpting Duo shade ("Illuminate & Nefertiti) and a new Gleam/highlighter ("Mirage"), a Brow Gel ("Strike") and a nude-pink lipstick in "Bare".
I have to say I loved every single item in this collection. 

If you remember my blog post from the Holiday 2013 Collection, you would remember me gushing about my love for contouring products and how I wished Illamasqua would release more shades. Well they did and this particular Sculpting Duo's contouring shade (Nefertiti) suits my skintone gorgeously, so much so that I use it every day for a subtle contour rather than a darker, heavier one. I do prefer a lighter highlighting colour so I tend to use the "Lumos" highlighter from the previous Sculpting Duo as "Illuminate" was quite golden and warmer than I am used to (see swatches below).
Illamasqua need to now make an even darker Sculpting Duo shade and my contour collection will be set; chiselled perfect face here I come!

My next favourite product had to be the Precision Brow Gel; up until now I've been using the Anastasia Beverly Hills Dipbrow Pomade in Ebony and I wanted to use a lighter colour so I thought this Brow Gel in "Strike" would work perfectly for a less darker brow.
Weirdly, the shade looked darker than I anticipated and in fact can be used really lightly for lighter coloured brows or heavier for darker brows; amazing!

The lipstick in Bare added to this collection was also a pretty nude-y shade that I love; I do have to wear it with a lip liner as my lips are dark but I must say I love this rosey nude shade for my NC30/35 skintone.

Finally, the Gleam highlighter is a gorgeous addition to the collection, however I found it too dark for my skintone to use as a highlighter and instead found it useful as a bronzer or used on the décolletage for a subtle glow.


Autumn/Fall - Once Collection
The Once collection released at the end of August really captured the tone of Autumn/Fall with the antique-y hues and gold shimmer running through the products.
I have to say the packaging on the new Vintage Metallix Cream Eyeshadows stole the show for me; rose gold just exudes elegance and luxury.
The formulation of the Vintage Metallix Cream Eyeshadows blends smoothly when applied but once the product sets it won't budge which is always a plus for me. I loved this moss green shade "Bibelot" but now have my eye on the brown shade "Embellish".
The sheer lipgloss in "Exquisite" would look good on top of a colour lipstick for me as alone it would be too light. The teal/gold nail varnish in "Melange" is such a pretty two toned colour, perfect for Autumn days. 


Holiday 2014 - Facets Collection
And last but certainly not least, the Facets Collection released for Christmas 2014 features 2 multitasking (or multi faceted) palettes in "Semblance" and "Aura", 2 lipsticks (Salacious and Starkers), a brush set and a makeup bag and an eye trio gift set.
I was surprised to see the packaging wasn't in the iconic Illamasqua shape, but in an ordinary square shape but aside from that, I have to say I love multitasking palettes like this; they make condensing a makeup bag or even my makeup kit so much more easier, meaning less space taken up by unnecessary packaging; perfect for holidays too.
"Semblance" palette swatches
I do already own a few of the shades in this "Semblance" palette; I actually own the blush "Hussy" twice already (one single blush, one part of the Hussy/Lover duo palette) and now this one; the Gleam in "Mirage" is also mentioned in the above International Season collection and I own the black eyeshadow "Obsidian" because I needed the Illamasqua Neutral palette in my life of course!
I would have loved to see limited edition/new shades in an exclusive palette, however seeing as I already have a few of these shades in the palette, it just means I don't have to carry half as much makeup and can just pop this palette in my makeup bag.

If I'm correct, I'd say the Aura palette is aimed at fairer skintones and the Semblance palette aimed at slightly deeper tones, but this judgement is based on the Gleam Creams - the Aura palette has the Gleam Cream in a lighter shade "Aurora". 

I'm now looking at the rest of the Facets collection and definitely have the "Embellish Eye Trio" gift set on my wishlist; it has the Precision Brow Gel and Gel Eye liner as well as the Embellish Vintage Metallix in it, and all in a limited edition rose gold packaging... love!

All Illamasqua products (aside from the Selfridges exclusive products) are available to buy in store or online at Illamasqua or Debenhams.

Which of these collections caught your eye this year? Did you buy any products from any of the collections?
 
post signature

FFF: Countessa Recreation

Friday 24 October 2014

Hello my lovelies! 

First of all, I'd like to apologise for the lack of posts; this has to be the longest I've gone without blogging, the last time I posted was in August and now it's almost November.. terrible.
It's been a hectic time and I've been wanting to blog but by the end of the day I'm so shattered I just want to switch off and watch a film or even better, sleep!
I've tried to do mini posts on Instagram so do follow me there too for more frequent updates. 

In the time I haven't blogged, I've been lucky enough to try out the new Illamasqua releases which I will be posting about in a separate post.
This particular blog post is a makeup look post where I tried to recreate the Illamasqua "Countessa" look.. I did it while the little one was having a nap so only got to do half my face but I've merged it with the original face chart for comparison below.. Let me know your thoughts!

Products used:
• UDPP - Eden
Illamasqua Brow Gel in Strike
• Illamasqua Semblance palette
• Urban Decay Naked Basics palette

• Illamasqua Daemon eyeshadow
• NYX Two Timer eyeliner
• Eldora lashes: H151
• Daniel Sandler Jumbo Jet Mascara
• Illamasqua Skinbase foundation in SB10
• Skinbase Lift in Medium 1
• Skinbase Mixer in White
• Illamasqua sculpting duo: Nefertiti

• MAC Lipliner - Nightmoth
• Illamasqua lipsticks- Pristine & Maneater


And my face with the face chart for comparison (I used the brighten tool to make my skin even paler):

Eyes

1) Prime the eyelids with UDPP Eden and fill in brows with Illamasqua Brow Gel in Strike (I used it quite heavily to achieve darker brows).
2) With a blending brush I added Daemon eyeshadow to just above the crease blending upwards and downwards. 
3) I then added Dizzy (a pale pink from the new Semblance palette) above the inner corner of the eye and W.O.S on the eyelid from the Naked Basics palette as well as Venus for highlighting the inner corner and browbone and Naked2 to blend out the red eyeshadow.
4) I added a little depth to the crease using Obsidian matte black eyeshadow (Semblance palette) and used it a tiny bit heavier on the bottom outer corner and lashline. I added Daemon to the middle bottom lashline and blended softly.
5) For the eyeliner I used the NYX Two Timer eyeliner- the felt side for the top liner detail and the kohl side to tightline the inner eye. I added a tiny beauty spot under the eye after concealing with this same eyeliner.
6) I coated the lashes with Daniel Sandler Jumbo Jet mascara followed by Eldora False Lashes in H151 (absolute fave).


Face & Lips

1) I concealed under the eyes using the Illamasqua Skinbase Lift in Medium 1 and used Illamasqua Skinbase foundation in SB10 all over the face, mixing it with the White Skinbase Mixer for a paler look.
2) I then lightly contoured the face using the Illamasqua Sculpting Duo, but only lightly using Nefertiti in the hollows of the cheeks.
3) For the lips I used MAC Nightmoth lipliner followed by Illamasqua Pristine lipstick directly on the top lip. Maneater lipstick was used directly on the middle of the bottom lip, followed by Pristine, but using a lip brush to line the lips neatly. I feathered out the Pristine lipstick using another brush to create an ombre effect into Maneater lipstick.

And there you have it; it was a bit of a rushed job but I'm just happy I got to get round to recreating the look! 

Illamasqua are holding a Halloween Special Beauty school drop in this Sunday 26th October if you'd like to learn some makeup techniques, check out the times and locations here.

Would you wear this look? Let me know if you have any specific blog post requests and I'll see what I can do <3
post signature

FFF: Golden Electric Blue EOTD

Friday 8 August 2014

So I managed to get some free time to do a quick EOTD!

I felt inspired by the blue in the previous guest post from Annie (check the post here) but teamed it with a neutral golden eyeshadow instead, with just a pop of blue on the lower lash line with electric blue on the waterline.. Hope you enjoy and feel inspired <3

Products used:
> UDPP - Eden
> Too Faced Chocolate Bar palette - Milk Chocolate, White Chocolate, Salted Caramel, Champagne Truffle

> Illamasqua Neutral Quad palette - all colours used
> Motives Mineral Gel eyeliner - Little Black Dress
> Urban Decay 24/7 eye pencils - Perversion, Electric, Ransom & Deviant 

> Daniel Sandler Jumbo Jet mascara
> LA Girl Pro Conceal concealer - Creamy Beige
> Eldora False Eyelashes - H151


After priming the eyes, I buffed Salted Caramel and Milk Chocolate from the Too Faced Chocolate Bar palette into my crease, blending upwards. I intensified the crease using Wolf and Obsidian from the Illamasqua Neutral palette, followed by patting on Vintage to the middle of the eyelid and Creme Brulee from the Chocolate Bar palette further inwards. I highlighted the inner corner of the eye with Champagne Truffle and the brow bone with White Chocolate and Stealth from the Neutral palette.

I decided to not go with my usual eyeliner extended flick style, and kept the wing short using Motives Gel Eyeliner in LBD.
I then lined the inner top waterline with Perversion eye pencil and the bottom with Electric. I then used a mixture of Ransom & Deviant on the lower lashline, blending slightly down.

To finish the look I concealed around the eye area with LA Girl Pro Conceal in Creamy Beige and applied Eldora False Eyelashes in H151, using the Daniel Sandler Jumbo Jet Mascara to blend the lashes and slightly coat the bottom lashes.

I hope you enjoyed this look, hopefully next time I get to do a full FOTD! 
post signature

Tuesday Takeover: Epiphannie A

Tuesday 5 August 2014

Hi my loves,

It's been a while since I've posted but I promise to be back soon! 
In the mean time I asked the lovely Annie (of Epiphannie A) to write a guest post for me. Annie is another great blogger and friend (who also attended one of my masterclasses, and blew me away with her makeup skills may I add) and she happily took this opportunity to conjure a gorgeous bright makeup look perfect for this hot summer we're having this year! Hope you enjoy the post and do check out her blog too <3

Sleek Rio Rio Palette
Hey everyone!!

I’m Annie from Epiphannie A and let me just start off by saying that I’m so grateful that Safiyah has allowed me to have some room on her blog today – I actually feel really special – I wasn’t too sure what I wanted to talk about but I just knew that I wanted it to appear natural and fit in seamlessly with the tone of this blog . . . which is why I’ve decided to opt for a makeup tutorial (despite the fact that I haven’t post a makeup look in AGES!!).

For this tutorial, I will be using the recently released Sleek Rio Rio Divine Palette which is a gorgeous palette filled with highly pigmented, tropical shades mixed with tuned down champagne shades

1)    I start off by blending Tropics; a matte orange-brown shadow shade, in and above my crease to act as my transitional colour.

2)    Once I’m happy with the way that looks, I pat a bit of Leme; dark royal blue, into the inner corners and outer corners of my eyes, leaving the inner section of my eyelid free for my to add Cachaca; a silver eye shadow.

3)    As I want this look to have a bit of tropical feel, I’m going to go over Cahaca with a lime green eye shadow aka Caipirinha

4)    I’m now going to add Leblon (matte black) eye shadow into my vee area to give my look a bit of definition

5)    Once that’s all done, a spot of eyeliner and false lashes are all you need to complete this look.

I really hope you enjoy this tutorial as I have had a lot of fun making it. Don’t forget to visit on my blog – I’m really fun (On certain days of the week lol)

Follow me on
  

Sunday Swatches: Illamasqua Matte Lip Liquid - Forbidden

Sunday 8 June 2014

Hello my lovelies!

Last month I posted a picture on my Instagram page of the new Illamasqua Matte Lip Liquid from the Summer 2014 "Matte Effect" collection and I've had a play around with it and absolutely love it!
 
I have to say I was a bit worried at first about the shade Forbidden as it seemed very cool toned for my dark/pigmented lips; but after trying Luster from the previous Illamasqua Glamore collection (blog post here), I've been more drawn to these cooler toned shades as I've been wearing them by blending the coolness away with my fingertips, which helps make the product look less pastel-like on my pigmented lips, as you can see in the swatch below.
Colour & Pigmentation: "Forbidden" is described as a "sensual pink" which is most definitely a cool toned pink. There's no doubt the Matte Lip Liquid is highly concentrated and pigmented.. a little goes a long way, particularly when I'm using it blended with my finger.
Texture: The texture of this product is fairly thick, which means less is more. On application the Matte Lip Liquid feels creamy, but once the product sets, there can be a slight dry feel to it. I always use lip balm and tissue off excess before wearing matte lip products to eliminate any discomfort.
Packaging: I like the fact that the Matte Lip Liquid has a brush applicator, however I'm more of a fan of squeezy tubes for hygiene/kit purposes, or for a product like this, I'd prefer a more precise applicator
Longevity: This product is actually probably the most long wearing lip colour I own.. which is saying something as I have a tonne of lip products! The fact that it is matte definitely helps with longevity, but I've eaten fairly oily foods with this product on the lips and it still manages to keep its colour on the lips once I'm done eating!
Scent: There's a faint vanilla/sweet smell to the product that I have to say I love too.
Price: At £18.50, this lip product is more on the pricey side, however if you're a fan of long wearing products like I am, it's worth investing in, not to mention the fact I wear the product thinly, so use much less than a usual lipgloss etc.

FrootiFactor: I have to say this product pleasantly surprised me as it is a lovely shade of pink, smells sweet and barely requires touch ups even after eating (which is handy with a baby now, as I rarely have time to check my makeup!)
I'd give this product a 4.5 out of 5, purely because I'd prefer a different applicator; I do love this product though and would love to see more shades as with the satin lipsticks, so I hope Illamasqua continue making more amazing products!
The new Matte Effect collection for Summer includes the Matte Lip Liquid in 3 shades, Velvet Blushers in 4 shades (one a web exclusive), a new Matte Veil primer/base, and a Matte Top Coat nail varnish.
All are available at Illamasqua.com or at Debenhams.

What do you think of the Matte Lip Liquids? Have you tried any of the products from the Summer 2014 Matte Effect collection?
post signature
 
template design by Studio Mommy (© copyright 2015)