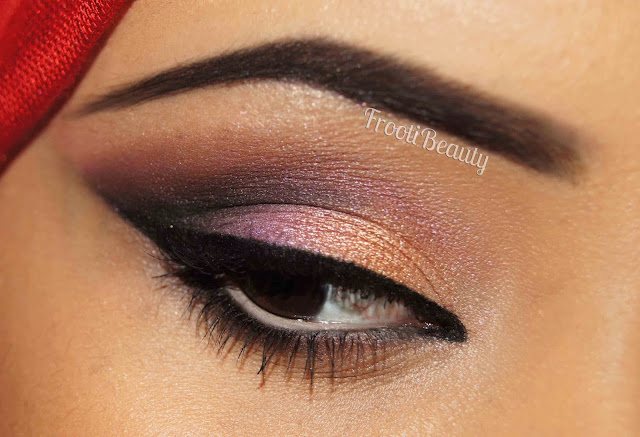
This weeks FFF features a look using the MAC Nocturnals Black & Gold pigment set and a few Motives products.
I've recently bought a Ring Light attachment for my Sony Alpha 55 SLR camera so I thought I'd test it out with this look.. please bear with me as I'm playing with the settings to get the right colours/detail; unfortunately this batch of makeup looks' photos are grainier than usual as I had to use a higher ISO setting in the dark lighting condition I had despite using the ring light. If anyone wants to give me some help/tips on how to use the Ring Light in unnatural light (as my makeup looks are usually done at night), then please feel free to email me!
FFF: MAC Nocturnals Black & Gold Pigment Set Makeup Look
Friday, 27 December 2013
8
comments
⋅
Labels:
EOTD,
FFF,
FOTD,
MAC,
makeup looks,
pigments,
smokey,
smokey eyes,
smokey looks


Saturday, 21 December 2013
Hello my lovelies!
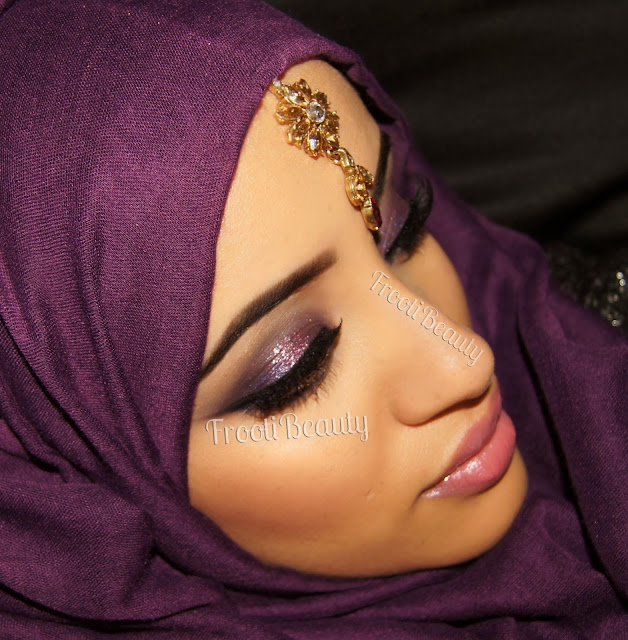
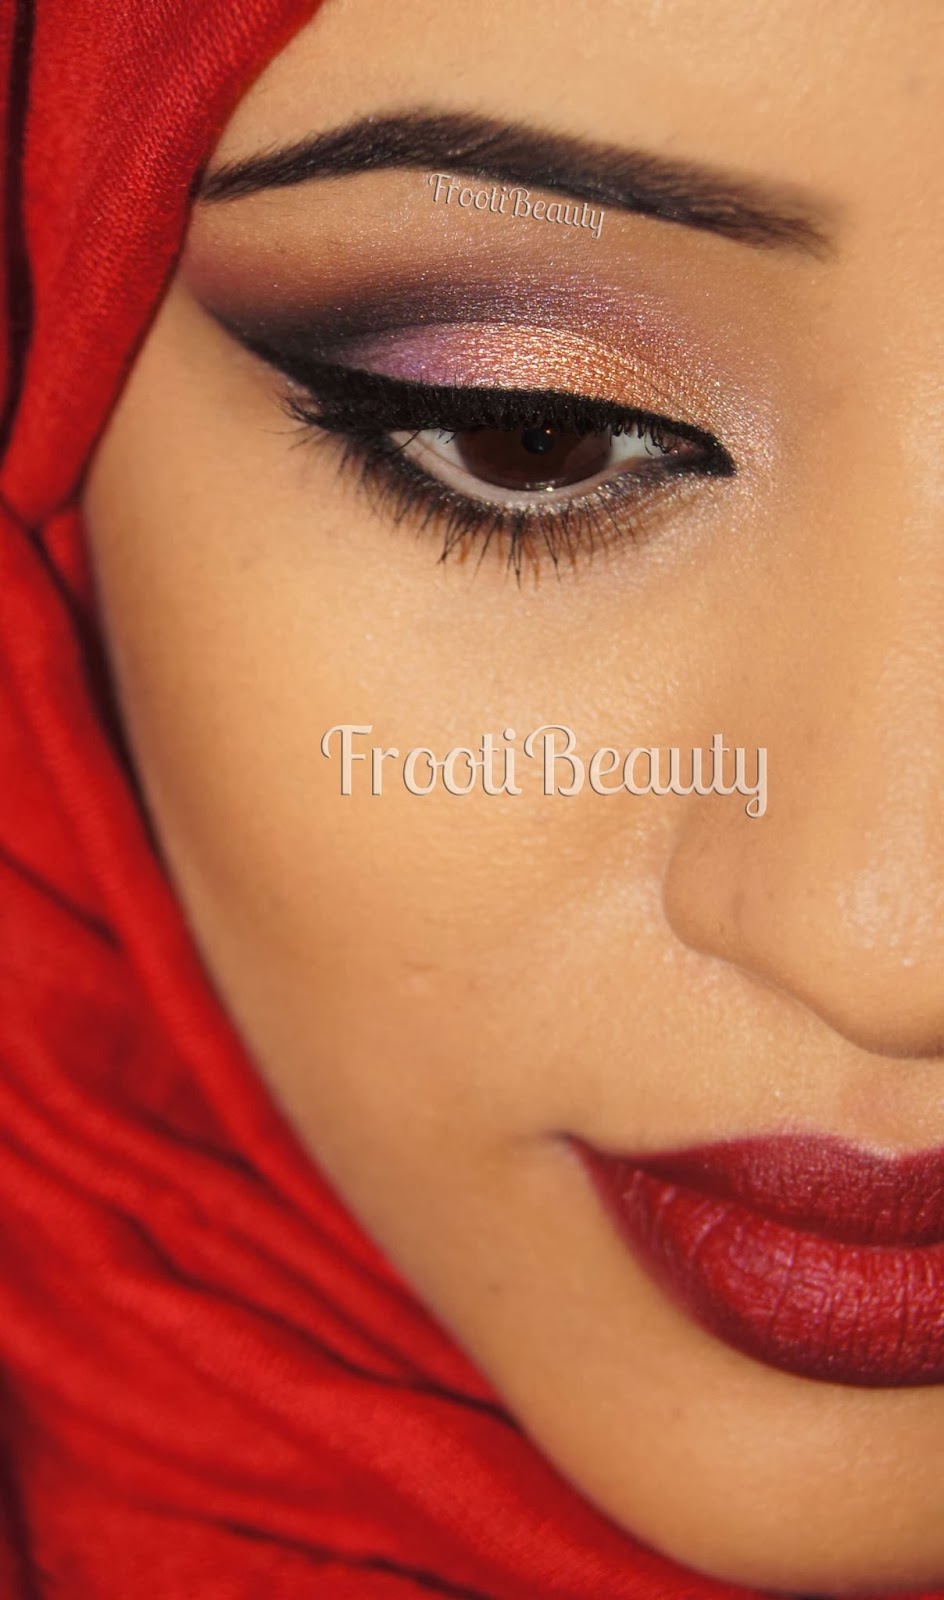
This week's FFF is a Purple-Pink look inspired by my one of my newest acquisitions from my wishlist: the MAC Nocturnals Silver & Violet pigment set.
I haven't done a look with pink in a while it seems (aside from the Rose-Gold look from the Naked 3 palette of course!), so I hope you enjoy this one!
Products used:
Eyes:
> UDPP - Eden
> NYX JEP - Black Bean
> MAC Nocturnals Pigments & Glitter Set - SIlver & Violet - Vanilla, Kitschmas, Push The Edge, Pink Glitter
> Motives Glitter Adhesive
> UD Naked Basics - Foxy, Naked2
> UD 24/7 Shadow Pencil - Delinquent
> UD Perversion 24/7 eye pencil
> Rimmel ScandalEyes Kohl liner in Nude 5
> UD SSLC in Lovechild
I started by priming the eye with Eden PP and Vanilla pigment on the brow bone and inner corner with Push The Edge all over the eyelid, blending upwards. Naked2 from the Naked Basics palette above the crease and Foxy to blend the harsh edges.
I patted Kitschmas over the middle of the eyelid on top of Push The Edge and pushed it further out on either side of the eye. I then applied the Pink Glitter to the centre of the eyelids with Motives Glitter Adhesive and my finger.
Delinquent 24/7 Shadow Pencil was used for the bottom lashline with Rimmel Scandal Eyes Nude liner for the bottom inner eye, whilst UD Perversion eye pencil was used for the inner top eye.
NYC liquid liner was then used to line the top eyelid with a slight flick and after concealing under the eye with Estee Lauder concealer, I finished with Daniel Sandler Jumbo Jet mascara and Ardell 120 lashes, filling in the brows with Anastasia Beverly Hills Brow Wiz and Brow Powder Duo in Ebony, using it lightly:

 For the rest of the face, I used Estee Lauder Invisible Fluid foundation and for the cheeks I used both the Motives Shape & Sculpt Duo and MAC Bronzing Powder in Refined Golden with a bit of Temper blush from UD.
On the lips I decided to keep it a light pink and went for the UD SSLC in Lovechild:


I hope you enjoyed this makeup look, it can be used with other colours too which is great, so I would love to see if you recreate something like this!
Would you wear this look? What colours do you think would look nice with this particular look?
This week's FFF is a Purple-Pink look inspired by my one of my newest acquisitions from my wishlist: the MAC Nocturnals Silver & Violet pigment set.
I haven't done a look with pink in a while it seems (aside from the Rose-Gold look from the Naked 3 palette of course!), so I hope you enjoy this one!
Products used:
Eyes:
> UDPP - Eden
> NYX JEP - Black Bean
> MAC Nocturnals Pigments & Glitter Set - SIlver & Violet - Vanilla, Kitschmas, Push The Edge, Pink Glitter
> Motives Glitter Adhesive
> UD Naked Basics - Foxy, Naked2
> UD 24/7 Shadow Pencil - Delinquent
> UD Perversion 24/7 eye pencil
> Rimmel ScandalEyes Kohl liner in Nude 5
> NYC black liquid liner
> Daniel Sandler Jumbo Jet Mascara
> Estee Lauder Double Wear High Cover concealer - 2W
> Daniel Sandler Jumbo Jet Mascara
> Estee Lauder Double Wear High Cover concealer - 2W
> Anastasia Beverly Hills Brow Wiz and Brow Powder Duo - Ebony
> Ardell Professional 120 Demi lashes
Face:
> Ardell Professional 120 Demi lashes
Face:
> Estee Lauder Invisible Fluid foundation 2WN1
> Motives Sculpt & Shape Duo
> Motives Sculpt & Shape Duo
> MAC Bronzing Powder - Refined Golden
> UD Shattered Palette - Temper Blush
Lips:
> UD SSLC in Lovechild
I started by priming the eye with Eden PP and Vanilla pigment on the brow bone and inner corner with Push The Edge all over the eyelid, blending upwards. Naked2 from the Naked Basics palette above the crease and Foxy to blend the harsh edges.
I patted Kitschmas over the middle of the eyelid on top of Push The Edge and pushed it further out on either side of the eye. I then applied the Pink Glitter to the centre of the eyelids with Motives Glitter Adhesive and my finger.
Delinquent 24/7 Shadow Pencil was used for the bottom lashline with Rimmel Scandal Eyes Nude liner for the bottom inner eye, whilst UD Perversion eye pencil was used for the inner top eye.
NYC liquid liner was then used to line the top eyelid with a slight flick and after concealing under the eye with Estee Lauder concealer, I finished with Daniel Sandler Jumbo Jet mascara and Ardell 120 lashes, filling in the brows with Anastasia Beverly Hills Brow Wiz and Brow Powder Duo in Ebony, using it lightly:


On the lips I decided to keep it a light pink and went for the UD SSLC in Lovechild:


 |
| Trying to capture the sparkle! |
Would you wear this look? What colours do you think would look nice with this particular look?
4
comments
⋅
Labels:
EOTD,
FFF,
FOTD,
glitter,
glittery eyeshadow,
glittery looks,
MAC,
makeup looks,
pink purple look,
purple eyeshadow
Wednesday, 18 December 2013
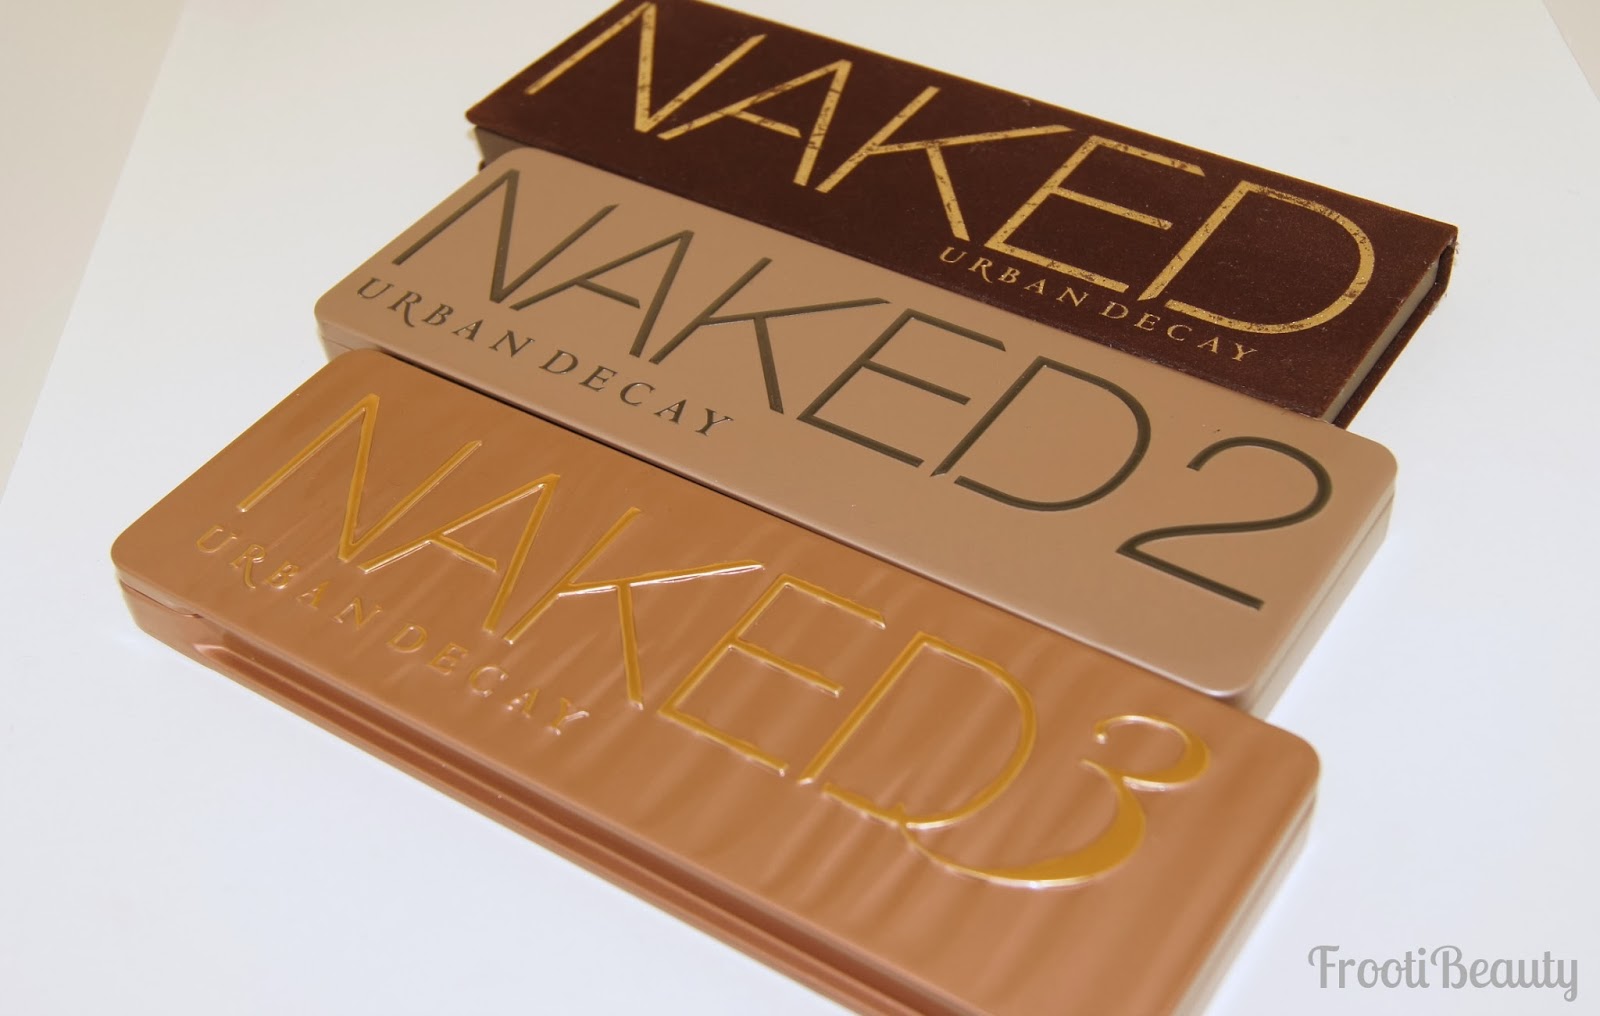
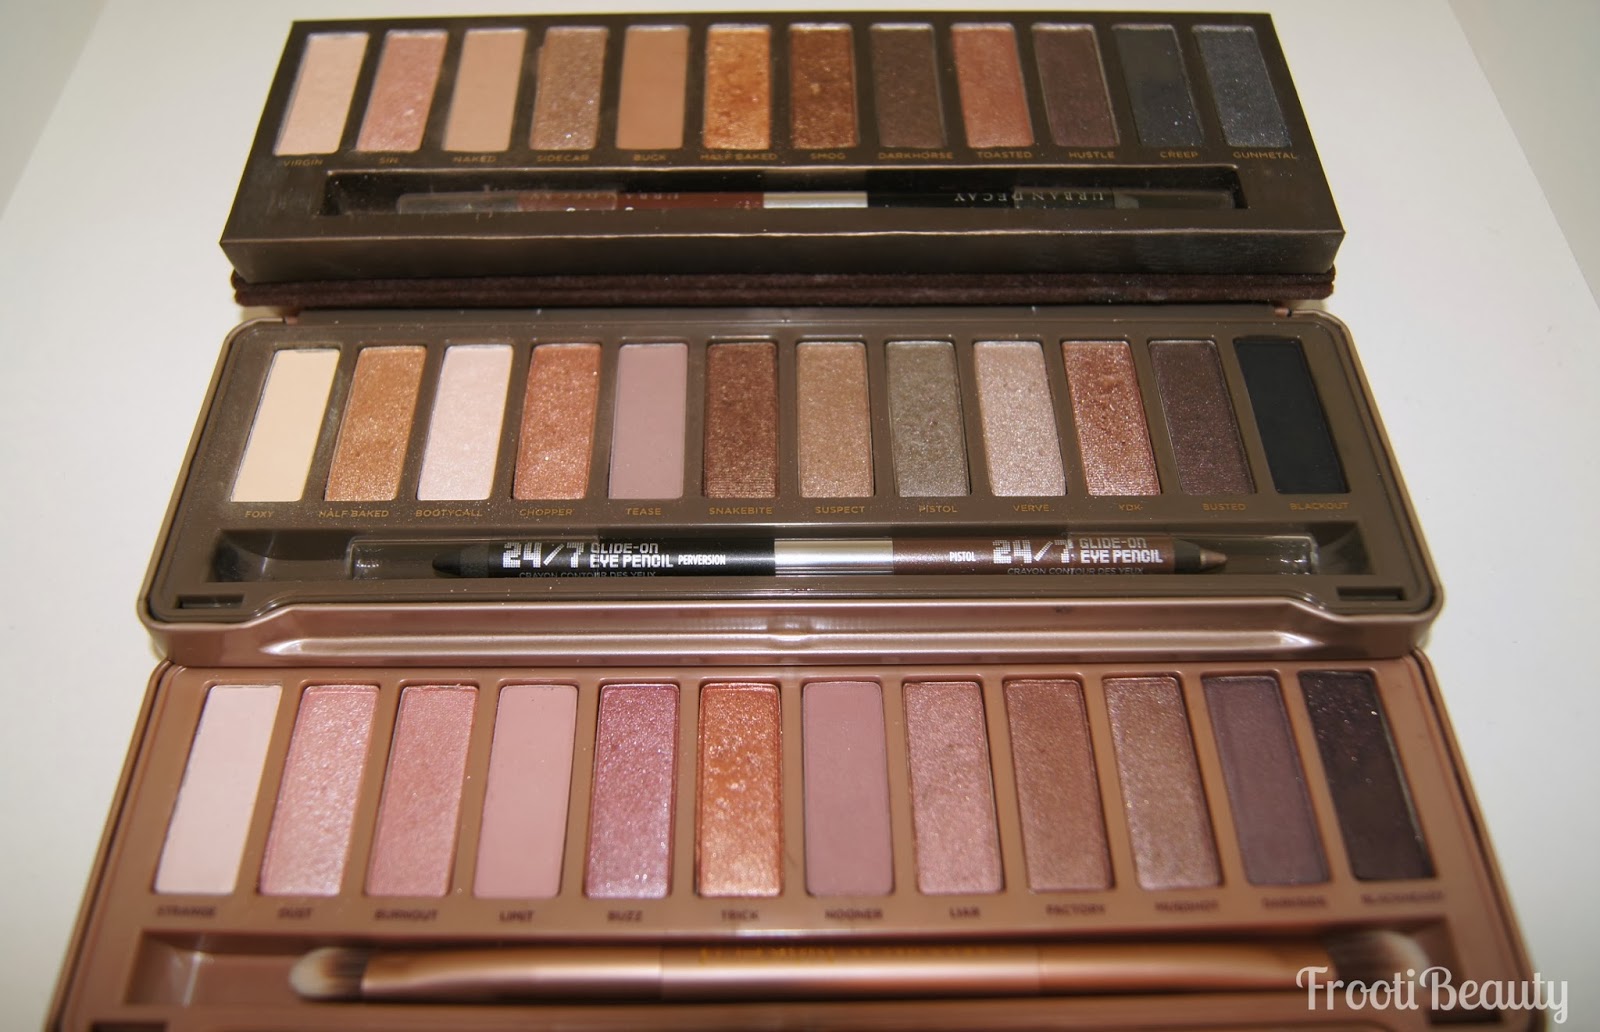
Despite the three palettes being neutral shades, each palette offers a range of neutrals to suit every skin tone.
They each have colours that would suit fair and deep tones alike, for example the golds Half Baked/Trick; or bronzes Smog/Snakebite; or plums Hustle/Busted).
However, I think some palettes look darker on fairer tones and the new Naked 3's matte shades will look too chalky on deeper tones (still yet to be 100% confirmed!)
Laid out together you can see the difference in palettes:

As a guide, I'd say the following palettes are best suited to these MAC skintones based on the matte blending/transition shades in each palette:
- Naked 1 (Bronze neutrals): Medium to Deep skintones (both yellow toned and pink/red tones) [MAC shades NC25s+ and NW18+] {blog post here}
- Naked 2 (Taupe neutrals): Fair to Medium skintones (both yellow tones and pink/red tones) [MAC shades NC15-40 or NW10+] {blog post here}
- Naked 3 (Rose neutrals): Fair to Medium skintones (mostly pink tones, some yellow tones) [MAC shades NW10+ and NC15-35] {blog post here}
- Naked Heat (Red neutrals): Warm to Dark skintones (mostly warm red tones) [MAC shades NW/NC25+] {blog post here}
- Naked Smoky (Dark neutrals): Light to Medium skintones (mostly dark greys/browns) [NW/NC10-25] {blog post here}
- Naked Ultimate Basics (Matte Neutrals): All/most skintones as there's a matte transition type shade to suit most skintones! {blog post here}
I hope this helps in deciding which palette is best for you (if you're not a collector/UD junkie like me).
All three Naked Palettes are now available to buy at the following retailers (if they're not already sold out for Christmas!):
House of Fraser, and John Lewis.
Do you have a Naked Palette? Which is your favourite?

3
comments
⋅
Labels:
gift guide,
guide,
naked,
naked palette,
Naked2,
Naked3,
neutral colours,
urban decay
Sunday, 15 December 2013
Estee Lauder has been one of the beauty industry's most established brand for over 60 years now and though I've never really blogged about individual products, it's been cropping up in my makeup wardrobe a lot more these days as I've found the brand is more appealing to both younger and maturer customers.
My most reached for foundation every day is now the Estee Lauder Invisible Fluid foundation (which I will be doing a foundation post on very soon!)
Colour Cosmetics
Pure Color has been a range of colour makeup for the eyes, lips, nails and face for a while and this Holiday 2013 has included the new Pure Color Metallics which feature new:
The Intense Eyeshadow Trios (IIETs) also had my attention as some of them sparkle so brightly, and being a magpie attracts me to things like that!
I've picked my favourite shades from the collection this year to review; of the Lip Lacquers I loved the bright orange "Melting Sun" which has flecks of glitter in it, and also the plummy "Wet Plum" which has no shimmer or glitter.
Of the Eyeshadow Trios the one that stuck out most to me was the Steel Lilacs trio as it's both purple and super sparkly.


 Colour & Pigmentation:
The pigmentation of these glosses are pretty amazing, they do have a major colour payoff and with the brighter shades (like Melting Sun and Wet Plum), they can even stain a little (see non-lip swatches in Intense Eyeshadow Trios review below).
Colour & Pigmentation:
The pigmentation of these glosses are pretty amazing, they do have a major colour payoff and with the brighter shades (like Melting Sun and Wet Plum), they can even stain a little (see non-lip swatches in Intense Eyeshadow Trios review below).
Texture: The texture is quite thick and while I wouldn't say it's really sticky, there is a slight "stick" to it for those who aren't keen on that kind of texture.
Packaging: The classic gold lids with the embossed "EL" logos give a feeling of luxury, whilst the paddle type plastic applicator is curved in the middle to hold a reservoir of gloss and also serves as a fairly precise applicator for the cupids bow area.
Longevity: This Lip Lacquer is said to last up to 6 hours, however I felt the glossiness/stickiness wore away after about an hour or so, but the stain (particularly in Wet Plum) meant the colour was still on the lips at least 3 hours later with eating and drinking.
Scent: I love the scent of these as it's a sweet sugary smell!
Price: At £21 each, they are a more premium price than your regular lipgloss, however because of the lipstick/gloss hybrid and longevity, it's definitely one that would be good to stick in your handbag for everyday if you wanted, or for going out equally.
FrootiFactor: Despite the fact I'm not usually a gloss kind of girl, I adore the scent and colour saturation/pigmentation in these Lip Lacquers, so I'd give them at least a 4:


 Colour & Pigmentation: This particular eyeshadow trio was very sparkly and had fairly high pigmentation despite the sparkle (see swatches above). It's hard to try and capture the true sparkliness of this trio but you can see a bit from the middle picture above that it's pretty damned glitzy.
Texture: Due to the glitteriness of the shadows, they are a bit crumblier than a normal eyeshadow, however I find these type of shadows apply best with the finger.
Packaging: Again, the shadows are encased in the classic gold EL packaging with a handy mirror in the lid. The applicator is a regular spongy one.
Longevity: These trios are supposed to last 10 hours but I haven't quite tested that out yet as I'm yet to wear the shadow for that long; the glitter did however stick to my arm fairly well after applying with no primer, so it may well be true!
Price: At £27 each, they are a again a slightly premium price to pay for a trio of eyeshadows, but would make a lovely gift for a true Estee Lauder fan and of course a fan of sparkle, particularly for Christmas!
FrootiFactor: I loved the sparkliness of the shadows, however I found the texture quite dry to work with, so I'd give the shadows a 3-3.5 out of 5:
 Estee Lauder products are available to buy from the Estee Lauder website, as well as the regular department stores (Debenhams, House Of Fraser, John Lewis etc) and Boots.
Which is your favourite Estee Lauder product and why?
My most reached for foundation every day is now the Estee Lauder Invisible Fluid foundation (which I will be doing a foundation post on very soon!)
Colour Cosmetics
Pure Color has been a range of colour makeup for the eyes, lips, nails and face for a while and this Holiday 2013 has included the new Pure Color Metallics which feature new:
- High Intensity Lip Lacquers - 12 shades
- Vivid Shine Nail Lacquers - 8 shades
- Vivid Shine Lipsticks - 6 shades
- Instant Intense Eyeshadow Trios - 9 shades
The Intense Eyeshadow Trios (IIETs) also had my attention as some of them sparkle so brightly, and being a magpie attracts me to things like that!
I've picked my favourite shades from the collection this year to review; of the Lip Lacquers I loved the bright orange "Melting Sun" which has flecks of glitter in it, and also the plummy "Wet Plum" which has no shimmer or glitter.
Of the Eyeshadow Trios the one that stuck out most to me was the Steel Lilacs trio as it's both purple and super sparkly.


High Intensity Lip Lacquers
As aforementioned, these glosses hold all the pigmentation of a lipstick but with super shine and hydration that lasts on the lips.


Texture: The texture is quite thick and while I wouldn't say it's really sticky, there is a slight "stick" to it for those who aren't keen on that kind of texture.
Packaging: The classic gold lids with the embossed "EL" logos give a feeling of luxury, whilst the paddle type plastic applicator is curved in the middle to hold a reservoir of gloss and also serves as a fairly precise applicator for the cupids bow area.
Longevity: This Lip Lacquer is said to last up to 6 hours, however I felt the glossiness/stickiness wore away after about an hour or so, but the stain (particularly in Wet Plum) meant the colour was still on the lips at least 3 hours later with eating and drinking.
Scent: I love the scent of these as it's a sweet sugary smell!
Price: At £21 each, they are a more premium price than your regular lipgloss, however because of the lipstick/gloss hybrid and longevity, it's definitely one that would be good to stick in your handbag for everyday if you wanted, or for going out equally.
FrootiFactor: Despite the fact I'm not usually a gloss kind of girl, I adore the scent and colour saturation/pigmentation in these Lip Lacquers, so I'd give them at least a 4:
Instant Intense Eyeshadow Trios
These eyeshadow trios are designed to highlight and define the eyes and contain a little clear plastic guide on where to apply the shadows on the eye to do so:


Texture: Due to the glitteriness of the shadows, they are a bit crumblier than a normal eyeshadow, however I find these type of shadows apply best with the finger.
Packaging: Again, the shadows are encased in the classic gold EL packaging with a handy mirror in the lid. The applicator is a regular spongy one.
Longevity: These trios are supposed to last 10 hours but I haven't quite tested that out yet as I'm yet to wear the shadow for that long; the glitter did however stick to my arm fairly well after applying with no primer, so it may well be true!
Price: At £27 each, they are a again a slightly premium price to pay for a trio of eyeshadows, but would make a lovely gift for a true Estee Lauder fan and of course a fan of sparkle, particularly for Christmas!
FrootiFactor: I loved the sparkliness of the shadows, however I found the texture quite dry to work with, so I'd give the shadows a 3-3.5 out of 5:
Which is your favourite Estee Lauder product and why?
Friday, 13 December 2013
This weeks FFF is inspired by a client's dress that she will be wearing for her engagement/wedding in December.
I wanted to also update my Blue-Purple look from 2012, but for this look I used the newly acquired Kiko Evolution Must Have Palette (reviewed here) and as many drugstore/affordable products too, so here goes!
Products used:
Eyes:
> UDPP - Eden
> NYX JEP in Black Bean
> Kiko Evolution Must Have Palette - 7 shadows - 1 (beige sparkle), 2 (pinky nude matte), 6 (bright pink), 7 (lilac matte), 8 (indigo shimmer), 9 (cream shimmer), 12 (dark blue shimmer)
> Urban Decay Smoked Palette - Freestyle and Blackout
> Kiko Double Glam Eye Liner - 100 Light Gold (& Ebony)
> Inglot AMC eyeliner gel - 77 (black)
Lips:


 I then used a beauty blender sponge to add the EX1 Invisiwear liquid foundation in F200 all over the face, using a small concealer/foundation brush to get in the nooks and crannies around the eyes and to clean around the eyebrows.
I didn't really need to set the foundation as it dries to a semi matte finish, but dabbed a bit of UD Razorsharp powder on my T-zone anyway as shine shows with flash.
I then added powder contour with the Sleek Contour Kit in Medium using my beloved Illamasqua Blush Up Brush, highlighting the top of the cheekbones too. Kiko Essential Bronzer in Sienna Melange was also used in between the contour and highlight to give depth.
For the lips, I used Sabaya lip pencil (from Dubai) with UD Revolution Lipstick in Fiend, accessorising with a navy scarf of course and the tikka from my own wedding:


And there you have it..
I have to say I'm even more impressed with the Kiko Palette I used for this look, the colour payoff is amazing and I'm particularly loving the sparklier shades as they can be used wet to make the sparkle stand out even more. I can now say that I'd give the palette 5 lipsticks out of 5!
 I hope you enjoyed this look as much as I did creating it, I have to say I love this combination of blue and purple and certainly did when I did the older version in 2012!
Would you wear this look?
I wanted to also update my Blue-Purple look from 2012, but for this look I used the newly acquired Kiko Evolution Must Have Palette (reviewed here) and as many drugstore/affordable products too, so here goes!
Products used:
Eyes:
> UDPP - Eden
> NYX JEP in Black Bean
> Kiko Evolution Must Have Palette - 7 shadows - 1 (beige sparkle), 2 (pinky nude matte), 6 (bright pink), 7 (lilac matte), 8 (indigo shimmer), 9 (cream shimmer), 12 (dark blue shimmer)
> Urban Decay Smoked Palette - Freestyle and Blackout
> Kiko Double Glam Eye Liner - 100 Light Gold (& Ebony)
> Inglot AMC eyeliner gel - 77 (black)
> Kiko Unforgettable Waterproof mascara (black)
> Ardell Professional 120 Demi lashes
> Anastasia Beverly Hills Brow Wiz and Brow Powder Duo - Ebony
> Urban Decay 24/7 concealer - ATF
Face:
> UD concealer in ATF
> Graftobian HD creme foundation Warm Palette - Buttermilk & Mid. Marigold for contouring
> EX1 Invisiwear foundation - F200
> UD Razorsharp powder
> Sleek Contour Kit - Medium
> Kiko Essential Bronzer in 201 Sienna Melange
> Kiko Essential Bronzer in 201 Sienna Melange
> Sabaya lip pencil in 08 (pink, from Dubai)
> UD Revolution lipstick in Fiend
I started by priming the eye with Eden PP and then just on the eyelid went over with NYX JEP in Black Bean, blending upwards slightly.
I patted on the Dark Blue shimmery eyeshadow from the Kiko palette with a flat brush all over the eyelid on top of the NYX JEP.
I then highlighted the brow bone with the Cream shimmer colour and the inner corner of the eye with the beige sparkle. The matte pinky nude colour was then used under the brow bone highlight, followed by the matte lilac shadow closer to the crease and UD Blackout in the crease. The slightest hint of the bright pink shadow was used above the crease followed by UD Freestyle eyeshadow in between the colours to blend out any harsh lines.
I lined the top of the eyelid with Inglot AMC gel liner in black and followed the outer bottom lashline with an angled brush creating a slight outward flick for the bottom inner corner. I then lined the inner eye with Kiko's Double Glam Eye Liner but only using the Light Gold shade and following the outer flick on the inner bottom corner.
I went back with a wet finger and added a tiny bit of the indigo shimmer to the middle of the lids to make the colour pop even further and with a wet liner brush went underneath the eye with the same dark blue and indigo shadows, following the outer eye only.
To finish off the eye I used the Anastasia Beverly Hills Brow Wizin Ebony and filled in the inner brow with the lighter shade of the Brow Powder Duo.
I added the Ardell 120 Demi lashes after I finished my face and Voila!


For the rest of the face I decided to do a toned down version of that Kim K/"bridal" contouring and used both the UD 24/7 concealer pencil and Graftobian Creme foundations to do this.
Be warned, the picture below is scary looking haha
I didn't really need to set the foundation as it dries to a semi matte finish, but dabbed a bit of UD Razorsharp powder on my T-zone anyway as shine shows with flash.
I then added powder contour with the Sleek Contour Kit in Medium using my beloved Illamasqua Blush Up Brush, highlighting the top of the cheekbones too. Kiko Essential Bronzer in Sienna Melange was also used in between the contour and highlight to give depth.
For the lips, I used Sabaya lip pencil (from Dubai) with UD Revolution Lipstick in Fiend, accessorising with a navy scarf of course and the tikka from my own wedding:


And there you have it..
I have to say I'm even more impressed with the Kiko Palette I used for this look, the colour payoff is amazing and I'm particularly loving the sparklier shades as they can be used wet to make the sparkle stand out even more. I can now say that I'd give the palette 5 lipsticks out of 5!
Would you wear this look?
Thursday, 12 December 2013
I posted this picture on Instagram earlier this week and figured it would fit well in a TBT post, so here's a collage of some of the EOTD makeup looks I've done this year.. Couldn't fit them all in!

You can search for a particular look on my blog here, or if you'd like to find the direct link to the blog post, feel free to sift through my Facebook album to find the look you're looking for.
Some of the looks have YouTube videos to go with them on my channel, so check them out if you haven't already and of course subscribe! ;)
Hopefully I should have another look up for tomorrow's FFF post with the Kiko Colour Evolution Must Have palette (review and swatches here), as a few people wanted to see the pigmentation of the palette in action.
Which is your favourite look?
Sunday, 8 December 2013
Following my previous FFF makeup look post (here) and holiday gift post (here) with my picks from the holiday sets and collections this Christmas, I wanted to give my thoughts on the gorgeous Illamasqua Envy Collection.
I received the package by surprise last Saturday and couldn't contain my excitement at receiving two of the products I'd lusted over from the new collection inside, namely the Powder Sculpting Duo and the Fatale Palette:

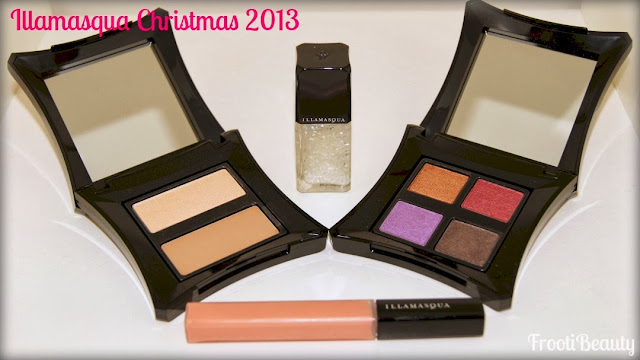
Fatale Palette
I fell in love with the Fatale Palette as soon as I saw David Horne use it on his Instagram page to create this beautiful look.
I think the colours are gorgeous tones suitable for all skintones and love the warmth they bring; perfect for a festive look with its gold and cranberry tones.

 Colour & Pigmentation: As always, Illamasqua shadows are gorgeously pigmented as you can see above from the swatches and translate just as you see them in the pan.
Bronx: bronze gold shimmer
Ensnare: berry shimmer
Charm: violet shimmer
Mystify: chestnut brown shimmer
Texture/Finish: Powder shimmer
Longevity: Pigmented shadows like Illamasqua's do last long, however I always recommend to wear with primer.
Price: At £34 it's the usual price for an Illamasqua quad and works out £8.50 per eyeshadow; a single eyeshadow is £15.50 for 2g and here you get 4 x 1.5g which still works out cheaper!
FrootiFactor: I can see myself using this palette as a great addition to my kit for Asian brides as it holds 3 of the main colours I use for brides in it (gold, red and brown) with the addition of the gorgeous violet shadow. I give the quad a 5 out of 5 as I feel it would suit pretty much every skintone!
 Sculpting Powder Duo
I have to say I'm a huge fan of contouring kits as I absolutely love the effect it gives to the face especially in bringing out the cheekbones, so when I saw this sculpting duo by Illamasqua I was very excited.
My hesitance on the product was that the contour shade looked like it would be too light for warmer complexions like myself, but the highlighter shade in Lumos certainly had my attention, especially as a Harry Potter fan!

 Colour & Pigmentation: Again, the pigmentation is of usual high Illamasqua quality. I found Lumos highlighter to be even more so pigmented than Heliopolis.
On my NC30-35 skintone, Heliopolis actually shows up on my face, more so than it does in the swatch above on my arm for some reason!
Lumos: shimmering champagne
Heliopolis: neutral peanutty brown
Texture/Finish: Both powder; Lumos is a champagne shimmer and Heliopolis is a neutral matte.
Longevity: I'm a fan of powders on the face as I feel they last much longer on the skin. The Lumos shimmer lasts especially longer than Heliopolis.
Price: At £26 it works out £13 per shade; personally I tend to spend more on highlighters/bronzers and contour shades as I use it pretty much every day more so than blush, so for me it's totally worth it.
FrootiFactor: I was pleasantly surprised that the Heliopolis contour shade showed up on my face as I was almost certain it would do nothing for contouring on my skin. I would however recommend using the Heliopolis contour shade as a matte bronzer/in between shade for contouring on deeper skintones, or as a contour shade on the eyes.
I hope Illamasqua release more of these sculpting duos for a variety of skintones as I know it will be a hit and unfortunately this particular contour shade wouldn't do any justice for contouring on much deeper/black skintones. For this reason alone, it loses out on half a lipstick rating, but other than that its a 5 in my books!
 Intense Lipgloss - Maiden
A surprise colour addition to the Christmas collection is the Intense Lipgloss in Maiden; I'd say it's more of a Spring colour but it would go well with a smokey eye if you wanted to tone down the lips so works well.

 Colour & Pigmentation: As the name suggests, it has high pigmentation in a warm peach colour, with all the intensity of a lipstick.
Texture/Finish: Glossy, slightly thick for my liking but I guess it's due to the saturation of colour!
Longevity: Glosses tend to last longer than lipsticks due to their stickiness so I'd imagine this gloss to be just as long wearing as other Illamasqua glosses I've tried.
Price: At £14.50 it's more than I would usually pay for a gloss, however I am a fan of highly pigmented glosses when I do go for a gloss, and £14.50 is around the average price for a high end brand.
FrootiFactor: Unfortunately this gloss is much too light for my skintone and pigmented lips; it translates a much whitish colour so doesn't suit my lips at all, however I do think those with less pigmented lips than myself would suit it beautifully, paired with a smokey eye. For this reason, this shade is not particularly for me and I'd have to give it a 2.5 for it's pigmentation and longevity.
 Nail Varnish - Blizzard
This polish is perfect for the wintery months, immitating snowy weather on your nails. You can wear it alone or I found it even better over a dark nail varnish (like Boosh) so the iridescent white speckles show up even more.

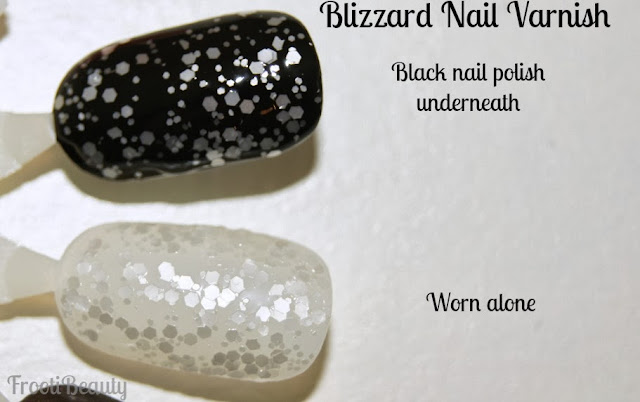 Colour & Consistency: A clear based nail polish with flecks of iridescent white sparkles in chunky hexagonal shapes and smaller shapes too. Two coats will give you the amount of sparkle in the above pictures.
Longevity: Fairly long wearing due to the particles in the polish; as with glitter they tend to last longer but I didn't find it as hard to take off as glitter which is good!
Price: At £14.50 it's a slightly pricier polish but gives a lovely wintery effect on your nails if you're looking for something to suit this season.
FrootiFactor: I'd give this nail polish a 3.5 out of 5 as I find it looks best on top of a darker colour polish and needs two coats for the full "snow" type effect. I do however like that it isn't as hard as glitter to take off!
 This "Christmasqua" collection is a great addition to their existing products in my opinion; I'm particularly fond of the Sculpting Powder Duo and the Fatale Palette which I can see myself using on in my kit as well as myself fairly regularly. I do hope they bring out more shades in the Sculpting Duo as I can see it being a very popular product for everyday and going out.
All Illamasqua products are available to buy in store or online at Illamasqua.
What are your favourites from this Holiday collection? Will you be buying any?
I received the package by surprise last Saturday and couldn't contain my excitement at receiving two of the products I'd lusted over from the new collection inside, namely the Powder Sculpting Duo and the Fatale Palette:


Fatale Palette
I fell in love with the Fatale Palette as soon as I saw David Horne use it on his Instagram page to create this beautiful look.
I think the colours are gorgeous tones suitable for all skintones and love the warmth they bring; perfect for a festive look with its gold and cranberry tones.


Bronx: bronze gold shimmer
Ensnare: berry shimmer
Charm: violet shimmer
Mystify: chestnut brown shimmer
Texture/Finish: Powder shimmer
Longevity: Pigmented shadows like Illamasqua's do last long, however I always recommend to wear with primer.
Price: At £34 it's the usual price for an Illamasqua quad and works out £8.50 per eyeshadow; a single eyeshadow is £15.50 for 2g and here you get 4 x 1.5g which still works out cheaper!
FrootiFactor: I can see myself using this palette as a great addition to my kit for Asian brides as it holds 3 of the main colours I use for brides in it (gold, red and brown) with the addition of the gorgeous violet shadow. I give the quad a 5 out of 5 as I feel it would suit pretty much every skintone!
I have to say I'm a huge fan of contouring kits as I absolutely love the effect it gives to the face especially in bringing out the cheekbones, so when I saw this sculpting duo by Illamasqua I was very excited.
My hesitance on the product was that the contour shade looked like it would be too light for warmer complexions like myself, but the highlighter shade in Lumos certainly had my attention, especially as a Harry Potter fan!


On my NC30-35 skintone, Heliopolis actually shows up on my face, more so than it does in the swatch above on my arm for some reason!
Lumos: shimmering champagne
Heliopolis: neutral peanutty brown
Texture/Finish: Both powder; Lumos is a champagne shimmer and Heliopolis is a neutral matte.
Longevity: I'm a fan of powders on the face as I feel they last much longer on the skin. The Lumos shimmer lasts especially longer than Heliopolis.
Price: At £26 it works out £13 per shade; personally I tend to spend more on highlighters/bronzers and contour shades as I use it pretty much every day more so than blush, so for me it's totally worth it.
FrootiFactor: I was pleasantly surprised that the Heliopolis contour shade showed up on my face as I was almost certain it would do nothing for contouring on my skin. I would however recommend using the Heliopolis contour shade as a matte bronzer/in between shade for contouring on deeper skintones, or as a contour shade on the eyes.
I hope Illamasqua release more of these sculpting duos for a variety of skintones as I know it will be a hit and unfortunately this particular contour shade wouldn't do any justice for contouring on much deeper/black skintones. For this reason alone, it loses out on half a lipstick rating, but other than that its a 5 in my books!
A surprise colour addition to the Christmas collection is the Intense Lipgloss in Maiden; I'd say it's more of a Spring colour but it would go well with a smokey eye if you wanted to tone down the lips so works well.


Texture/Finish: Glossy, slightly thick for my liking but I guess it's due to the saturation of colour!
Longevity: Glosses tend to last longer than lipsticks due to their stickiness so I'd imagine this gloss to be just as long wearing as other Illamasqua glosses I've tried.
Price: At £14.50 it's more than I would usually pay for a gloss, however I am a fan of highly pigmented glosses when I do go for a gloss, and £14.50 is around the average price for a high end brand.
FrootiFactor: Unfortunately this gloss is much too light for my skintone and pigmented lips; it translates a much whitish colour so doesn't suit my lips at all, however I do think those with less pigmented lips than myself would suit it beautifully, paired with a smokey eye. For this reason, this shade is not particularly for me and I'd have to give it a 2.5 for it's pigmentation and longevity.
This polish is perfect for the wintery months, immitating snowy weather on your nails. You can wear it alone or I found it even better over a dark nail varnish (like Boosh) so the iridescent white speckles show up even more.

 Colour & Consistency: A clear based nail polish with flecks of iridescent white sparkles in chunky hexagonal shapes and smaller shapes too. Two coats will give you the amount of sparkle in the above pictures.
Longevity: Fairly long wearing due to the particles in the polish; as with glitter they tend to last longer but I didn't find it as hard to take off as glitter which is good!
Price: At £14.50 it's a slightly pricier polish but gives a lovely wintery effect on your nails if you're looking for something to suit this season.
FrootiFactor: I'd give this nail polish a 3.5 out of 5 as I find it looks best on top of a darker colour polish and needs two coats for the full "snow" type effect. I do however like that it isn't as hard as glitter to take off!
All Illamasqua products are available to buy in store or online at Illamasqua.
What are your favourites from this Holiday collection? Will you be buying any?
1 comments
⋅
Labels:
Christmas 2013,
collections,
contour,
contouring,
eyeshadow,
eyeshadow quads,
highlighter,
Illamasqua,
lipgloss,
nail polishes,
nails,
review,
reviews,
swatches
Friday, 6 December 2013
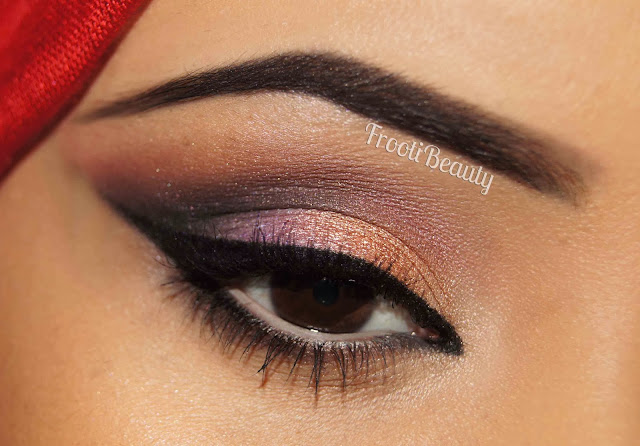
So I thought I'd do a makeup look with my newly acquired Illamasqua Fatale Palette and Sculpting Powder Duo.. I was inspired by Rose's look on the Illamasqua channel and agree that the berry shade Ensnare can be a tricky colour to use if used too much on the eye (no one wants their makeup to make them look like they've been in a fight!)
I only added 2 extra eyeshadows to do this look (matte black and a matte neutral shade) and this is what I made!
Products used:
Eyes:
> UDPP - Eden
> Illamasqua Fatale Palette - Bronx, Ensnare, Charm, Mystify
> Illamasqua Sculpting Powder Duo (Lumos)
> Urban Decay Smoked Palette - Freestyle and Blackout
> Illamasqua Eye Colouring Pencil - Vow
Lips:
I only added 2 extra eyeshadows to do this look (matte black and a matte neutral shade) and this is what I made!
Products used:
Eyes:
> UDPP - Eden
> Illamasqua Fatale Palette - Bronx, Ensnare, Charm, Mystify
> Illamasqua Sculpting Powder Duo (Lumos)
> Urban Decay Smoked Palette - Freestyle and Blackout
> Illamasqua Eye Colouring Pencil - Vow
> Inglot AMC eyeliner gel - 77 (black)
> Lancome Hypnose Star mascara
> Estee Lauder Double Wear High Cover concealer - 2W
Face:
> Illamasqua Skinbase in SB10
> UD Razorsharp powder
> Illamasqua Sculpting Powder Duo
> UD Toasted Bronzer - Toasted
> UD Toasted Bronzer - Toasted
> Illamasqua Lip Colouring Pencil - Severity
> lllamasqua lipstick - Sangers
After priming the eye with Eden PP, I applied Lumos highlighter to the brow bone and inner corner of the eye. I then added Bronx to the inner eye and Charm to the outer eye followed by Ensnare in the crease, blending upwards and slightly inwards toward the inner corner of the eye. I then added Mystify to the crease and blended it with Ensnare, to deepen the colour and Blackout eyeshadow to further deepen it above the crease.
I blended the harsh lines with Freestyle eyeshadow then lined the eye with Inglot black gel liner, making a slight point on the bottom inner eye but not all the way along.
Vow eye pencil was used on the lower waterline and the remainder of the colour on the liner brush from the Inglot eyeliner was used to fill in the brows. To finish off the eyes I concealed with Estee Lauder's new Double Wear High Cover concealer and coated the lashes with Lancome Hypnose Star black mascara.
 For the rest of the face I used Illamasqua's Skin Base in SB10 all over, setting it with UD Razorsharp powder, then sculpted the cheek softly with the Blush Up brush and Illamasqua's Sculpting Powder Duo in Heliopolis and Lumos. I added a bit of UD Toasted bronzer in between the highlight and contour.
For the lips I first used Severity lip pencil by itself, then decided to brighten it s bit with Sangers lipstick:


And there you have it!
I will be posting reviews and swatches of the new Illamasqua collection soon, so keep an eye out for that if you like the look.
Would you wear this look this festive season? Which lip colour do you prefer with this look?
I blended the harsh lines with Freestyle eyeshadow then lined the eye with Inglot black gel liner, making a slight point on the bottom inner eye but not all the way along.
Vow eye pencil was used on the lower waterline and the remainder of the colour on the liner brush from the Inglot eyeliner was used to fill in the brows. To finish off the eyes I concealed with Estee Lauder's new Double Wear High Cover concealer and coated the lashes with Lancome Hypnose Star black mascara.


For the lips I first used Severity lip pencil by itself, then decided to brighten it s bit with Sangers lipstick:

 |
| Severity lip pencil alone |
 |
| Severity lip pencil with Sangers lipstick |
I will be posting reviews and swatches of the new Illamasqua collection soon, so keep an eye out for that if you like the look.
Would you wear this look this festive season? Which lip colour do you prefer with this look?
Subscribe to:
Posts (Atom)