Illamasqua Glamore Collection launch

Thursday 27 February 2014

Last week I attended the Illamasqua event for their new Glamore Collection, where I met and chatted with the amazingly talented and inspiring founder Alex Box (who is always so grounded, absolutely love her!)
Glamore collection with an extra "Marquise" nail varnish
We talked about the new collection and how it was all very girly and glam but also perfect for Spring with the floral type visuals. Alex wanted to show how these glamorous colours can suit any skin tone (see the visual below) and I have to say I was sceptical at first when I saw the cool toned pink for my own skin tone but once trying it out at the event I was pleasantly surprised!
a couple of us bloggers (Sheenie, Leanne, Priya & Sharmin) wearing the new lipsticks at the event photobooth
The collection features:
3 satin finish lipsticks (£16.50 each):
  • Luster
  • Glissade
  • Soaked
3 glitzy "Shattered Star" nail colours (£15 each):
  • Trilliant
  • Fire Rose
  • Marquise
It also includes a repromote of the Eye Brow Cake (£15.50) and Angled Brush (£19) to frame the face with these gorgeous lipsticks.

I decided to get a manicure done similar to one Alex was sporting with an ombre glitter effect and chose the colours Trilliant (a light pink shimmery shade with chunkier silver glitter) and Fire Rose (bright pink shimmer with silver glitter too):
holding shade "Trilliant" with ombre mani in Trilliant and Fire Rose
I was more drawn to the pinks in this collection, however on trying the Marquise nail polish, I absolutely loved that it had a pinky-gold hint with one coat and turned into a beautiful golden burnt orange-red when using two coats:
As for the lipsticks, I absolutely adore them, not only for the colours and longevity, but also because of the new satin texture which is massively different to their usual much drier textures as you can see in the swatches below:
I have to say I was quite surprised not to find an outlandish product in this collection as Illamasqua are known for their dare-to-be-different shades; personally this collection is my favourite to date as I am a huge girly girl and love anything sparkly or pink/purple and this collection hits all of these points on the head perfectly. 

I really can't fault this collection on any points as I feel there's something for everyone here and it will certainly draw more mainstream makeup lovers back to Illamasqua once again.
 
The collection is available globally from today (27th February) at Illamasqua.com and in stores.

What do you think of this collection? Have any particular products caught your eye?


Tuesday Takeover: Chocoholic Hijabi

Tuesday 25 February 2014

This weeks Tuesday Takeover is by Asmaa from Chocoholic Hijabi who is a fellow blogger friend and of course a chocoholic as her name suggests!
I'm not usually much of a skincare blogger but I've personally been interested in trying products from GlamGlow as I've heard great things about the brand, so I asked Asmaa to guest post her review of the YouthMud Tinglexfoliate Mask which she recently tried.

GlamGlow YouthMud Tinglexfoliate Mask [review]

Hello FrootiBeauty readers! I'm Asmaa and I blog over at Chocoholic-Hijabi. Today's guest post is a review on the very well known GlamGlow YouthMud Tinglexfoliate Mask, which I received a sample of in the February You Beauty Discovery box.

YouthMud Tinglexfoliate promises to leave your skin with a 3 day glow, soft and smooth and with tightened pores. Also known as the 10 minute facial in a jar, it claims to leave your skin camera ready immediately. It's supposed to leave you with younger looking skin and reduce the appearance of fine lines and wrinkles, but seeing as my skin isn't quite mature, I wasn't sure what to expect.

First of all, the texture of the mask is grainy and contains particles of leaves, which I wasn't too keen on. You only need to apply a thin layer of the mask over the face, there's no need to apply loads as the smallest amount will have an impact.

Texture of the mask. You can clearly see the 'bits' of leaves in the mask (which did clog the tube a little).
The dried mask is more chalky in colour whereas the mask that is still wet, is less apparent on the skin.
Within seconds of applying the mask, I could feel my skin tingling and (slightly more worrying) burning. I know that the mask is supposed to tingle (it's in the name), but it really was a bit extreme on my sensitive skin. Nevertheless, I did leave the mask on until it had dried. I noticed a tightening sensation where the mask has started drying and the burning/tingling did decrease as the mask dried. After 10 minutes, I used lukewarm water to wet my face again and then, using circular motions, started to remove the mask (and also exfoliate at the same time).

Results: After removing the mask thoroughly, my skin felt extremely smooth and taut, and I'm happy to say that there are no lasting effects from the burning/tingling that initially occurred. True to it's word, the mask definitely has the effect of a facial and great for when you're in a bit of rush, but want to treat yourself. There is a visible difference to my skin, I'm not quite sure if it's glowing, but there is definitely something (and it's stayed smooth and soft). Overall I don't think this mask is best suited for me and I'm going to try out the SuperMud Clearing mask (hopefully with equally good results) =)

GlamGlow YouthMud Tinglexfoliate is available from a number of retailers (such as HQhair, LookFantastic and Beauty Expert), priced at £25 (15ml) and £50 (50ml). It is pricey, but I do believe that there is a 'Try before you buy' sample set available on the GlamGlow website, which allows you to try all of their products before purchasing any full size product.

I hope you found the review useful and thank you for reading! You can find more of my ramblings over at chocoholic-hijabi.blogspot.co.uk =)
 

Twitter: @asmaamangera

Instagram: @asmaa17

Sunday Swatches: Urban Decay Naked Spring 2014

Monday 24 February 2014

This weeks Sunday Swatches and review is from the Spring Naked collection from Urban Decay, featuring the new Naked Ultra Nourishing Lipglosses and the Ultra Definition Loose Finishing Powder, used in my Friday FFF/FOTD makeup look post (here).

Naked Ultra Nourishing Lipglosses
These glosses are named "Ultra Nourishing" due to their ingredients; the hydrating and conditioning ingredients include: Hyaluronic Filling Spheres™, vitamin E, avocado oil and shea butter. Rosehip seed oil provides an extra vitamins, including vitamin A and vitamin C.
Colour & Pigmentation:  The colours Nooner (light nude with micro sparkle), Lovechild (medium light pink) and Rule34 (medium brown nude) are all fairly sheer as expected after seeing the swatches on Temptalia; despite loving the Lovechild Super Saturated Lip Color (SSLC), I was a bit disappointed with the pigmentation of this gloss by itself.. I'm yet to try it on top of the SSLC which may make it look better or on top of a lipstick/lipliner.
Texture: The texture is quite thick, but not sticky.. like a very rich balm/gloss.
Packaging: The packaging is the best point of this product! I absolutely adore it, from the rose-gold tube with cutout "Naked" to the paddle applicator which applies just the right amount of gloss.
Longevity: Due to the thickness of the gloss, it tends to last up to 1.5/2 hours on me.
Scent: I'm not personally overly keen on the minty smell of these glosses; it's like a sweet(ish) mint smell but despite the smell, it doesn't have that tingly feeling that the Lip Junkies (or other minty balms/glosses) have.
Price: At £14 each, they're the same price as an SSLC and £1 more than the Lip Junkies.


FrootiFactor: If I could rate the product based on the packaging alone, I'd give it a 5! However the pigmentation is slightly disappointing despite the fact that I know it's part of the "Naked" range. I do like that the ingredients seem to be great for the lips and I think the glosses will work well on top of lipstick/lipliner so I'd give the product a 3.5:


Naked Ultra Definition Loose Finishing Powder
Again, another greatly packaged product (Urban Decay have been outdoing themselves with product package design of late!) and one that I'm quite loving too. It's free of oil, parabens, alcohol and fragrances and "Optical Blurring pigments" in the powder cause a soft-focus/blurring effect that is actually visible in the swatches below!
Medium Dark swatched on the finger
Medium Dark blended in - lines are blurred!
Colour & Pigmentation/Coverage: As this powder is meant for setting makeup and blurring imperfections, the pigmentation isn't really meant to offer much coverage. I went for Medium Dark in the colour range available (based on their shade match to the Naked Skin foundation) and feel like it may be a bit on the darker side, however it blends out beautifully and isn't very noticeable.
Texture/Finish: The texture is light and silky; it reminds me strongly of their translucent Razor Sharp Finishing Powder, but with colour. The finish is a demi-matte one, great for using on combination to oily skin but not too drying on drier skin. I like that it doesn't leave a chalky finish either!
Packaging: The packaging is sleek with its gunmetal lid and the sifter is cutely embossed with the "UD" logo inside. 
Price: At £22 it's £1 more than my favourite Razorsharp powder, however I do like that the shades available work well with the Naked Skin Foundation range and have a buildable coverage.

FrootiFactor: I'd give this product a 5 out of 5 as I'm pleased with it and like that it visibly blurs lines on my finger, let alone my face!
Both the lipglosses and powders are available to buy at selected Debenhams and House Of Fraser stores as well as online at the following retailers: LookFantastic, HQhair and BeautyBay

Have you tried any of these new Naked products? Which are your favourite Urban Decay products from the Naked range?
 

FFF: Lorac Pro Golden Bronze Makeup Look

Friday 21 February 2014

This week's FFF is using the fairly newly acquired Lorac Pro Palette that a friend very sweetly got for me from the US as it's not available here in the UK (booooo!)
I wasn't sure what I'd do with the palette at first as it's so pretty and the texture is so soft but I decided on a fool proof golden bronze look, so I hope you like it!

Products used:
Eyes:
> UDPP - Eden

> Lorac Pro Palette - Cream, Taupe, Sable, Espresso, Black, Nude, Lt Bronze, Gold, Garnet

> Inglot AMC Gel liner in 77 (black)
> Rimmel ScandalEyes Kohl liner in Nude 5 
> Daniel Sandler Jumbo Jet Mascara
> Collection 2000 Lasting Perfection Concealer - Medium
> Urban Decay Heavy Metal glitter eyeliner in Midnight Cowboy
> Anastasia Beverley Hills Dip Brow Pomade - Ebony
> Eylure Girls Aloud lashes - Kimberley
Face: 
> UD Naked Skin foundation in 6.0
> UD Naked Skin Loose Finishing Powder in Medium Dark
> Motives Sculpt & Shape Duo 
> UD Toasted Bronzer - Toasted
Lips:
> UD Naked Ultra Nourishing lipgloss in Rule34

After priming the eyes with UDPP in Eden, I filled in the brows with the Anastasia Beverley Hills Dip Brow Pomade in Ebony and concealed around the brows to make them more clean. I then started applying Taupe with a fluffy brush to the crease of the eyes, and using a flat brush, applied Nude to the brow bone to highlight, blending in between with Cream and Taupe.
Using a pointed brush I applied Espresso to the outer V of the eye and crease and blended more. I then applied Gold to the middle-inner part of the lid and Lt Bronze to the inner corner of the eye, with Garnet and a bit of Black to the outer corner. You can add more Black to the crease with a pointed brush for more depth, making sure to blend upwards and at the lower outer lash line.
I then went with a flat liner brush and added more black to the outer corner, then further with Inglot AMC gel liner. With another liner brush I added Nude to the bottom inner lash line and UD Heavy Metal glitter eyeliner on top.
I lined the top eyelid with Inglot AMC Gel liner, extending the wing out and lining the top inner eye. For the bottom inner eye I used Rimmel ScandalEyes Kohl liner in Nude.
After coating the lashes with mascara, I added Eylure Girls Aloud Kimberley lashes and concealed under the eyes with Collection 2000 Lasting Perfection concealer to finish off the look:
For the rest of the face I used Urban Decay Naked Skin foundation in 6.0 (yellow toned), and the Naked Medium Dark Loose Powder.
For the cheeks I used the Motives Sculpt & Shape Duo with UD Toasted Bronzer in between the highlight and contour.
I decided to then keep the lips neutral as my last look was fairly dramatic and only used the UD Naked Ultra Nourishing lipgloss in Rule34 (no lip liner), which is quite sheer but a nude brown:
And voila, the look is done!
I usually prefer brighter colours on my lips and probably would have paired it with a less sheer nude or a plummy brown colour lipstick, but wanted to try out the new UD Naked Lipgloss for this look so I went with that.

What lip colour would you wear with this look?
 

Sunday Swatches: Illamasqua I'm The One Collection

Sunday 16 February 2014

Following my previous FFF makeup look post on Friday (here) with red lips, I thought I'd do a corresponding Sunday Swatches blog post featuring the new Illamasqua I'm The One Valentines collection which was used for the red lips in the post.

The collection features four products in the colour of love and can be bought in a gift set from the Illamasqua site which saves you £9.50!

I'll be swatching the lip pencil and lipstick in this post as worn in the previous makeup look post so you can see the colours individially.
swatches of the I'm The One collection
"Feisty" Lip Colouring Pencil
A new shade of red to their Colouring Pencils, this pencil is a beautiful Scarlet. I've only tried one other lip Colouring Pencil (Severity, a red grape colour) and was impressed with that shade too.
Colour & Pigmentation: I don't usually find bright reds suit me but I was happy with this shade; I'd say it leans more on the orange-red side than blue red and has amazing colour payoff too.

Texture/Finish: For a lip pencil, I was pleasantly surprised at how soft it glided on, along with the pigmentation. It didn't feel drying on the lips despite it having a matte finish.

Longevity: As with all lip pencils, I found it to last at least 3 hours without budging, but I'd expect it to last a lot longer!

Price: At £14 it's the average price of a lip pencil for a high end brand.

FrootiFactor: As I quite like the longevity and feel of the pencils on my lips so far, I'd say these pencils are worth the price; Feisty is a flattering bright Scarlet red for most skintones so if you're looking for a lovely red, I'd recommend trying it. I give this pencil a 4.5 out of 5:
Lipstick in "Maneater"
Another great lippie from Illamasqua, despite it not being a new shade, I've never tried this particular cherry red. The other reds I've tried from Illamasqua are Sangers (blood red) and Liable (orange red) but this particular red is a lovely blue based red that I prefer on myself for two reasons; first being my pigmented lips and second the illusion of whiter teeth when wearing blue-based reds.
Colour & Pigmentation: The colour is a gorgeous blue-red as aforementioned, and the pigmentation as with all Illamasqua products is top notch.

Texture/Finish: Another matte finish lip product, it didn't feel drying on the lips compared to my Liable lipstick which was great!

Longevity: Matte lipsticks generally last the longest on the lips and again I found this lipstick to last at least 2 hours on its own (with a bit of a pleasant stain).

Price: At £16.50 it's slightly pricier than a MAC lipstick but of course being a huge fan of Illamasqua and luckily getting pro discount, I certainly think they're worth it.

FrootiFactor: I do like the colour, texture and pigmentation of this particular lippie so I have to give it s 5:


I'm not much of a gloss wearer but I have to say the new gloss shade in "Touch" from this collection was very pigmented (as with all Intense lipglosses from Illamasqua) and has a lovely depth to the colour with the different tones of sparkle (see first swatch picture in this post).

The nail varnish "Throb" is also to the usual high quality pigmentation of an Illamasqua varnish, one coat would give enough coverage, but two coats look very opaque and lush.

All Illamasqua products are available to buy instore or online at Illamasqua or Debenhams.

What are your favourites from this Valentine's I'm The One collection? Will you be buying any particular products? 


FFF: Smokey Sultry Valentines Makeup Look

Friday 14 February 2014

Hello my lovelies!

Today's makeup look is a quick, simple but sultry look, perfect for Valentines day if you wanted to go for a bit more drama.
I paired it with the red themed Illamasqua I'm The One Valentines collection (just the lip pencil and lipstick) for extra va-va-voom.. hope you like!

Products used:
Eyes: 
> UDPP & NYX JEP in Black Bean

> Smashbox Full Exposure palette - mattes in black, brown and skintone colours

> Illamasqua Pure Pigment in Furore
> Illamasqua Sculpting Powder Duo (Lumos)
> Illamasqua Eye Colouring Pencil - Vow 
> Inglot AMC eyeliner gel - 77 (black)
> Lancome Hypnose Star mascara
> Collection 2000 Lasting Perfection Concealer - Medium
> Eylure Girls Aloud lashes - Kimberley
> Anastasia Beverley Hills Dip Brow Pomade in Ebony
Face: 
> Illamasqua Skinbase in SB10
> UD Naked Skin Ultra Definition Finishing powder - Medium Dark
> Motives Sculpt & Shape Duo
> Illamasqua Sculpting Powder Duo
Lips:
> Illamasqua Lip Colouring Pencil - Feisty
> lllamasqua lipstick - Maneater

After applying UDPP, I lightly applied the NYX JEP in Black Bean only on the eyelid, as in the last makeup look pictorial (here). I blended the JEP and added the matte black eyeshadow from the Smashbox Full Exposure palette, winging out the shadow and slightly buffing upwards. I then added 2 of the matte brown shades from the bottom left of the palette to the crease, gently buffing upwards. With an angled liner brush, I added the same matte black eyeshadow to the bottom lower lashline, blending slightly downwards.
The matte skintone colours were used to blend out any harsh lines and finally Illamasqua Pigment in Furore was patted onto the inner corner of the eye and Lumos from the Sculpting Powder Duo to the brow bone.
I lined the eyes with Inglot AMC Gel liner in 77 and lined the bottom inner eye with Illamasqua Eye Colouring Pencil in Vow.
The brows were then filled with Anastasia Dip Brow Pomade in Ebony and the lashes were coated with mascara and then Eylure Kimberley lashes added on top to finish off the look:
For the rest of the face, I used Illamasqua's Skin Base in SB10 all over, setting it with UD Naked Powder in Medium Dark; I then sculpted the cheek with the Blush Up brush and the contour shade from Motives Sculpt and Shape Duo, followed by Illamasqua's Sculpting Powder Duo in Heliopolis and Lumos to highlight. 
For the lips I first used Feisty lip pencil by with Maneater lipstick on top:
As you can see, although the technique is fairly simple, its definitely a stand-out/dramatic look; if you wanted to tone it down a bit, you could go for a nude lippie or gloss instead.

I hope you enjoyed this look, do let me know if you try it!


Tuesday Takeover: Truly Madly Beauty

Tuesday 11 February 2014

This weeks guest poster is the lovely Aysh from Truly Madly Beauty, who I've followed for a while now; I think we've both been blogging for around the same time in 2010 and I love her nail posts.. totally wish I could have the patience to do nails!

Revlon Sparkling Glitter Gradient

Well helloooo there lovely FrootiBeauty readers! How are you all doing? My name's Aysh & I blog over on Truly Madly Beauty :)
First things first, thank you so much to the lovely Safiyah for letting me loose on her blog today! It's such an honour as I absolutely adore this lovely lady's blog of which I've been following for yonks & am in complete awe of her make up skills. Its my wish to one day have my make up done by this talented lady! :D
Now whilst I love all things make up & beauty, if you're familiar with my blog you'll know that its nails that I am mostly passionate about & enjoy doing so I thought I'd share a quick little mani with you lovelies today! 
Whenever I'm stumped or lost for ideas/inspiration when it comes to nail art, I always like to go for a nice glitter gradient. Not only are they so easy to do, but its super quick, looks pretty & doing a gradient is a fab way of 
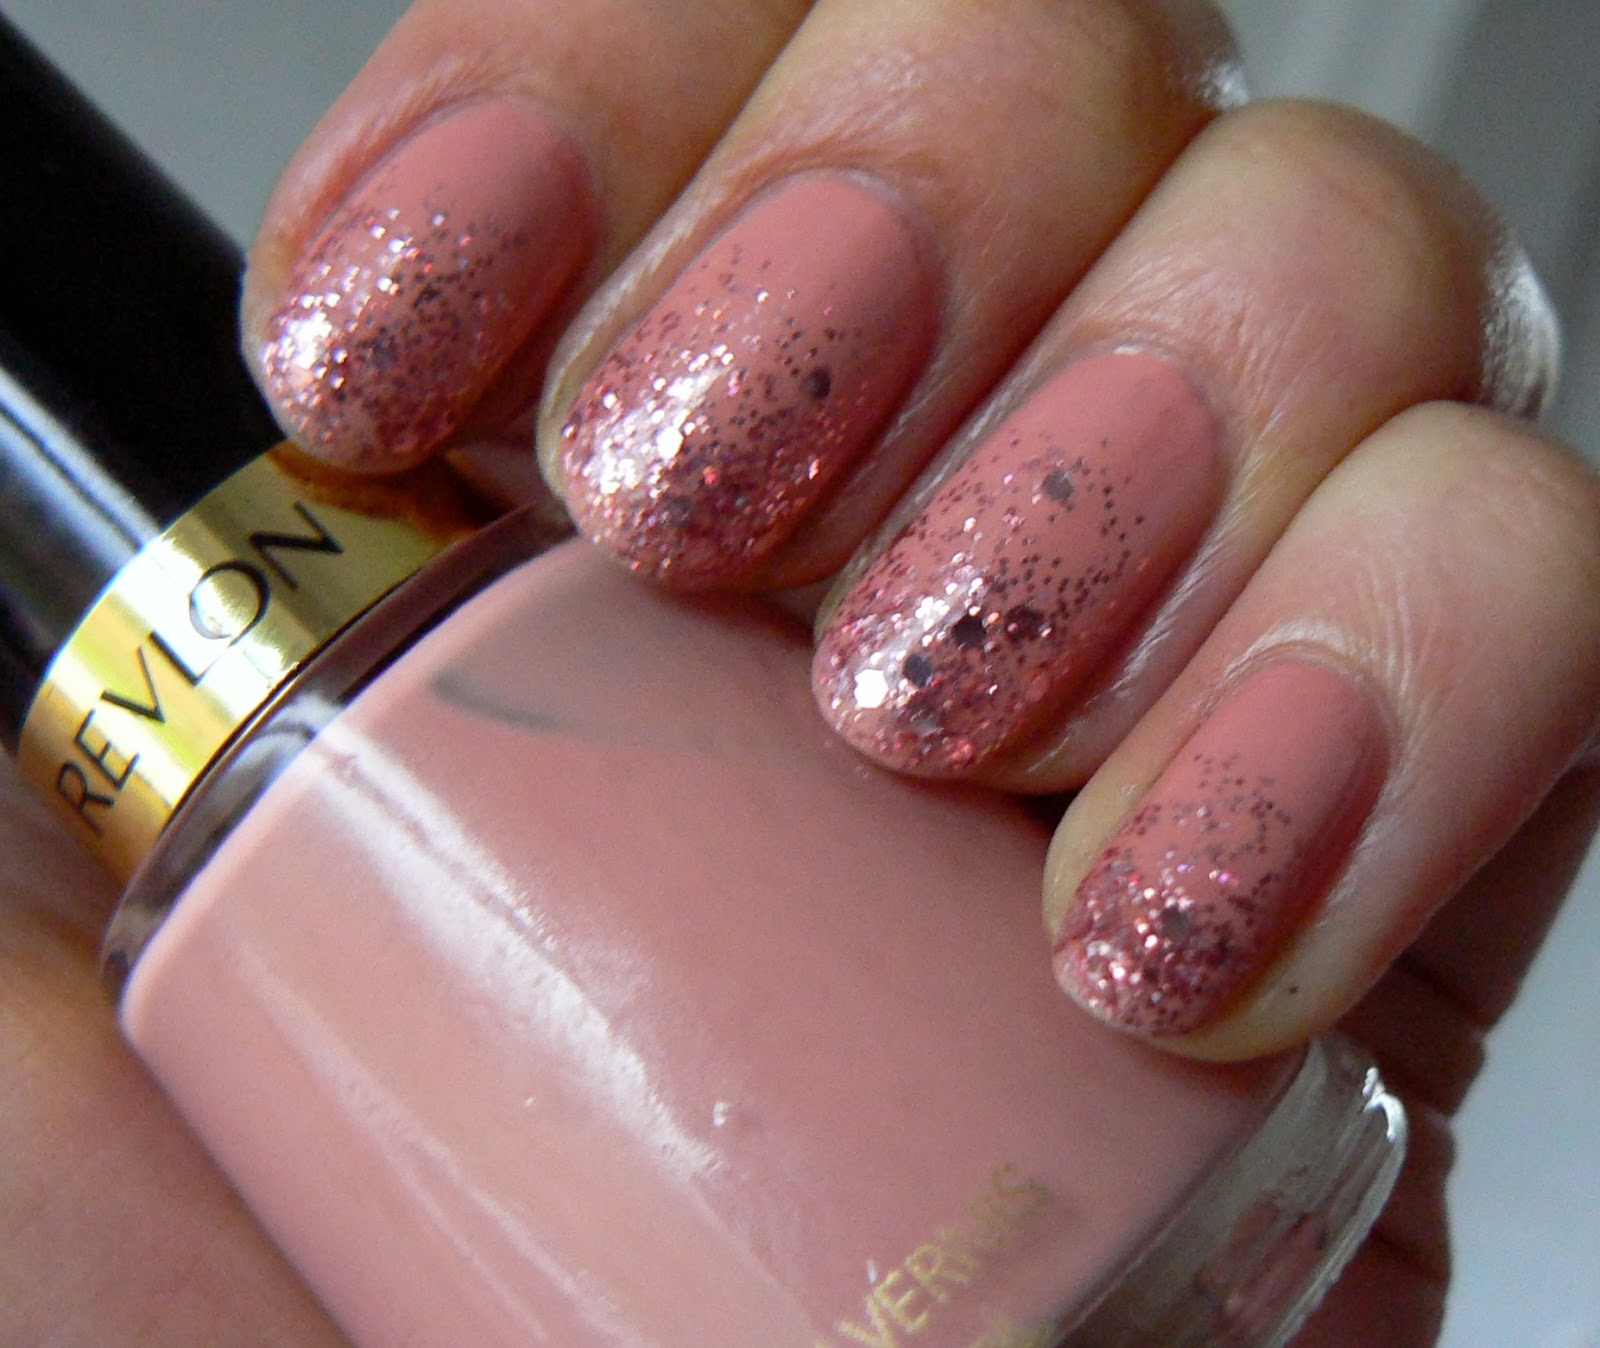
jazzing up an otherwise ordinary mani. Here I've used Revlon's Touch Of Mauve & Revlon's Sparkling for the gradient.
I started off with my base which was two coats of Revlon's Touch Of Mauve, a lovely pink based nude crème. I actually found this lovely in Poundland, which is one of my FAVOURITE little hunting grounds for polishes! I've found some right pretties in the past including Sally Hansen, OPI & Loreal so I definitely recommend you pop in to your local Poundland to see what treasures you can find!
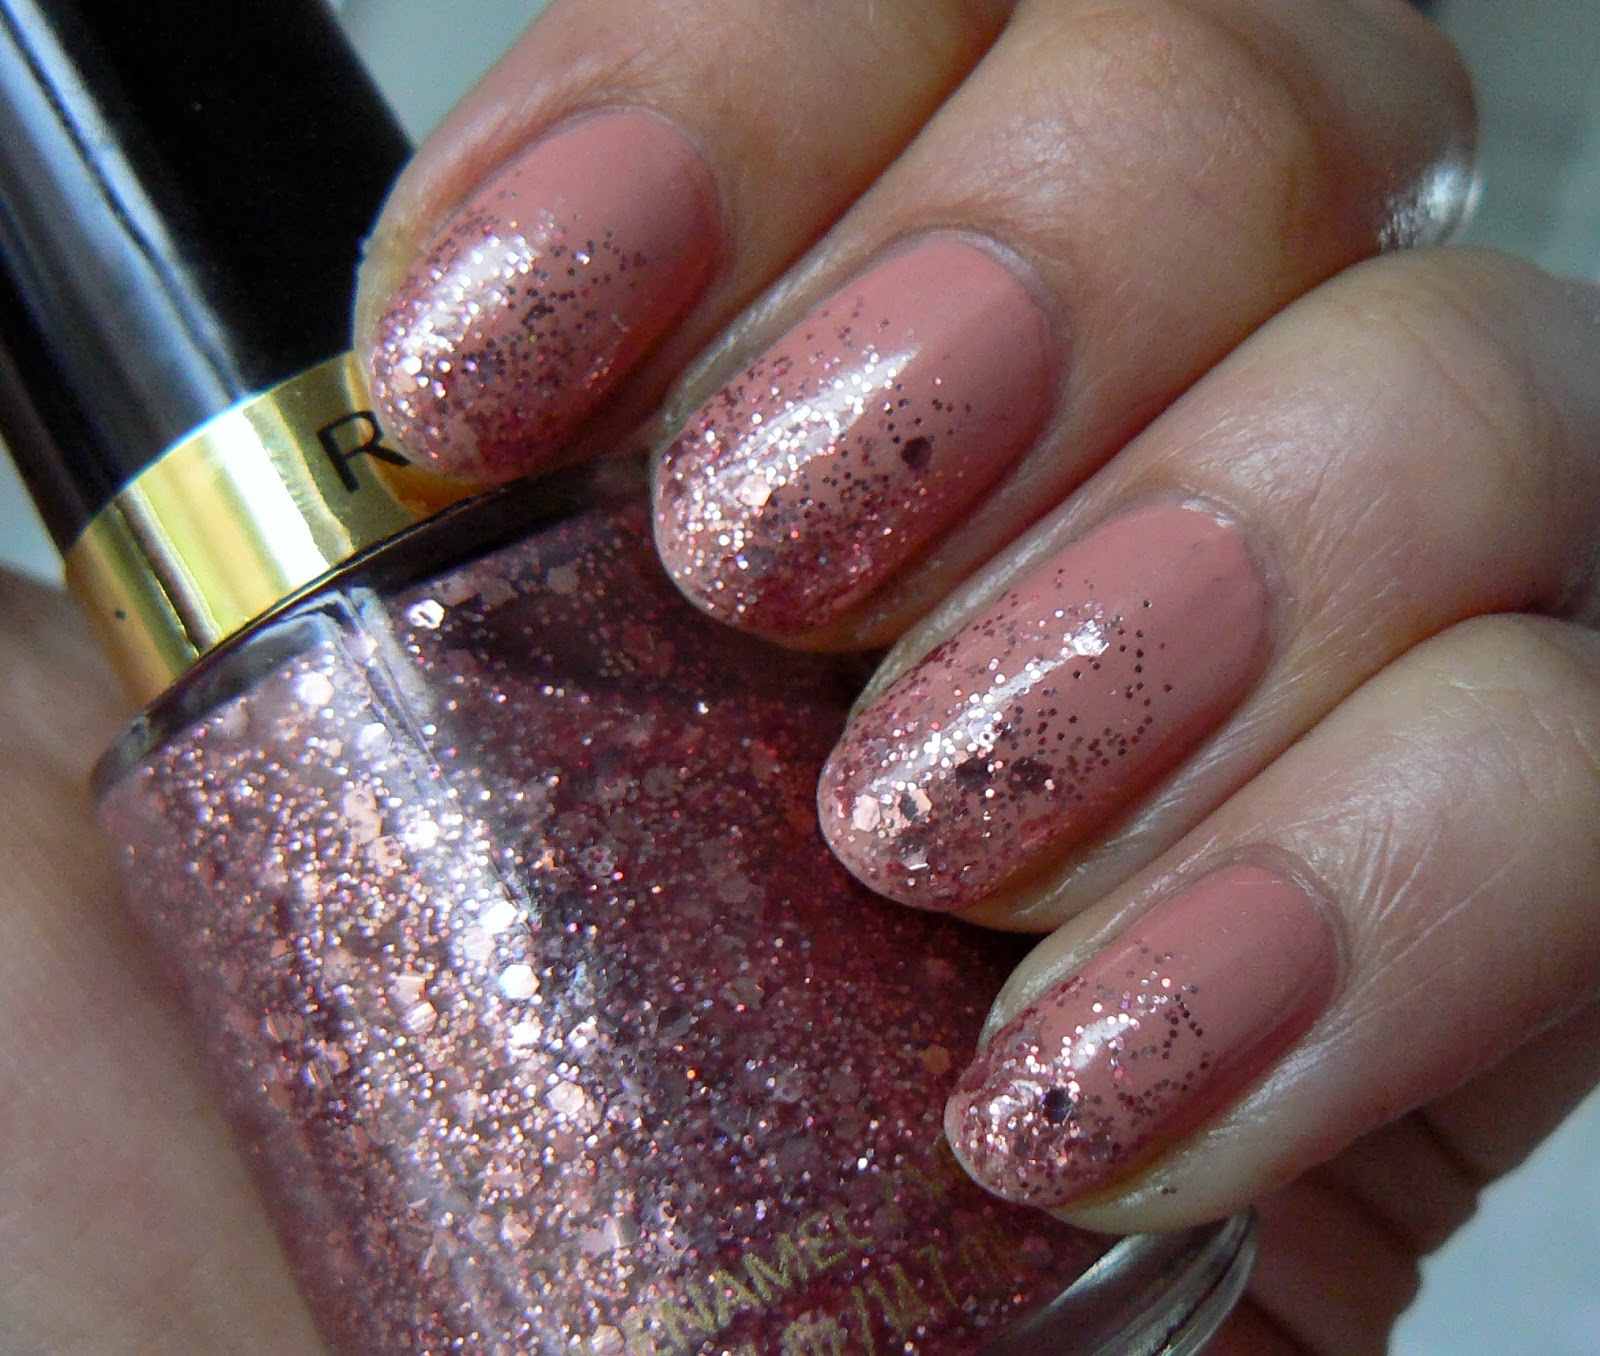
Then for the gradient I used Revlon's Sparkling which is a lovely pale pink glitter made up of both small & large hexagonal glitters in a clear base. To begin the gradient its best to start off with just a little glitter on the brush, wiping off any excess on the bottle rim, then starting about three quarters of the way on your nail brushing upwards towards the tip.
Once you've done all ten nails, go back to the first with a bit more glitter & apply in the same way but this time starting from the middle. Depending on the denseness of the glitter used you can also go in for a third time, this time applying mostly on the tips, which I've done here.
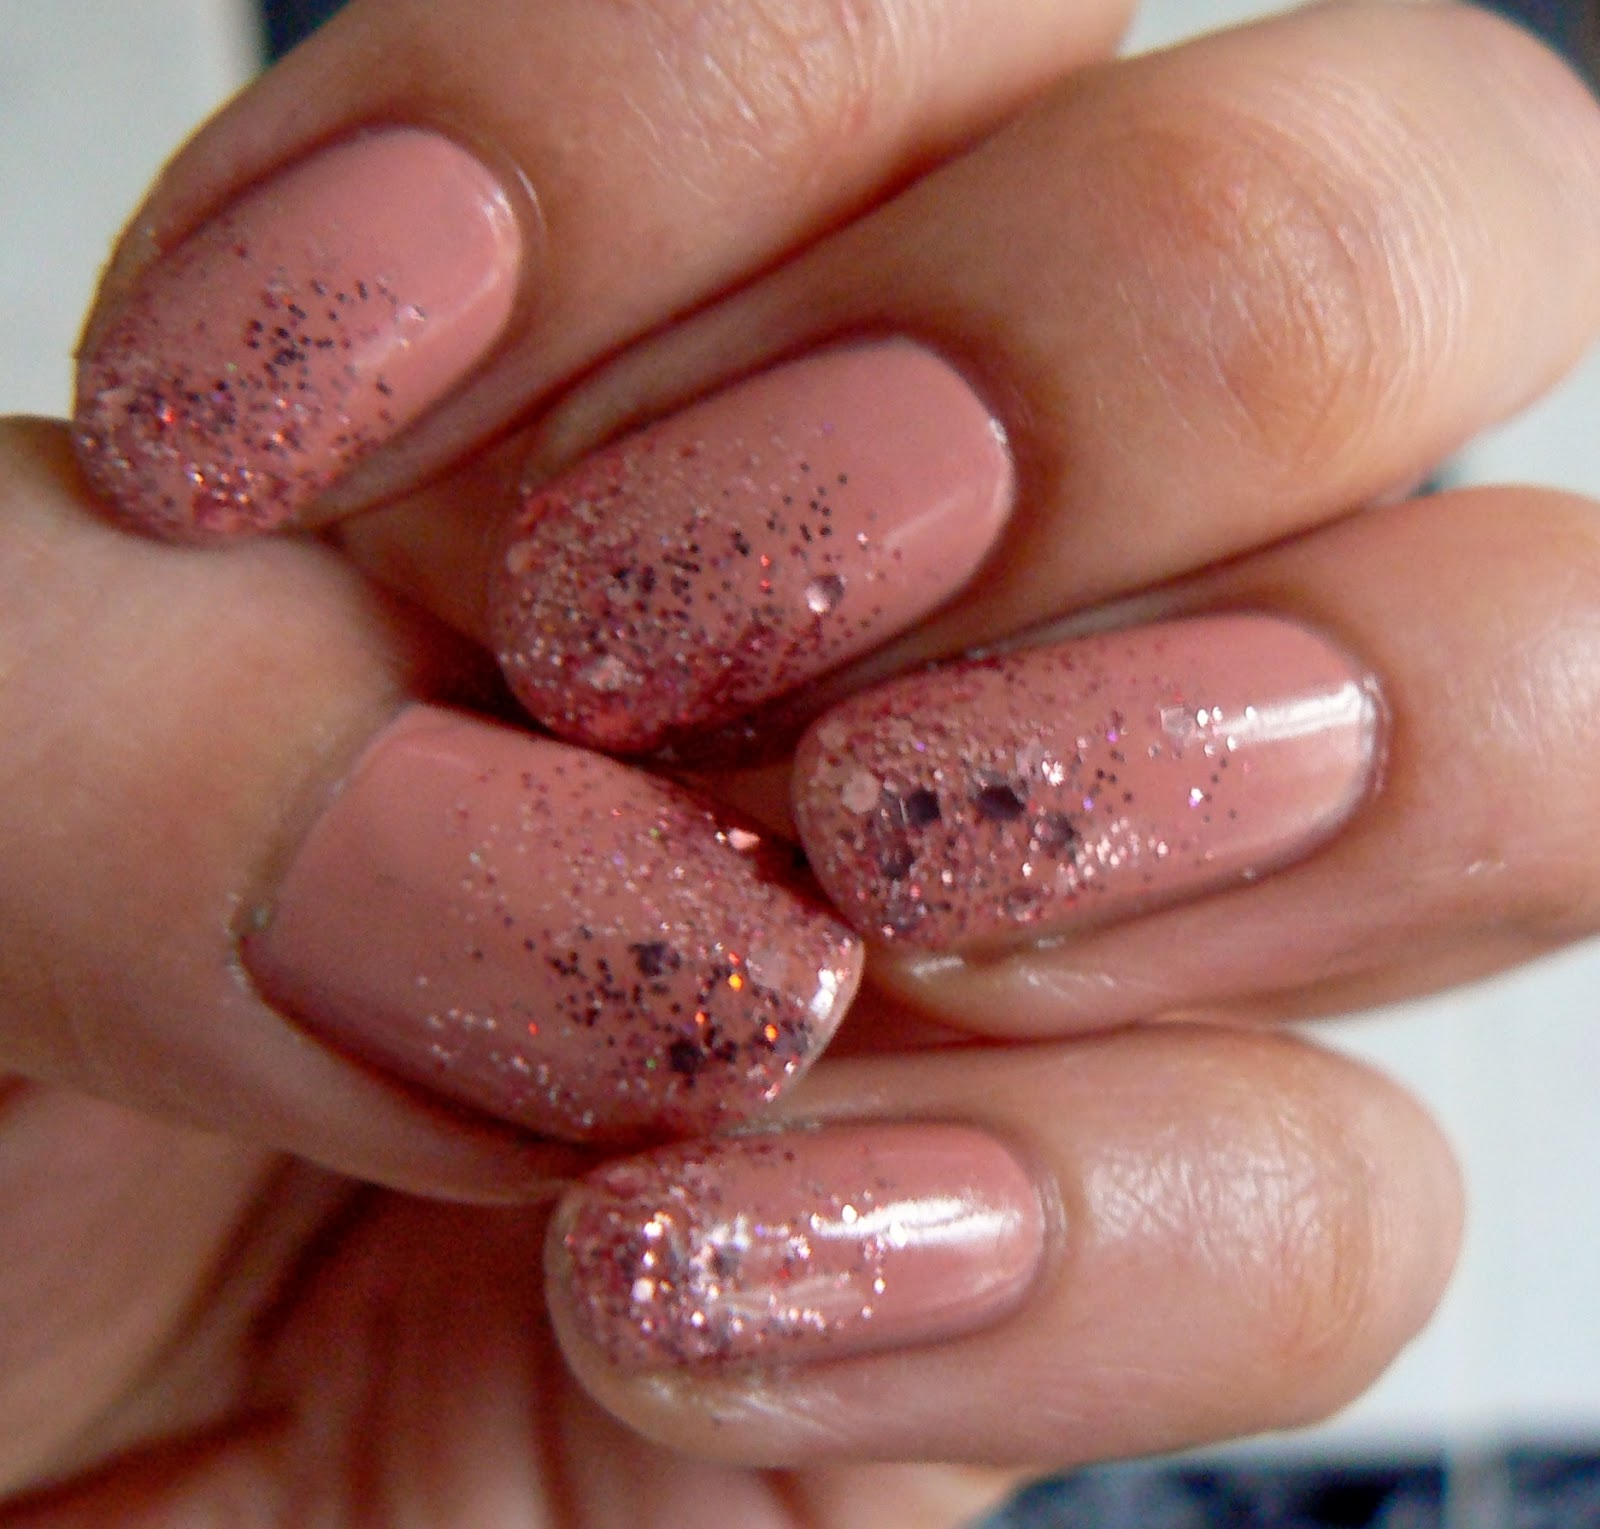
Finish off with a nice thick coat of topcoat to shine & smoothen all that glitter & thats it! Glitter Gradient nails ready to go. Because of all the glitter layers, drying time may be a wee bit longer than normal but having a quick drying topcoat helps!

Hope you liked the mani lovelies! Thank you again Safiyah for having me on your blog today!
Lotsa love to ya!

Aysh xoxo 

Twitter: Aysh_tmb
Instagram: Aysh_xox

Tuesday Takeover: The Blushing Giraffe

Tuesday 4 February 2014

Hello my lovelies!

Apologies for the lack of posts, I have a backlog list of posts as I've been busy with my 2014 masterclass, but now that it's over, I will be posting more as I should have some more time.

In the mean time, this weeks guest post is by the lovely Iqra over at The Blushing Giraffe; another recent blog discovery, I love her writing style and pictures, so do check her blog out <3 

My Favourite High Street Nude Lipsticks


Hello lovely FrootiBeauty readers! My name is Iqra, and I am a fairly new beauty blogger over on The Blushing Giraffe! I am so excited to be able to do write a guest post for the beautiful Safiyah and I hope you enjoy this read!

Nude lipsticks are almost fail proof, they’re easy to apply without it smudging over the edges (red lipsticks), they aren’t loud and in-your-face like some brighter lipsticks, and usually they accentuate the eye makeup beautifully. The tricky thing with them is finding the right nude for YOU. I have been hunting for this since I started enjoying makeup and the creativity that it allowed, but each lip product I tried either washed me out, made me look gaunt and scary or was too brown to be considered a nude colour for my NC30-35 skin tone. I have to admit I am quite the fusspot when it comes to lipsticks anyway, I find they can be a real faff to wear because they seem to either cling to all the dryness on the lips or they keep fading and need reapplying!

This hunt I should add didn’t include higher end lipsticks, and I’m sure if you went to a MAC counter and asked to be matched to a few nudes, you’d find a shade to your liking that ticked the boxes. For someone who usually wears nude tones, a high end and expensive lipstick isn’t the most purse friendly thing, so thankfully I have found two lipsticks that both look absolutely beautiful and are half the price of a MAC lippie! On top of that they feel comfortable on the lips and are creamy and moisturising rather than drying. 
The wear time is decent, I get a good few hours before I feel the need to top up, and as mentioned before they don’t cling to the lips so reapplying is also a breeze! If you haven’t already guessed by the photo, I’m talking about Rimmel’s moisture renew collection of course! These particular ones are the older packaging, and they have recently bought out even more shades in slightly sleeker outer casing, but as far as I am aware the older kind are still available (for now!)

Starting with my all time favourite, Notting Hill Nude it is pretty much the perfect ‘my lips but better shade’. It’s nothing like concealer at all (winning!) and is more of a peachy shade with a leaning towards pink, so doesn’t wash you out in the slightest. I really do think this would look wonderful on most skin tones because in terms of a wearable nude lipstick it’s hit the nail on the head! 
It’s very easy to use, and I tend to pop this on when unsure what colour to go for. What’s great about it is how it would look beautiful on skin tones over NC25-30 too because most drugstore nude lippies seem to cater for the skin tone and under only!
The second lipstick is more of a ‘true nude’ and funnily enough is called Nude Delight. I always stayed away from this shade, thinking it was going to wash me out far too much, but when I saw the beautiful Sana from lookamillion wearing this with one of her amazing eye looks I decided to try it and I’m so glad I did! When I have made a bit of an effort with eyeshadow and really do want the nude lip look this is the shade I go for, the perfect nude for skintones NC30 and under, it’s just beautiful with or without a gloss on top.


Available for £6.49 from boots (but always wait for a 3 for 2 offer!) these lippies are well worth a look!


Thank-you for reading and a huge thank you to Safiyah for this opportunity! It’s an absolute honour <3 


You can find my blog at www.TheBlushingGiraffe.com, as well as on Facebook, Twitter and Instagram, so please do say hello ^_^


Iqra | The Blushing Giraffe x
 
template design by Studio Mommy (© copyright 2015)